Tampilkan postingan dengan label makeup tutorial. Tampilkan semua postingan

Selasa, 21 Oktober 2014

6 K-pop Inspired Korean Style Eyeliners Tutorial


6 K-pop Inspired Korean Style Eyeliners Tutorial


hanggggg on. haven't i already done an eyeliner tutorial before already? why do some of them look eeriely similar? well, that's because.. just how many different styles of eyeliner can there be!? and no, i'm not trying to cheat another post or video here. i've done this video with selected k-pop artistes in mind, so this differs slightly from my 10 daily eyeliner looks tutorial.

like i said, this video is with respect to a few kpop singers like IU, suzy, sandara park, and sohee. i thought this would make it easier for you all to refer to, you know, much alike the plastic surgeon's office where they hear stuff like "i want XXX's eyes and nose.". now, you can tell me "i want XXX's eyeliner!".

watch the video here!


PRODUCTS USED_______________________________________________________

Mayelline Eye Studio Lasting Drama Gel Eyeliner 01 Black
eyeliner: maybelline eye studio lasting drama gel liner (black) and it's accompanying brush.


matte brown shade: kate designing eyebrow N (EX-4)

PICTORIALS_____________________________________________

here are the pictorials for the 6 different eyeliner looks i've done in my video, complete with annotations and markings!

-ONE-
iu's natural eyeliner.
iu's eyes are naturally lifted upwards slightly, so this look completements her eyes a lot as it seeks to balance the upward lift. the key idea is to make the end of the eyeliner end on the same horizon where your inner corner is lying on. koreans are all about smiley moon shaped eyes, this is one way to get it.
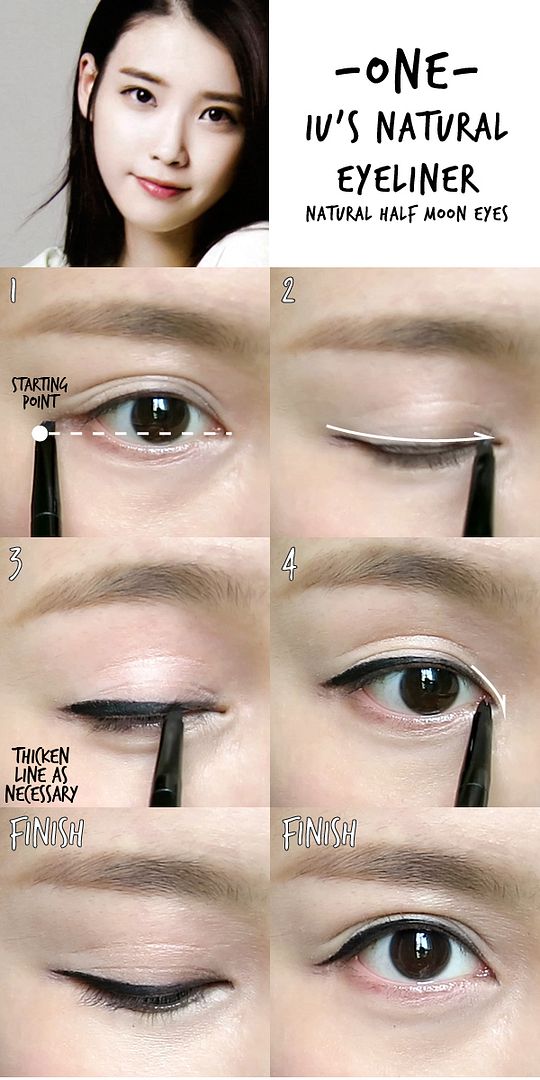

click on image to enlarge slightly!

-TWO-
iu's slightly jazzed up moon shaped eyes. this isn't a good reference photo but i couldn't find one that's large enough to show her eyeliner. she did something like a inward flick to force the appearance of a moon shaped eyes. you'll see what i mean in the pictorial below.

this is also the look i wore for my "5 ways to get a korean gradient lips" video. a few viewers requested for the tutorial on that look to my surprise - i didn't think this look suited me very well. but, to each its own.


step 2 requires you to draw a horizontal line from the end of the upper line until it hits the lower lash line. then elongate it as necessary in step 3.
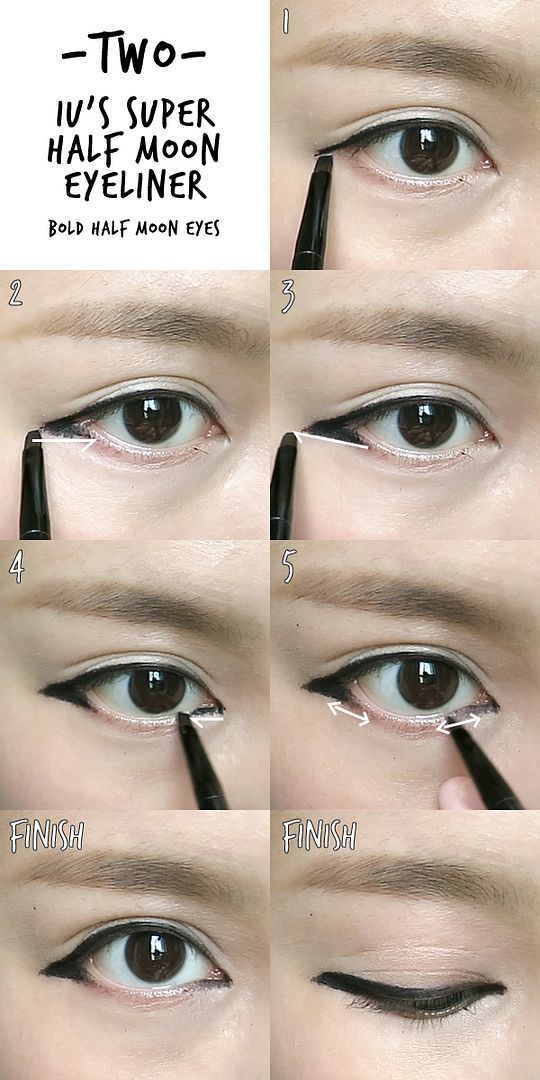

click on image to enlarge slightly!

-THREE-
suzy's smiley eyes. i think the photo below is most illustrative of what i mean by the half moon eyes, when they smile the eyes take the shape of a half moon! the use of matte brown shadow on the lower lash line helps to create the same effect the black eyeliner does in the previous look, but it looks much softer and natural.

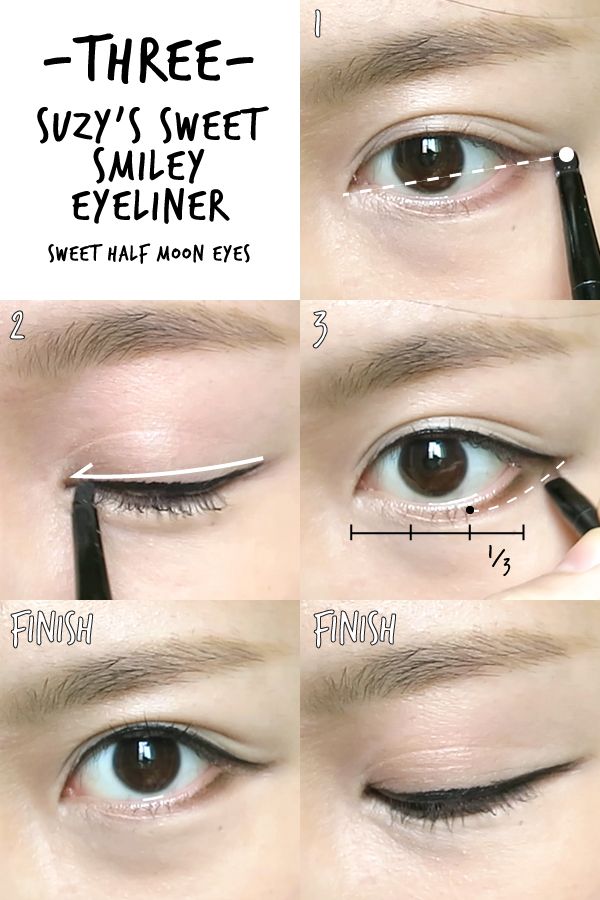


click on image to enlarge slightly!

-FOUR-
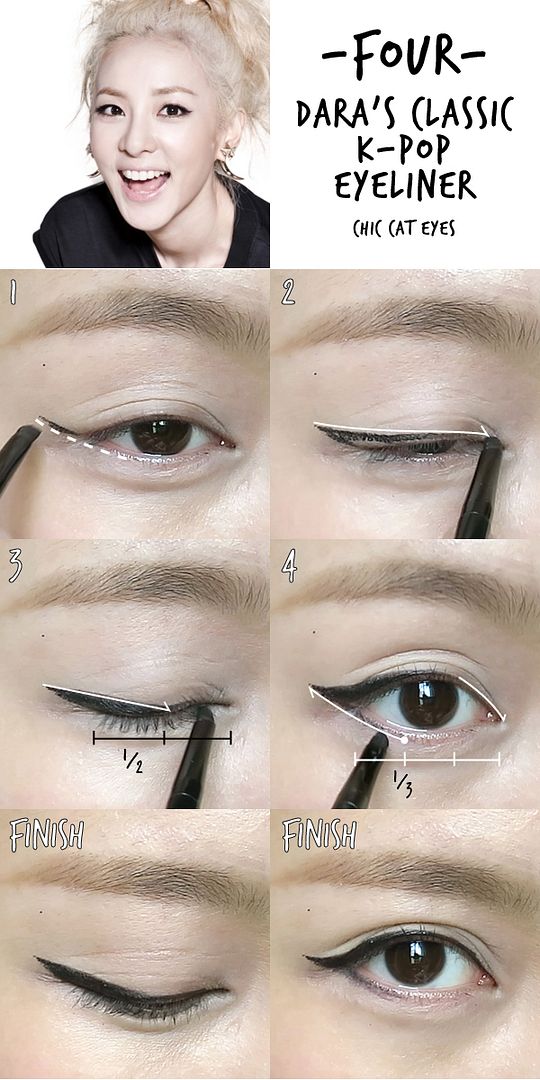
sandara's classic kpop eyeliner, which is also the classic cat eyes that a lot of kpop artiste sport since they share similar eye shapes.

as with all my other cat eyes, always squint your eyes to use the lower lash line as a guide to get that gentle flick. if you prefer a stronger angle, keep your eyes wide open instead. 

the key is in step 3, making sure the line that connects the end of the eyeliner to the 1/3 point of the lash line is straight.

i didn't line my lower water line, but you can do it for the added kpop flavour.

click on image to enlarge slightly!

-FIVE-
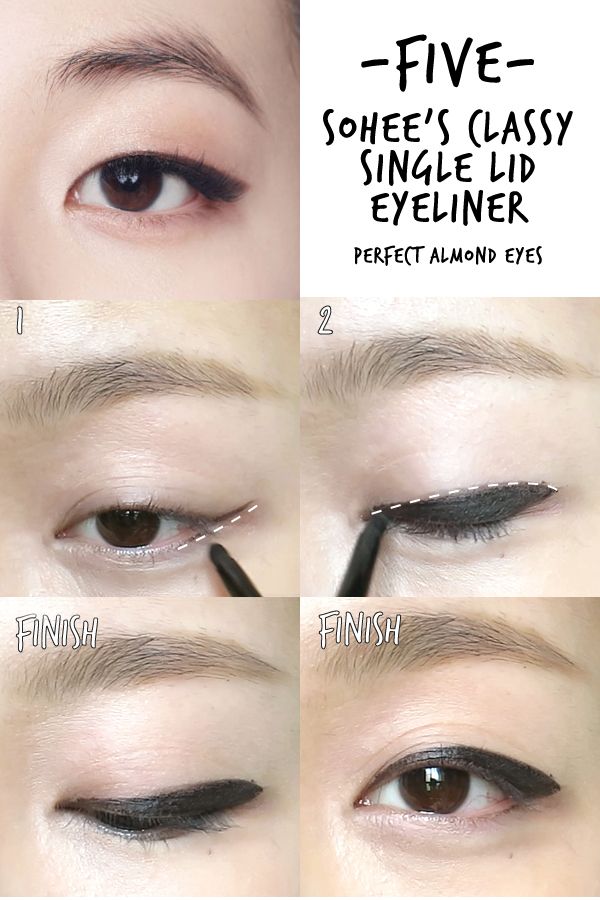
sohee's look are perfect for single eyelids! i love her oriental eyes, it's rare these days because most koreans do go under the knife to get double lids. hey, it's an open secret, right?

the key is to make sure the inner half of the eyeliner is still barely visible when your eyes are open. it necessary, make markings with the eyes open to know how thick your eyeliner needs to be.

click on image to enlarge slightly!

-SIX-
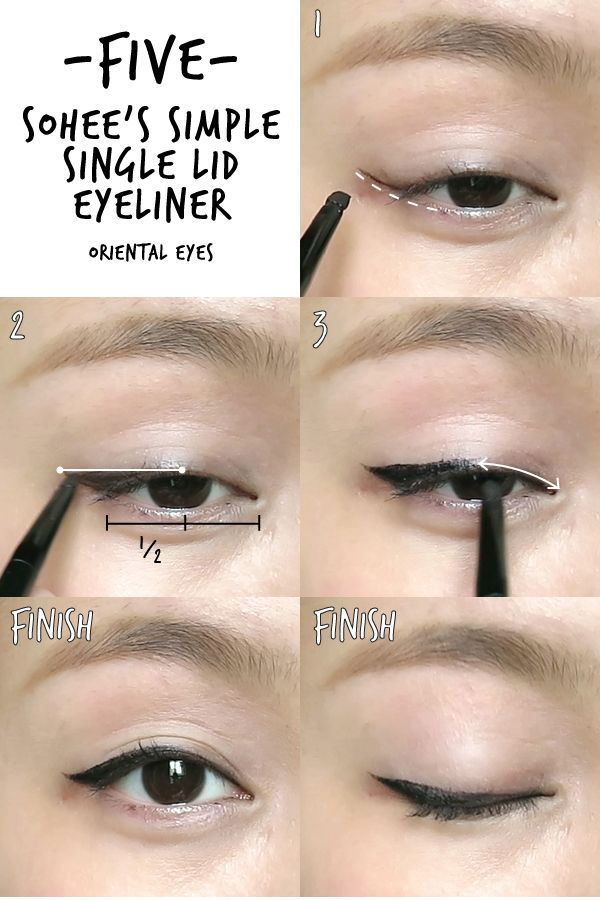
another sohee's eyeliner look! this is more winged out and makes the eye look longer. again, the trick here is to draw a straight line from the end of the liner to the center of the lids.



click on image to enlarge slightly!

this is probably the last makeup video that i'll post in the near future. i've made an announcement in my video (after the tutorial). if you didn't see it, it's okay. i'll be back after my skin heals :) in the mean time, i'll probably be posting more about makeup news and other things that are still related to makeup, but doesn't require my skin :)

i hope this tutorial was useful!

leave me a comment below on who's eye look should i dissect and explain next time!

Selasa, 14 Oktober 2014

Halloween Makeup Idea 2: Fafinette Dolly Look


Halloween Makeup 2: Fafinette Dolly Look

after last week's scarier makeup (click here if you haven't seen it yet), this pales in terms of the scary factor, but it's still quite crazy to me because there's just no way i can rock this heart shaped cheeks on any other day but halloween.

let me introduce the fafinette, amazing pin up illustration/graffiti drawn by a french artist by the name of fafi.


from the WWW

the first time i saw the fafinettes was way back in 2008. back then i wasn't this crazy about makeup yet. i had no idea what MAC does, but i saw their incredibly beautiful posters on their store front and there it is, the fafinettes. they collaborated with fafi a few years ago, while i had no idea who fafi is, the iconic heart shape cheeks etched themselves into my brain.


taken from the WWW.

i don't know, there's just something about those cat eyes and heart shape cheeks that drew me in like the fire draws the moth. since i have the chance to showcase something that interest me, i took this chance to put together this fafinette inspired look, with daily makeup products of course ;)

the look focuses on a few key points:
1. cat eyes
2. heart shaped cheeks
3. mega pouty lips (on hindsight i should have added a layer of gloss)

watch the video here!


PRODUCTS USED_______________________________________________________


1. INNISFREE no sebum mineral powder
2. KATE stick concealer (light beige)
3. LOREAL lucent magique foundation (N2 pure porcelain)
4. MAYBELLINE eye studio lasting drama gel liner (black)
5. CANMAKE color stick (09)
6. HEAVY ROTATION coloring eyebrow (03)
7. MAYBELLINE colorshow crayon kohl (snow white)
8. KATE super sharp liner (BK-1)
9. MAYBELLINE the falsies mascara
10. REVLON matte balm (210 unapologetic)
11. DAISO ellefar hanataka powder (pearl pink)
12. NATURE REPUBLIC blending highlighter
13. KATE designing eyebrow N (EX-4)
14. INNISFREE creamy tint lip mousse (05 vitamin red) [i forgot to include it in the photo >_<]


from left to right:
1. ELF complexion brush
2. generic foundation brush
3. ESSENCE eyeshadow brush
4. MAYBELLINE eyeliner brush
5. old MAYBELLINE eyeliner brush (used as lip brush)

FINAL LOOK_____________________________________________


the cat eyeliner is actually just a triangle! straight lines everywhere.


the photo is a little washed out because it was almost night fall by the time i'm done recording this look. but the look still has all the signature of a fafinette!

do you like this look? i really like it!

what's best, you can throw on normal clothes and adorn yourself with accessories to become a fafinette! if you google for more images, you'll realize how funky they are.

sadly i can't go out to a party this year, but maybe next year.. I'LL BECOME A REAL FAFINETTE.

happy halloween in advance!

Selasa, 07 Oktober 2014

Easy Halloween Makeup: Creepy Cute Doll


Easy Halloween Makeup: Creepy Cute Doll

sorry if i scared you with my header image. here's my first halloween makeup look, just one of the many others that're available on youtube actually. but who knows, maybe this will inspire you to do something similar since it's so easy, and you really just need some eyeliner, lipstick, and concealer (all the rest are actually optional)!

i made an assumption that these are the basic makeup products, so anyone should be able to follow through without having the need to rush out to buy something just for the sake of halloween, only to stash it inside your drawer till the next halloween arrives. make use of what you have and be creative!

watch the video here!


PRODUCTS USED____________________________________________________________


from left to right:
1. REVLON nearly naked pressed powder (020 light pale)
2. REVLON colorstay foundation (200 nude)
3. KATE stick concealer (light beige)
4. KATE dual blend eyes (BK-2)
5. KATE designing eyebrow N (EX-4)
6. DAISO eyelash (No.221)
7. KOJI fix eyelash glue
8. HEROINE MAKE volume and curl mascara
9. MAYBELLINE colorshow crayon kohl (snow white)
10. REVLON colorburst lipstick (012 cherry ice)
11. MAYBELLINE eye studio lasting gel eyeliner (black)

TOOLS USED


top to bottom:
1. ELF complexion brush
2. generic foundation brush
3. MAYBELLINE eyeliner brush (used for concealing)
4. MAYBELLINE eyeliner brush (for eye lining)
5. ESSENCE eyeshadow brush
6. KATE dual ended brush (came with the designing eyebrow)

FINAL LOOK_________________________________________________________________ 


without all that dramatic photoshop effects, the look isn't as scary as it looks. it's lighter and cuter i think. hahaha! sorry if the video was a little too creepy for your liking, but i hope it adds to the overall effect of the makeup :D

xoxo
karman

Selasa, 30 September 2014

HOW TO: Shape and Groom Eyebrow (For Beginners)

HOW TO: Shape and Groom Eyebrow (For Beginners)

previously i talked about how to fill in eyebrows to get the korean style straight eyebrows, i realize it wasn't very helpful as that assumes you've already shaped your brow according. and then i figured.. if you need help filling in your eyebrows, you probably need some guidance on shaping it too.

this tutorial is to build on that so as to prepare your eyebrow for the filling in.

i've showed 2 different styles of eyebrow trimming here, the first is a natural looking eyebrow that harnesses your original eyebrow shape, if you do have some eyebrow to begin with, you can get away with excessive filling in and drawing with the first method since the shaping already gets your eyebrow looking neater and more defined.

the second one is pertaining to korean style eyebrow, and it branches out further into 2 ways on how to get it.

watch the video here!


PRODUCTS USED____________________________________________________________


from left to right:
1. KATE stick concealer (light beige)
2. MAYBELLINE eyeliner brush
3. MAYBELLINE colorshow crayon kohl (snow white)
4. KATE designing eyebrow N (EX-4)
5. KATE eyeliner brush (cut into an angled brush by me)
6. KATE dual end brush (using the fluffy one for blending)

TOOLS USED


top to bottom:
1. ruler (or any other straight objects)
2. tweezer (or a razor if you're afraid of over tweezing)
3. spoolie (recycled from maybelline cat eyes mascara)
4. scissors

PICTORIAL_________________________________________________________________ 


in case you didn't catch these in the video, they are permanently here for your reference:

Getting the line of references:

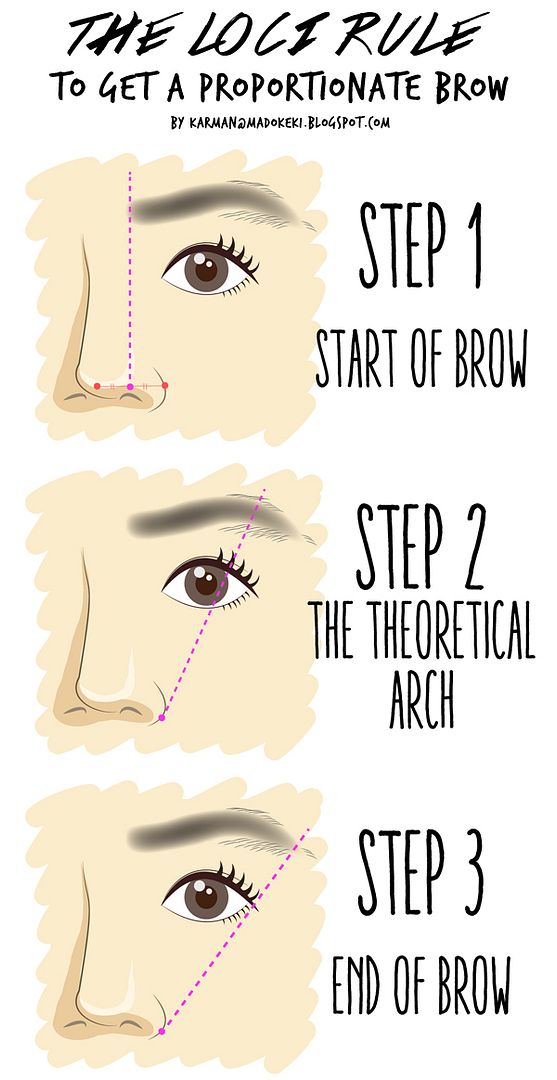
i called this the loci rule because these lines are basically locus where the points of our desired eyebrow lie on.

STEP 1: START OF BROW
some guides suggest that the start of the brow should lie on the line vertically above the side of the nose, but that's not a law, it's just a guide. i prefer my brows to look closer to each other so as to create the illusion of a more defined nose bridge.

the idea here is this:
narrower nose bridge = closer eyebrows = use any point between the tip of your nose and the side of your nose as the reference point to draw the vertical line.
wider nose bridge =further eyebrows = use the side of your nose as the reference point.

STEP 2: FINDING THE ARCH
i've aligned the side of my nose and the side of my iris to get line 2. some guides asks you to align the side of the nose to the centre of the iris instead. it's up to you.

STEP 3: DEFINING THE END OF THE BROW
this is straight forward! align the side of the nose to the end of your eye.

after finding out the 3 lines, you can proceed on to either the natural brow or the korean style brow below.


click on image to enlarge!

NATURAL LOOKING BROW


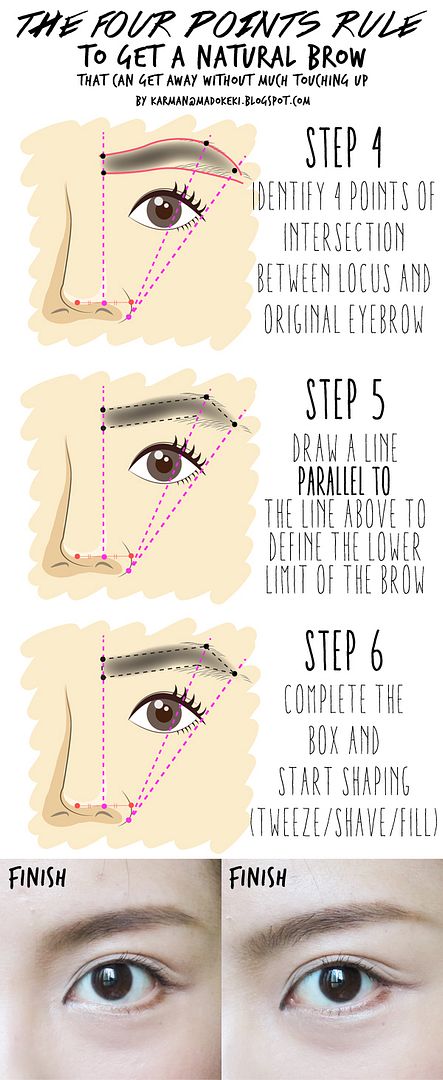
STEP 4: IDENTIFYING 4 POINTS ON THE LOCI
to get a natural looking brow, use your original eyebrow as a guide. the first three points that will define the upper limit of your brow should be the intersection between the loci and your original eyebrow's upper limit. you can change where the end of your eyebrow is depending on what you fancy, i tried to keep it within my own brows so i don't have to draw the end of the brow should it exist on an place with no brow hair.

the last point would be the lower limit of the start of your brow, it should also intersect with your original brow.

STEP 5: CONNECT THE DOTS
the upper limit should be easy, just connect the 3 dots together. for the lower limit, start from the singular dot at the bottom and draw an line that is parallel to the line above, until it hits line 2.

STEP 6: COMPLETE THE BOX AND SHAPE
remove hair outside the box, fill in whatever empty space (if you have any) inside the box. there shouldn't be much empty space unless your brow is naturally shorter than it should be.


click on image to enlarge!

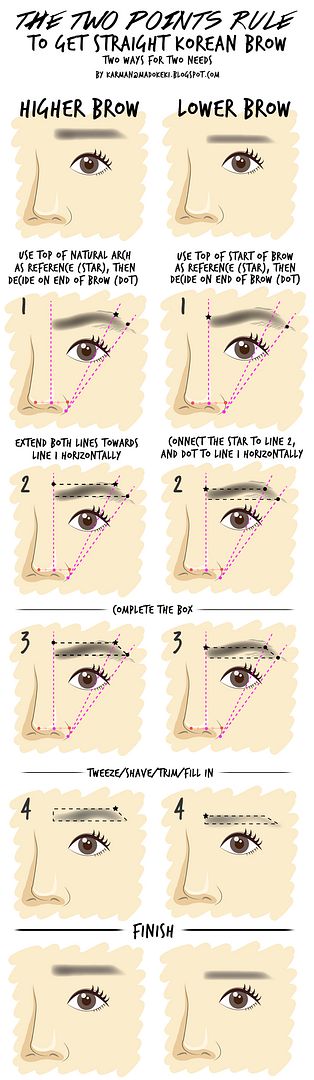
KOREAN STRAIGHT EYEBROW


after defining the three loci from the steps above, you can carry on here if you prefer straighter eyebrows.

the one on the left is for you if you want your brow to be higher (which also means you will have more lid space, but don't take this too far up or you look too shocked all the time), while the one on the right will make the eyebrow appear lower and closer to your eyes.

as i would prefer my eyebrows to look slightly higher, i used the steps on the left when shaping my eyebrow.

STEP 1: 
LEFT (HIGHER EYEBROW) uses the top of your natural arch as the reference point to find out all the other points.

RIGHT (LOWER EYEBROW) uses the top of your the start of your brow as the reference point.

for both methods, you get to choose where you want the end of your brow is by picking any point along line 3. i suggest to keep it within your original eyebrow.

THE REST OF THE STEPS ARE PRETTY STRAIGHTFORWARD.


click on image to enlarge!


final look of the korean style eyebrow at two different angles, front and side.

the truth is, i use a mixture of the two styles to get me a versatile eyebrow. i trim my eyebrow using the natural method so as to retain most of my original eyebrow shape. when i fill in, i can change my brows very slightly get get me different looks for the day.

please experiment and test out which style suits you the best! this is just a guide, it gives you a starting point to kick start the iteration process. i didn't end up in this brow in a single try, what you see now is actually months of tweaking this and that until i found one that suits me the best currently.

hope you found this useful! :D

xoxo
karman

Selasa, 23 September 2014

HOW TO: Glowy Skin With Powder Foundation (ft. My Go To MakeUp)


HOW TO: Glowy Skin With Powder Foundation (ft. My Go To MakeUp)

i put together this video because i struggled with unnatural and flat looking skin before i adopted this method. everything is pretty much trail and error and this is what i've got so far! i love the glowy effect these powder products gave me! it can't compare to the effects of liquid and moisturizing products, but i can't always rock those looks as it'll just melt off in Singapore's climate.

powder foundation is in fact one of the fastest thing that i can apply onto my face (as compared to liquid products), and i've found that a flat top brush gives me the best finish as of now. the buffing motion probably polished my face somewhat, the powder are sticking really close to my skin (thanks fo the moisturizing step prior to that) and it's pushed into every visible pore.

the secret to getting glowy skin is none other than the highlighter (and a shimmery blush too). the highlighter makes our skin shiny and a little more specular-reflective. i'm not saying matte foundation powder don't reflect light - everything that you can see (that don't produce its own light) reflects light, but powder foundation tends to produce scattered light, whereas highlighters produce more of a specular reflection. IN LAYMAN'S TERM, highlighter is making our skin more "mirror like".

i think an image would explain this better.


image taken from the world wide web.

as always, be creative! if you only have a matte blush, use the blusher before the highlighter! the highlighter will go on top of the blusher to give you that glow.

and i just had to throw in my "daily" 10 minutes makeup look. i call it daily because that's my default look if i'm not intending to look fancy, i would have called it my auto-pilot look but i'm not sure if anyone can relate to that. it took longer in the video (like 18 minutes?) because of the extra cuts. otherwise it's just 10 usually!

watch the video here!


PRODUCTS USED____________________________________________________________


from left to right, clockwise:
1. NATURE REPUBLIC super origin brightening CC cream
2. KATE mineral foundation powder (OC-B)
3. KATE gradical eyes A (BR-1)
4. KOJI eyelash curler (73)
5. BOURJOIS little round pot blusher (32 ambre d'or)
6. MAYBELLINE masterliner (brown)
7. HEROINE MAKE volume & curl mascara
8. REVLON just bitten balm stain (040 rendezvous)
9. L'OREAL lucent magique highlighter pen (fair)
10. CANMAKE highlighter (05)
11. KATE designing eyebrow N (EX-4)

BRUSHES USED


face: elf powder brush
eyebrow: kate eyeliner brush (cut into an angled brush by me)


the elf powder brush is a flat top brush, awesome for buffing in products.


PICTORIAL_________________________________________________________________ 


i just put the more important things into image form for easy reference!

BASE MAKEUP:


1. FOUNDATION
i tend to apply foundation on on the centre of my face for a more natural effect. that already helps to bring the centre of the face up due to the brightening effect of the foundation (i use a tone lighter than my skin tone). buff it out in small circular motions for a polished and tight fitting look.

2. HIGHLIGHTER
buff the highlighter onto the highest point of your face, namely the T zone and along the cheekbone. without makeup, these places will appear lighter in colour due to the amount of light they reflect. since we "flattened" our face by unifying the colour on our face, we need to lift these places up.

i think pearly highlighters are more natural as they only reflect more light under direct light source. if you want a more theatrical look, you can opt for a light coloured concealer to do the job.

buff it in for a tighter fit, the effect will be more obvious than if you were to use a fluffy brush to dust the highlighter over your skin.

EYE MAKEUP:


click on image to enlarge!

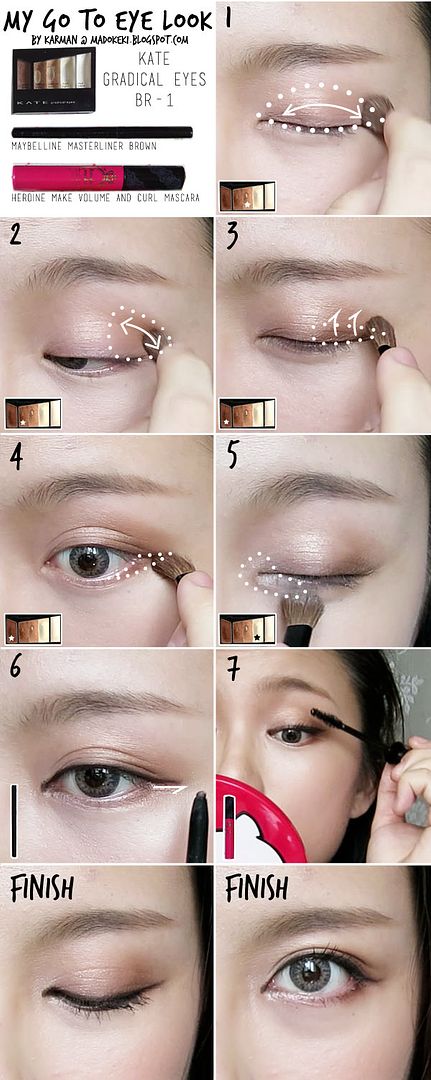
this is my most used colour placement. i tend to use this for most of my eyeshadow quads:
1. lightest colour as a base,
2. medium colour on the outer half for depth,
3. darkest colour along outer half of my lash line, blended upwards for a gradient effect, same colour applied on the outer third of my lower lash line too.
4. highlight colour either on the centre of my lid or just my inner corners.

FINISHED LOOK____________________________________________________________


because i find it hilarious to do a side by side comparison :X


flashed from the front.
the highest point of my cheek is being brought "forward" as it looks lighter in colour.


natural lighting from way above me.


flashed on the side of my face.


natural light on the side of my face.


flash on the side of my face. see that "C area"? that's the highlighter! you don't see it in the previous photos because pearly highlighters only reflect light when it receives a direct light source.


natural light. i think the highlighter helped to make my cheeks look fuller and more three dimensional!

hope you found this useful for days when you're rushing but still wanna look good!

xoxo
karman

Selasa, 16 September 2014

Korean Ulzzang Style Burgundy Makeup For Fall

Korean Ulzzang Style Burgundy Makeup For Fall
Fall Makeup #2: Korean Ulzzang Style Burgundy Eyes

i must be honest here: i purchased the etude house look at my eyes cafe eyeshadow in PK004 thinking it's a burgundy shade because it look like that via my monitor (i'm wrong). it turned out to be more of a wine shade, meaning it has more purple than red to make it burgundy-ish. just when i thought i can't rock this colour (because it gave me a case of bruised eye look), i managed to find a way to use it. it has gotta be korean style because by confining the colour within the eyelid fold, the wine shade suddenly look gorgeous instead of bruise looking!

you may wonder, what exactly is burgundy? it's just another name for ox blood (in the west). it's a reddish brown colour.


by mixing in some brown, it can make the wine look more burgundy-ish. this can also work for red/brown colour combination. pink brown may be stretching the limit but you can give that a try!

the entire point of this video is to show you how you can make use of whatever colour you have on hand to achieve a burgundy colour instead of buying one. well, no one usually buys a wine eyeshadow anyway, if you don't own one, i got you covered. you can use a lipstick or blush from the reddish/wine-ish spectrum. i think the chances of someone owning a lipstick in this shade is way higher than owning an eyeshadow in this shade. if you wanna learn how to work an lipstick as an eyeshadow, you can watch this tutorial where i used my wine lipstick for the look.


i illustrated the products above because i don't own so many colours, yet. :P

Korean Ulzzang Style Burgundy Makeup For Fall

the end result! you can't really see the colours when my eyes are open. :P

watch the video tutorial here!


PRODUCTS USED____________________________________________________________

Korean Ulzzang Style Burgundy Makeup For Fall
from left to right, clockwise:
1. revlon nearly naked 020 light pale
2. innisfree creamy tint lip mousse 05 vitamin red
3. etude house look at my eyes cafe PK004
4. kate colorcious diamond BR-1
5. heroine make volume and curl mascara
6. maybelline eye studio creamy gel eyeliner 02 brown
7. kate designing eyebrow N EX-4
8. maybelline lashionista mascara
9. nature republic brightening CC cream
10. revlon super lustrous matte 010 wine not
11. media cheek color A PK-1
12. etude house precious mineral any cushion W13 natural beige
13. lancome blush subtil (rose sable)
14. canmake eye nuance 13

BRUSHES USED:

from left to right:
1. elf studio complexion brush
2. essence eyeshadow brush
3. generic eyeshadow brush (flat and has a rectangular surface for picking up colours)
4. maybelline eyeliner brush
5. kate eyeliner brush (cut into an angled brush for eyebrow)

EYESHADOW COLOURS

canmake eye nuance swatch
from the canmake eye nuance (13) - gold

etude house look at my eyes cafe pk004 swatch
etude house look at my eyes cafe (PK004) - wine


Kate colorcious diamond BR-1 swatch
from the kate colorcious diamond (BR-1) - shimmery peach and dark brown

COLOURS AT A GLANCE

the combination of colours for this look!

PICTORIAL_________________________________________________________________

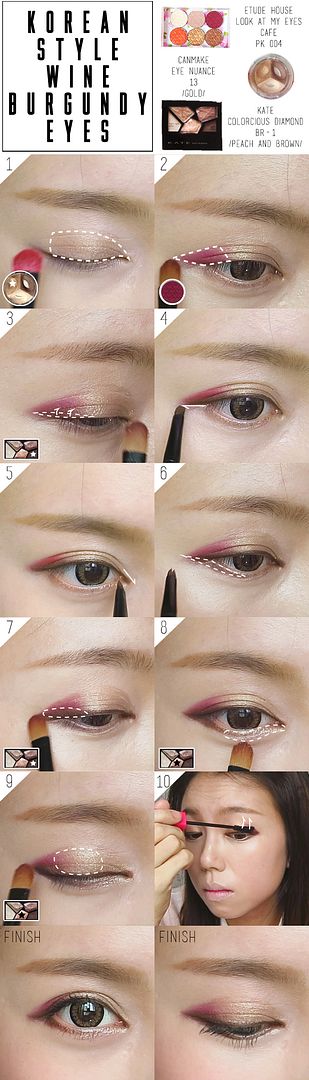
simple pictorial for the eye to supplement the video! i've marked out all the different areas for different products!

FACE:

keep it hydrated and moisturized as fall tends to be drier. the brightening effect of the foundation allowed me to skip out on concealer this time round.

i went for two layers of foundation over my eyes to prepare it for the reddish/purplish colours as they tend to look like a bruise on my yellow skin.

EYEBROWS:

straighter eyebrows for a more korean look! i've done a tutorial on this before already so i won't go into much details.

remember to contour your nose after all that brightening.


EYES:

a little note: KEEP THE EYESHADOW WITHIN YOUR EYELID FOLDS.

this is the only reason why the wine shade can look good on my eyes. if i did the smokey effect like i did for my previous look, the purplish tone will seriously make me look like i was punched.

the magical step is probably when we add the dark brown to the wine, it changes it into a burgundy shade :D

extend the eyeliner according to your original eye shape (extend it horizontally when your eyes are half open). if you need a more detailed guide, you can find the eyeliner in my eyeliner tutorial. it's a combination of the "natural" and the "kpop" eyeliner.

use the glittery shade to help blend out any edges or boundaries (as shown in step 9).

for this look i used two mascaras - the waterproof volumnizing one for holding the curls, and a lengthening one to lengthen. i didn't use the latter on its own as fibre mascara tend to have a sucky holding powder. using the waterproof mascara as a base helps to hold the curls in place before i load up on the fibres.

Korean Ulzzang Burgundy Makeup Fall Tutorial Pictorial
click on image to enlarge!

CHEEKS AND LIPS:

i use two tone for both the cheeks and lips.

for the cheeks, it's baby pink on the apples of the cheeks and a darker rose shade on the outer half of the cheeks, swept along my cheek bone.

the lips uses a red as a base and the center of the lip is darkened with a wine lipstick. the red was too bright originally, while there are no rules saying i can't wear red in fall, i wanted to darken it just a little to suit the mood. adding the darker colour in the inner half of the lips is a good way to do that while retaining some youthfulness to the overall look.

FINISHED LOOK____________________________________________________________


Korean Ulzzang Style Burgundy Makeup For Fall
i'm wearing my geo angel brown for a slight enlarging effect.

Korean Ulzzang Style Burgundy Makeup For Fall


Korean Ulzzang Style Burgundy Makeup For Fall

Korean Ulzzang Style Burgundy Makeup For Fall


hope you like this look and tutorial! I LOVE IT! well, there isn't a time i don't like my look, right? hahaha! tweak this look to suit yourself!

xoxo
karman