Kamis, 10 Juli 2014

za Pure Shine Lips BE-1 & RD-1 (Swatches & Review)

za Pure Shine Lips BE-1 Praline & RD-1 Rouge Indulge

if i remember correctly, these are probably the first few lipsticks that i own (from a few years back that i still have yet to use up), and you may notice that za has already changed the packaging for this lipstick line. i'm pretty sure they don't have these colours anymore :(

the pure shine lips provide sheer and transparent colour together with a load of moisturizing agents like collagen complex, hyaluronic acid, and evening primrose oil (as stated on its website).

za Pure Shine Lips BE-1 Praline & RD-1 Rouge Indulge

za Pure Shine Lips BE-1 Praline & RD-1 Rouge Indulge

za Pure Shine Lips BE-1 Praline & RD-1 Rouge Indulge Swatch
two swipes for each colour.

za Pure Shine Lips BE-1 Praline & RD-1 Rouge Indulge Swatch

BE-1 praline is a sheer beige colour loaded with golden shimmer (that is pretty invisible on the lips), while RD-1 rouge indulge is more of a warm rosey pink, also loaded with gold shimmer. both of the lipsticks apply sheer and looks translucent (typical of japanese lipsticks), giving my lips a hint of colour. the finish is shiny, but not sticky. shimmers aren't very obvious when it's on my lips.

the lipstick is very lightweight on the lips, and application is smooth as butter - the bullet melts right onto my lips and glides on easily. i think it's composed of very light oils, hence the shininess and airy feel (it feels much alike to the chanel rouge coco shine and lancome color fever shine). since the colours are so sheer, they don't seem to enhance any lip lines, nor appear to apply unevenly. moreover, the shiny formula reflect so much light that it'll hide any lip line if that makes any sense.

it is very moisturizing as it contains a lot of oil in its formula. it's the feather-light kind of moisturizing, unlike goopy lip gloss that wraps around your lips tightly. 

the lipsticks are slightly scented.

IMHO:
these can totally be lip balm substitutes. in fact, i think that's what it's supposed to be. i love the lightweight formula, it's hydrating effects, and the shine. the hint of colour makes it very wearable on a daily basis, plus the shine visibly reduces the appearance of lip lines and any dead skin that may form throughout the day.

these days i use RD-1 rouge indulge as a cheek colour, and i love the effect it gives me! the shimmer will slightly more obvious on my cheeks, so it gives of a diffused glow when light hits my face. the shade is also perfect for creating a natural blush - slightly rose. in fact, i only use it on my cheeks lately because i totally love the effect it creates.

BE-1 is good for helping to blend out a darker colour to make a gradient lip. the shade doesn't show up too well on my lips as it's really sheer, but it adds shine to my lips and does help to make the gradient lips look that much better.  

i got these a long time ago at watsons when it was on sale for $10 each. nifty little gems in my makeup stash i would say.

Selasa, 08 Juli 2014

Summer Makeup Tips : Heat, Oil and Sweat Resistant Routine


Summer Makeup Tips: Heat, Oil and Sweat Resistant Routine

the heat is rising, summer is definitely here and it's not a good things for people like me who tend to sweat a lot. i thought this is a good chance to share some of my tips on how i summer-proof my makeup. even though i perspire a lot, i'm not overly oily. usually, the revlon colorstay foundation alone is able to serve me well (as it is sweat proof!!!), but in this tutorial i talk about a method that may benefit people who have very oily skin.

the three step oil proof routine (see below) is very simple - moisturise, powder, foundation. that's right, the powder comes before the foundation! but not just any kind of powder. it has to contain silica, the prime ingredient in absorbing oils! the finish is very lightweight and smooth, when applied lightly it will not cake the foundation.

of course i had to finish the look with a suitable summery eye look :) hope you enjoy the look!

watch the video here!


PRODUCTS USED____________________________________________________________

BASE MAKEUP


from left to right, clockwise:
1. nature republic california aloe sunblock spf50
2. revlon colorstay foundation 200 nude
3. hadanomy collagen mist
4. sonia kashuk hidden agenda 07
5. innisfree no-sebum mineral powder


COLOUR MAKEUP


from left to right, clockwise
1. catrice made to stay highlighting pen 010 eye like
2. revlon just bitten balm stain 040 rendezvous
3. maybelline the falsies volum'express waterproof mascara (black)
4. maybelline eye studio gel eyeliner (black)
5. canmake candy wrap lips 10 mauve bon bon
6. canmake highlighter 05
7. etude house look at my eyes OR205
8. kate designing eyebrow N (EX-4)
9. bourjois little round pot blusher 32 ambre d'or

BRUSHES


from left to right
1. foundation brush (generic brand-less brush i got from sasa a super long time ago)
2. elf studio complexion brush
3. essence eyeshadow brush
4. maybelline eyeliner brush

PICTORIAL_________________________________________________________________

STEP 1. BASE MAKEUP
introducing the THREE STEP OIL PROOF ROUTINE. the functions of each step is as follow:

1. moisturise - maintains hydration in skin to reduce oil production
2. powder - absorb excess sebum to let makeup stay in place
3. foundation - creates a sweat proof film that last all day thanks to the protection from the first two steps

i don't usually add in the powder step as my skin isn't that oily, if you have very oily skin, you may like to give this a try!


click on image to enlarge!

you may notice i used very little foundation, and only used it on the centre of my face. this way, i can skip out on bronzers (which means adding more things to my face). remember, LESS IS MORE! especially for summer.


click on image to enlarge!

for more information on concealing, watch my tutorial on that.


click on image to enlarge!

STEP 2. EYE MAKEUP

i used two products for this look. the first is a long wear highlighting pen from catrice. of course i found more ways to fully utilise it! thanks to its long wear formula, i can use this as an eyeshadow base! this thing is really really really made to stay. they chose a really suitable product name. the second is an orange eyeshadow. if you want more insurance, go for another oil resistant eyeliner pencil in any colour of your choice!


click on image to enlarge!


click on image to enlarge!

i did the demure kitten eyeliner here, you can choose any eyeliner that complements your eyes :)


click on image to enlarge!

STEP 3: CHEEKS AND LIPS


click on image to enlarge!


click on image to enlarge!


click on image to enlarge!

regarding make up setting sprays, their main idea is to allow the powders to adhere to your skin better. one way to do it is to moisten it slightly before allowing it to dry. you can really use any of your mist type toners for this. it will be best if you use one with glycerin as it's a humectant, allowing you to help hydrate your face as the summer heat will definitely dry you out. just make sure to spray it at least 15cm away so that the mist is well distributed instead of pooling around one spot on your face.
i also made an instagram version :D


click on image to enlarge!

FINISHED LOOK____________________________________________________________


close up on the eyes.


close up on face.


like my hair? it's the braided fringe :D

IMPORTANT NOTE ///////////////

i've mentioned this in the video, i thought i'll mention this here too. silica powder reflects flash very harshly, it may appear invisible on your skin until someone flashes you, and then it starts to look awkward. that's why i pressed the powder on to my face and used a brush to brush most of it off. if your face is oily, the powder will adhere to your skin well, so you don't have to worry about brushing "everything" off.


applied heavily.


brushed out to ensure only minimum amount of powder is used.

i hope my tips can save your makeup in this hot summer weather! and trust me when i say the revlon colorstay foundation is sweat proof. i sweat buckets and at the end of the day after thousand times of gentle blotting (of my sweat), my makeup still looks fresh :) i've done a first impression review where i mentioned about the sweat proof abilities!

if you tried this look out, take a photo, share it on instagram and tag me @madokeki, because i'd love to see your version of it! remember to always tweak the makeup looks to suit yourself!

xoxo
karman

Minggu, 06 Juli 2014

Majolica Majorca Lash Expander Frame Plus (Swatches and Review)


Majolica Majorca Lash Expander Frame Plus (Swatches and Review)

i am aware that this mascara has been replaced by the lash expander edge meister. once again, this is so telling of how long i've owned this mascara. this dates back to 2010. =_= surprisingly, it has not dried out yet, so i still keep it in my stash even though i seldom use it (you'll see why in a bit).

the name is seriously fancy and yet says nothing about what this mascara does. i mean, expand the lashes in which direction? if it's the horizontal direction, it could be a voluminizing mascara..! i would actually name it "lengthening and curling mascara", but that wouldn't catch the hearts of the little princesses i guess..!

ok, i'm being mean here. this mascara claims to carry out 3 functions - lengthening, curling, and separating. while it did not state explicitly that it's waterproof on the tube, it is actually waterproof.

Heroine Make Volume & Curl Mascara S
it comes with girly prints on the tube. i love the little details! and i really like the gold on black design. so classy.

as usual, i got it in black, its colour code is BK999. it's as though 999 stands for the blackest of the blacks.

THE BRUSH__________________________________________________________________

Heroine Make Volume & Curl Mascara S
not only do the mascara have a fancy name, it has a rather fancy brush too. there are two sides to it.

the first is meant for the bottom lashes and it consists of shallow grooves that will collect lesser products so as to prevent depositing too much onto the lower lashes.
the second side is a single comb brush with closely spaced tooth. this is meant for combing the upper lashes. the groove is much deeper than the first, so it contains much more products (which is ideal when it comes to building length with it).


tried to take a close up to show the fibres in the mascara.
i have no idea how long the fibres actually are, and i don't think it matters because do you really use a ruler to measure how long it lengthened your lashes? neither do i.


THE BEFORE AND AFTER______________________________________________________

Majolica Majorca Lash Expander Frame Plus Before and After
naked lashes vs 1 coat vs 2 coats, lashes curled prior to mascara application.

Majolica Majorca Lash Expander Frame Plus Before and After
MAGIC. comparison with eyes opened.

Majolica Majorca Lash Expander Frame Plus
gif image comparing naked lashes, 1 coat, and 2 coats of mascara.

THE CAPABILITIES___________________________________________________________

the lengthening power is okay, it looks really amazing in the comparison photo with my eyes opened because they made my really thin lashes become more visible, but does it really lengthen that well? i think it's rather mediocre if you compare the gif. if anything, it made my lashes wider than longer (due to the age of the product i suppose). when it was brand new a few years ago, the mascara was relatively wetter, when i load up two coats of mascara, what i get is the same lengthening effects, but lesser volume. i ended up with really natural looking lashes, so natural that it looks like i didn't wear any mascara at all (not sure if i like that look or not).

thanks to the comb brush, it is able to separate my lashes into little clusters.

this mascara is able to hold the curl for the entire day, but one thing i didn't like is that it will straighten part of my curls right after application. instead of a beautiful curl (that i achieved by crimping my lashes along the lengths), it now becomes a one that points straight up, i can't even call it a curl. it's waterproof, and is able to stay put on my lashes for the entire day when i do wear it. no melting or smudging!

if i want better curls, i'll have to curl my lashes with an electric lash curler. it works so much better that way in giving me natural looking curls. the mascara doesn't melt off when heated! :D

the age definitely made it a little harder to get the 2nd coat on without some clumping even when the first coat is not fully dried yet.

lastly, it is so waterproof that it'll take some effort in removing it, even with a eye makeup remover.

IMHO:
i'm not one who goes for just length actually, that's why i'm not too happy with my purchase. my lashes are both short and sparse, and without the volume, no matter how much length i pack on, it will just seem MEH on my lashes.

i really didn't like the fact that it straightened my lashes after application. sometimes i think that the only reason why it's still pointing upwards is because i didn't really get to my roots. otherwise, it'd have fallen down too. but that part can be remedied by using an electric lash curler, so that's fine.

however, with all these said, i used to use it together with a voluminizing mascara, as the latter is able to impart volume and curl, acting like a mascara base for me before i build on its length. BUT, the fibres are really fine, and they can't hold a shape very well, and they often end up bent on the tip of my lashes. who has bent lashes like that!?


can i say that this mascara is overly waterproof? i bet if i go dive with this mascara on, it'll stay on me even after the dive. this stuff is really nasty to remove off my delicate lashes. it's actually the hardest to remove out of all my waterproof mascara.

i don't even know why i still keep it in my stash. to be honest, i've only wore it once in the past few months, and it's for taking swatch photos for this entry. i know hate is a very strong word to use, but i really hate how this mascara works for me - it just didn't work for me!

IN A NUTSHELL
this mascara is good for you if you want
1) separated lashes
2) natural looking lashes
3) length
4) SUPER waterproof mascara that is heat resistant

i bought this for SGD18+ when it was on sale in watsons.

Kamis, 03 Juli 2014

etude house sweet recipe cupcake eyes br402 chocochip sweet mint


Etude House Sweet Recipe Eyes BR402 Chocochip Sweet Mint

korean brands are well known for their adorable packaging. this eyeshadow duo comes in a tin case that resembles a cupcake.


it contains two wearable shades and is easy to use.


Etude House Sweet Recipe Eyes BR402 Chocochip Sweet Mint Swatch


Etude House Sweet Recipe Eyes BR402 Chocochip Sweet Mint Swatch
swatched over powder foundation

the lighter shade is a shimmery blue shade, the colour payoff isn't great (don't expect it to appear blue on your skin). it took me two swipes to get the intensity in the swatch. however, when used on the centre of the lids, it is able to impart a good amount of metallic shimmer for some additional dimensions. very shimmery when viewed from the side!

the darker shade is a brown with red undertone, and it has a shimmery finish (gold micro shimmer) when applied on the eyes, giving it a slightly reflective look. pigmentation wise, i'd say it's okay, it can be built up.

both shades are prone to hardening over time, and a good scrubbing (with an old toothbrush) does a good job in reviving its colour intensity.

IMHO:
i think this eyeshadow duo follows korean cosmetic's natural look motto.
the colour adds just a wash of colour, but abundant shimmery and shine to give it that translucent make up look, i'm not gonna lie, i like this effect sometimes when i want to go light with my make up.
i believe the "no make up make up look" can be easily achieved with this eyeshadow.

MAKEUP LOOK


brown on the upper lid, and blue on the inner corner of the lower lid.


blue on the centre of the lid, and brown on both sides of the lid.

Selasa, 01 Juli 2014

10 Ways To Wear Eyeliner for Everyday Looks


HOW TO: 10 Ways To Wear Eyeliner for Everyday Looks

how many eyeliner looks do people usually wear? one? two? maybe i'm the odd one out, i wear way more than that. most of the looks i share this time are actually looks that i wear personally, what i mean is, i went out rocking these looks. i'm not that keen on showing the more fancy but impractical eyeliner looks for now (i'll save that for halloween), so here are 10 different variations you can try out for real.

as always, remember to tweak the looks to suit your eye shape! not every look suits me, in my opinion the invisible eyeliner looks really bad on me because my double lids are too thick, however it looks really really good on people with narrower lids. same for the k-pop eyeliner, it'll suit someone with longer eyes.

watch the video here!


PRODUCTS USED____________________________________________________________


eyeliners used

from left to right:
1. maybelline eye studio gel liner (black)
2. maybelline eye liner brush
3. heroine make smooth liquid liner (black)


on my eyes: daiso ellefar nose highlighting powder

i wore this as an eyeshadow, just a slight wash of reflective pearlescent powder on my eyes to make them brighter and to show you the contrast of the black eyeliner better.

PICTORIAL_________________________________________________________________


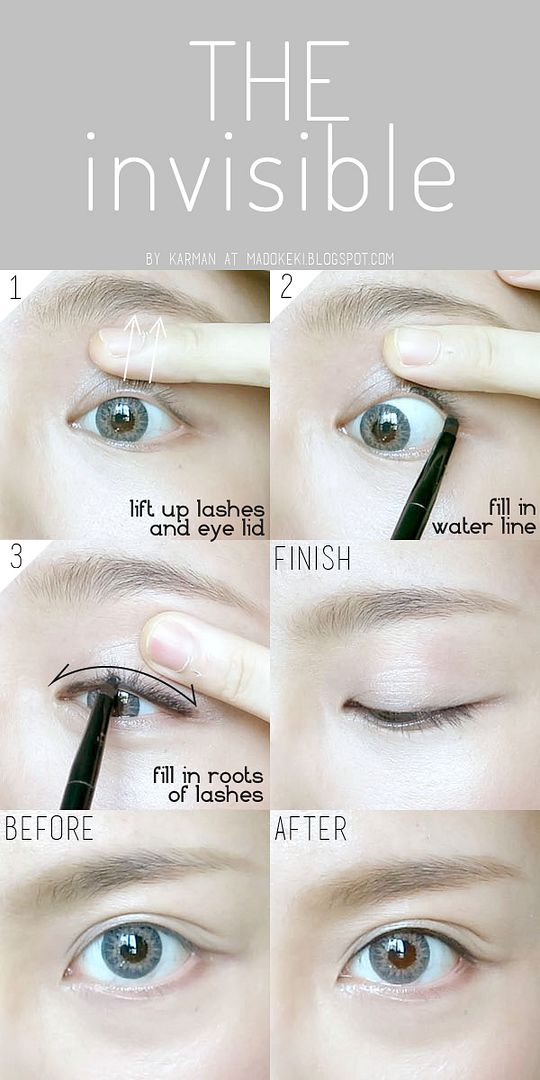
1. THE INVISIBLE EYELINER


the key is to line the water line (also called tight lining) and to fill in the empty spaces between the lashes. very suitable for people with not much lid space (narrow double lids or single lids). this gives the illusion of fuller looking lashes, hence defining and enlarging the eyes every so subtly.


click on image to enlarge!


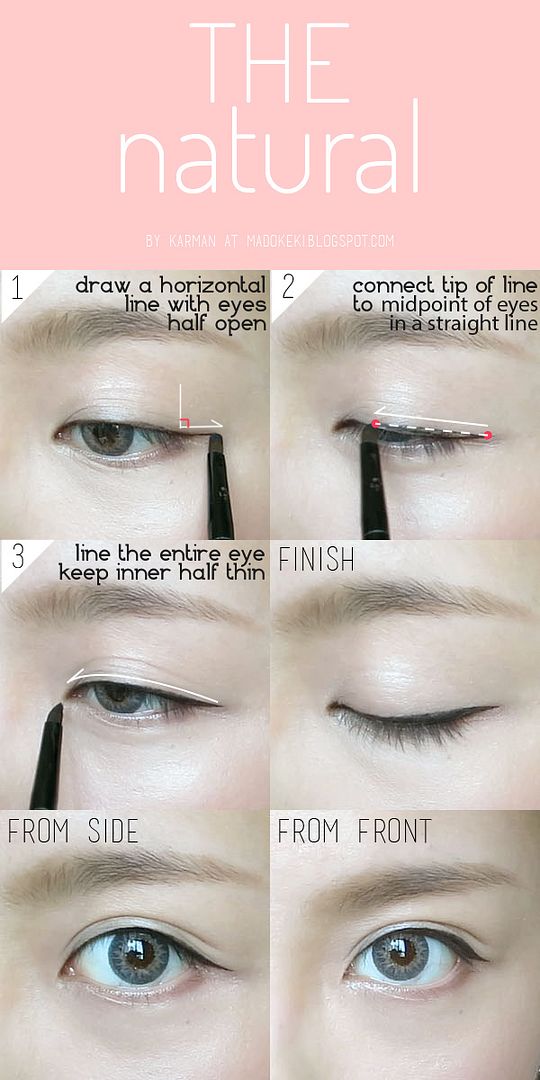
2. THE NATURAL EYELINER


this is probably the most worn eyeliner i usually wear. it outlines the eye but keeps it looking natural. it also elongates the eye proportionately so you still retain most of your natural eye shape. very suitable for people with narrow eyelids, you'll like to keep the eyeliner really fine and thicken it only at parts where your lid is wider (usually towards the outer half of your eye).

what's interesting is even though we draw a horizontal line (with eyes half open), when you fully open your eyes it'll look like it's pointing downwards slightly. that's just the natural contour of your eyes (that's why this eyeliner look is able to retain your natural eye shape), i find that it's easiest to describe a horizontal line than to give you fancy angles like 093 degree (bearings).


click on image to enlarge!

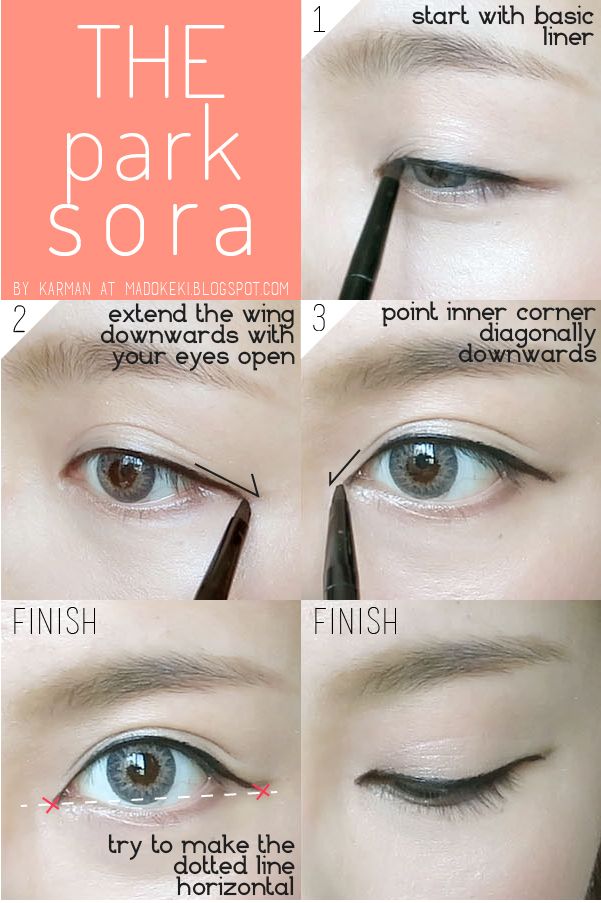
3. THE PARK SORA EYELINER


i wonder how it's like to have an eyeliner look named after myself.. i named this the park sora eyeliner because this is the kind of eyeliner she rocks, i've done a tutorial on that before if you're interested.

this look aims to lenghten your eyes by extending the tail of the eyeliner diagonally downwards. equal attention has to be paid to the inner corners as well because park sora has very close set eyes, so if you want to look like her you'll need to define your inner corners (unless you have her kind of eye shape).


click on image to enlarge!

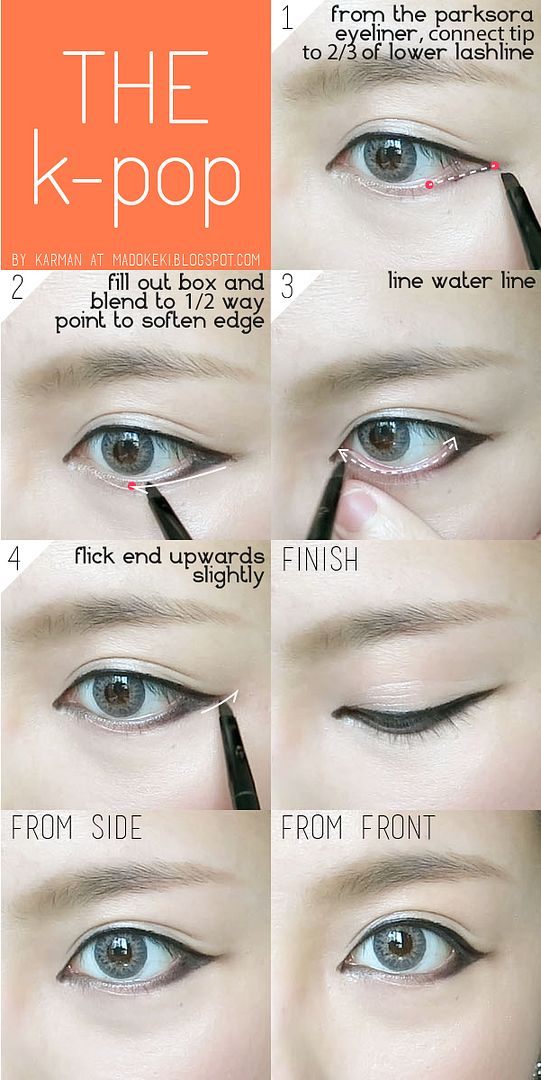
4. THE K-POP EYELINER


it's all about the strong and bold eyeliner, especially the lower eyeline. i feel that that's the signature k-pop look. they always have really long and strong eyes, and the secret is in lenghtening the eyes by two ways: extending the tail of the eyeliner, and to make the eyes look proportionately longer by lining the lower water line too.

this look doesn't really suit my eyes as i have some slightly droopy upper lid, i had no choice but to make the end flick up slightly. if you have narrow double lids, this look will suit you perfectly as you will be able to keep the eyeliner tail really straight.


click on image to enlarge!

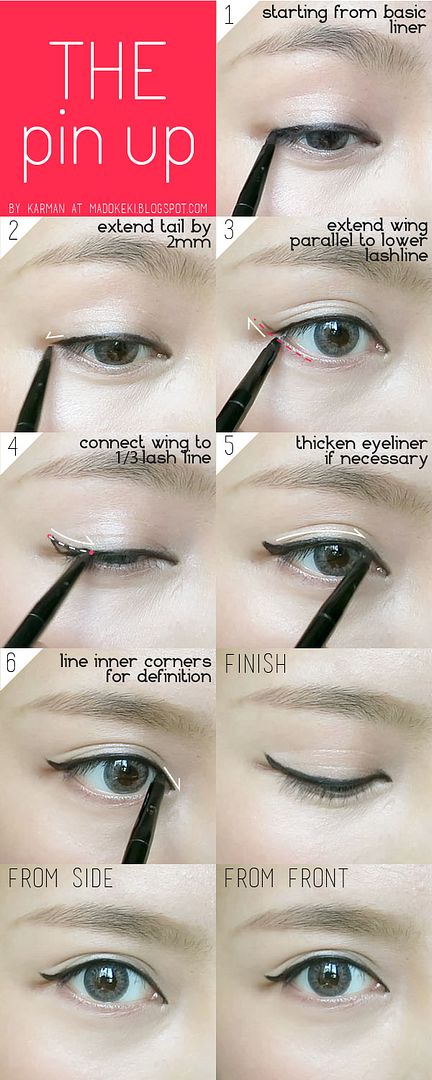
5. THE PIN UP EYELINER


the classic pin up look, originally i wanted to call this the kitten look because it is indeed a cute little cat eye look. this look lifts your eyes up slightly and make it look proportionately rounder.

so classy, i love it. the only problem i usually face is getting the wing to be of the same angle on both sides. i found the perfect trick to achieving that - extend the wing that is parallel to your lower lash line when your eyes are wide open. there's no way you can go wrong with this method.


click on image to enlarge!

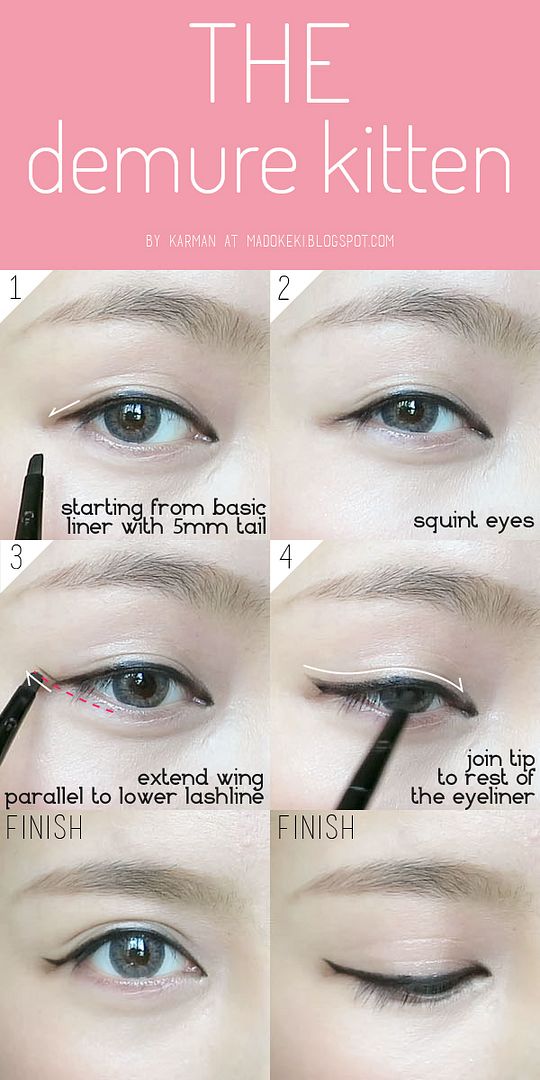
6. THE DEMURE KITTEN EYELINER


this is a little different from the pin up eyeliner in a sense that.. this elongates your eyes while the former makes your eyes look rounder.

by lengthening the tail of the basic liner, you already lengthened your eyes. the angle of your lower lash line is wider when you squint your eyes, the resulting wing also contributes to the lengthening effect.

suitable for people with hooded lids as the wing is further down your eye (and hopefully it can escape the eyelid folds).


click on image to enlarge!

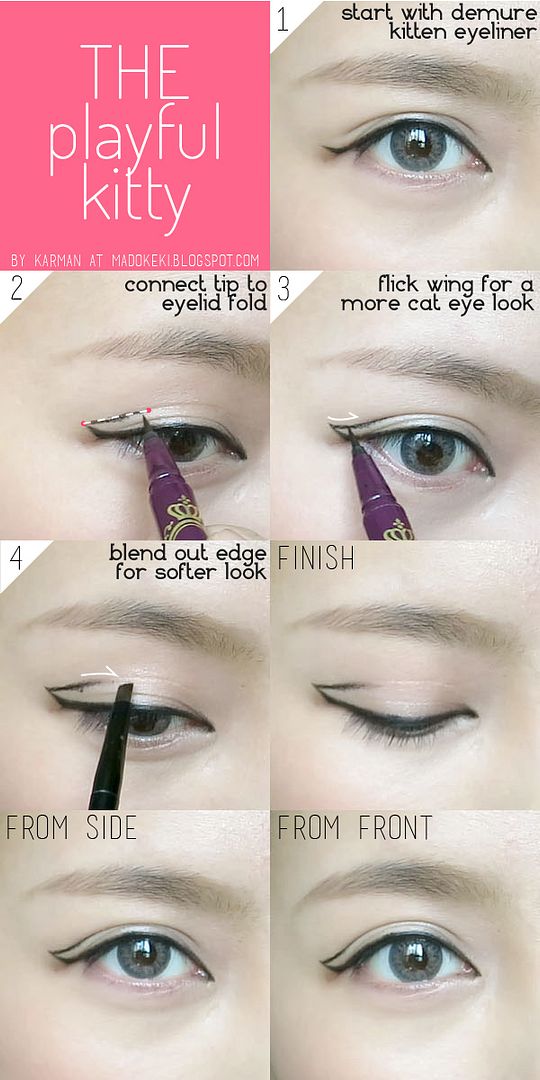
7. THE PLAYFUL KITTY EYELINER


i thought this is a really awesome way to try out the full on cat eye liner safely - by wearing it's outline. starting with the demure kitten eyeliner, you can connect it to your eyelid folds (or any where you deem suitable if you have single eyelid) to create the cat eyes look but without the boldness. i usually wear it with a colourful eyeshadow so it looks more fun that way!


click on image to enlarge!

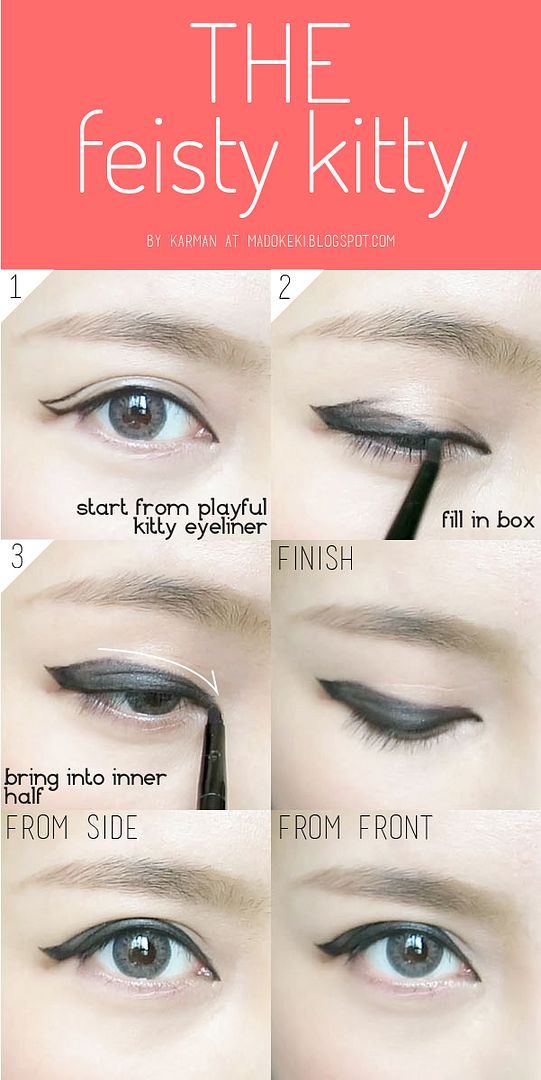
8. THE FEISTY KITTY


after getting the outline, the natural progression is to.. fill it up. and there you have it, a super bold cat eye. not for the faint hearted.


click on image to enlarge!

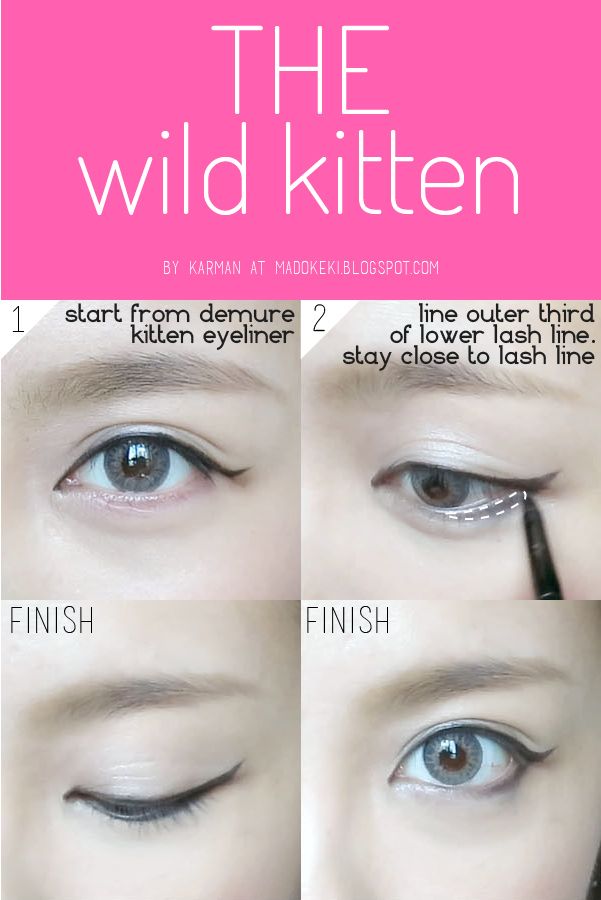
9. THE WILD KITTEN


if heavy and bold eyeliner ain't your cup of tea, let's tone it down to a more readily acceptable cat eye look. this is a variation of the demure kitten eyeliner - you line the outer third of the lower lashline too. just make sure to stay close to the lash line so as to retain the shape of your eyes.


click on image to enlarge!

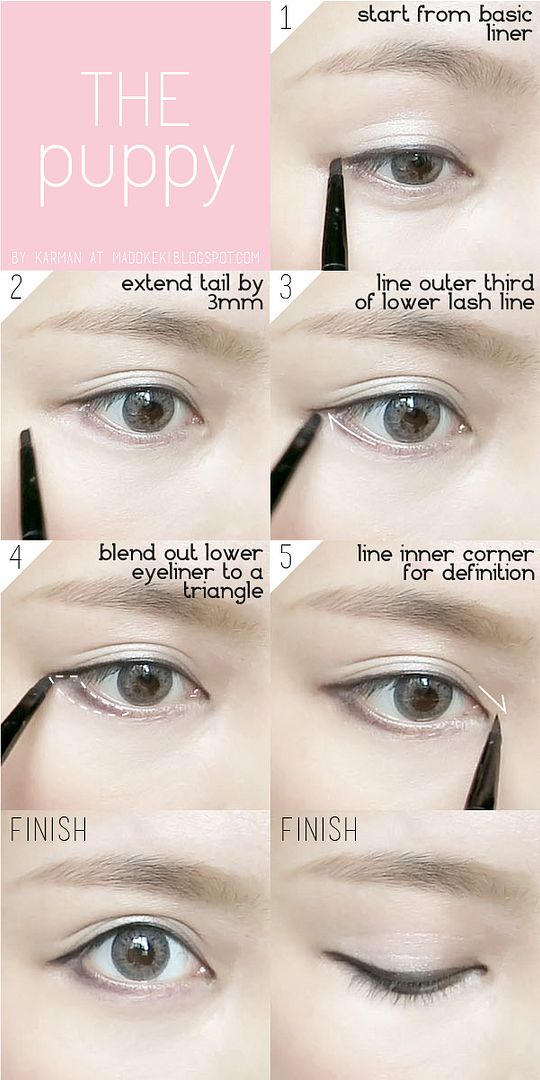
10. THE PUPPY EYELINER


last but not least, the innocent puppy eyes. puppy eyes just mean droopy looking eyes, so we'll go all out to achieve that. starting with extending the tail of the eyeliner downwards, and to shade the outer third of the lower lash line to add on to the droopy effect. by shading that triangular area, it will "pull" your eyes down visually. don't forget to define the inner corners or your eyes may look like they got pried apart.

i don't recommend people with naturally droopy eyes to try this look, it may make you look overly sad.


click on image to enlarge!

that's all i have to offer this time round! hope you found it useful :) it's fun to try more things! i used to be the type who stays in my comfort zone when it comes to making up, but it's through trying new things that i learnt about more looks that will suit me too. i've also learnt a lot more about my own features and what should i do/avoid.

experiment with some of them and let me know how it went for you! if you tried this look out, take a photo, share it on instagram and tag me @madokeki, because i'd love to see your version of it! remember to always tweak the makeup looks to suit yourself!

which is your favourite eyeliner look?

xoxo
karman