Tampilkan postingan dengan label dollywink. Tampilkan semua postingan

Jumat, 19 Desember 2014

Maybelline Lashionista Mascara VS Dolly Wink Long Mascara

Maybelline Lashionista Mascara VS Dolly Wink Long Mascara

my first ever film type mascara was the deja vu fiberwig mascara and it disappointed me. but that didn't stop me from trying more film type formulas.

film type mascaras are water and oil resistant, as far as the formula in the past few years goes.. i can't say the same for fiberwig from a decade ago! they are easy to remove in the shower as they can easily come off with warm water. they form little "caps" of black polymer that will just trickle down your drain after some gentle rubbing.


i'm comparing the maybelline lashionista mascara in black to the dollywink long mascara, also in black.

Maybelline Lashionista Mascara VS Dolly Wink Long Mascara

similarities:
1. both create very natural lengths (seems to have similar lengthening powers)
2. both straighten my curled lashes
3. both last me throughout the entire day, no panda eyes!
4. both are able to hold curls IF i use a heated lash curler after application, and they do not melt or stain the heated lash curler!

differences:
1. dollywink has a wetter formula and tend to group my lashes together, whereas the maybelline is of a drier formula, giving me a one by one look.
2. dollywink has a fatter brush than the maybelline.
3. maybelline is able to go up to 5 coats without looking unnatural, while dollywink may look a little spidery.
4. maybelline may be a few dollars cheaper than dollywink.
5. maybelline's formula feels more light weight.

that's all for a simple comparison! if you were to ask me which do i prefer, i'd go with the maybelline. even though both will straighten my curled lashes, the lightweight formula of the maybelline means i can keep going on and on to build a layer of fibers, and then using my fingers i can push these fibers upwards and they'll hold the curl just fine. they'll probably need some "reassurance" throughout the day to keep them perked up, but i couldn't achieve that with the dollywink because it's formula is just too wet. i did try to remove most of the excess mascara on the wand, but it's just a little troublesome.

for a more dolly look, i'd go for the dollywink since the brush bunch up my lashes together. for a really natural "i don't have any mascara on" look, i'd choose maybelline.

the full review of the individual mascaras are linked above! check them out if you want more details.

Selasa, 02 September 2014

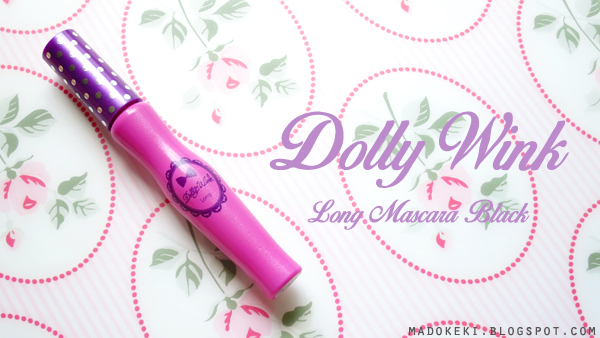
DollyWink Long Mascara Black (Swatches and Review)

DollyWink Long Mascara
DollyWink Long Mascara (Swatches and Review)

a lengthening film type mascara, dollywink is a japanese brand that i've heard but never thought of laying hands on until my girlfriend gifted me this.

this is the first version and it has gotten pretty good reviews from across the community. i was quite happy to receive it so i gave it a try! it claims to be oil and sweat proof, maintain curls all day, and comes off easily in the shower.


i got the mascara in black.

THE BRUSH__________________________________________________________________

DollyWink Long Mascara
the brush is straight and has a cylindrical shape, except for the tip which is slightly tapered, which is meant delicate areas like the lower lashes and the hard to reach corners.

DollyWink Long Mascara

visible fibres on the brush. perhaps you can tell how wet the formula is from this photo too?

THE BEFORE AND AFTER______________________________________________________

DollyWink Long Mascara Before and After
naked lashes vs 1 coat vs 2 coats vs 3 coats, lashes curled (with traditional lash curler) prior to mascara application.

DollyWink Long Mascara Before and After
comparison with eyes opened.

DollyWink Long Mascara swatch
see my lashes grow!


THE CAPABILITIES___________________________________________________________

the mascara does a superb job at lengthening. i think the gif image says it all! i usually wear two coats and it does a good enough job at growing my lashes a fair bit. i'm sure if i go further i'd be able to achieve really long lashes! my lashes remained soft after mascara application.

i don't remember the mascara clumping, however i always apply my second coat before the first dries out fully (this means i will apply one coat to my left, then proceed on to my right, and going back in to my left for the second coat).

as the formula is so wet, it does straighten out my curled lashes (sadly). but the workaround is to use a heated eyelash curler instead, and i have gotten amazing results with that method, the curls did last the entire day! what's amazing is that the mascara doesn't melt when heated, so it's definitely heated-curler-approved!

my lashes are pretty well separated thanks to the brush, and going in on the second layer added some volume to my lashes, this makes the dollywink mascara different from maybelline lashionista as the latter doesn't add volume at all.

as this is a film type mascara, it washes off in the shower with warm water. it does come off when i use an eye makeup remover, but that will take some rubbing, whereas in the shower, it's almost effortless.

it does live up to its claim of being oil and sweat proof, as the mascara didn't melt and transfer to my lids after the entire day!


IMHO:
i love that this mascara adds a little volume on top of the amazing length it gives me. i'm still learning to like to super wet formula though. i haven't gone beyond 2 coats so i can't testify whether it's able to lengthen without clumping.

as with most film type mascaras, it straightens my lashes almost immediately no matter how well i curled my lashes prior to that. even though a heated lash curler could easily fix that, on days when i'm rushing out i don't have the luxury to do that. i just want to crimp my lashes, load up on the mascara and be gone. unlike the maybelline lashionista, this can't be curled just by pushing my lashes up with my lashes. the formula is too heavy for that.

i strongly recommend removing most of the product on a piece of tissue before using it to reduce the likelihood of the product weighing the lashes down. or you must use it with a heated lash curler to get really amazing curls that lasts the entire day.

i use this mascara when i have the time to use my heated lash curler.

IN A NUTSHELL
this mascara is good for you if you want
1) long and light weight lashes
2) a mascara that doesn't melt in the heat, oil, and sweat
3) your mascara to come off in the shower
4) some volume to your lashes

i would really recommend this mascara to people who have a heated lash curler, otherwise you can't achieve the full potency of this product. and it's also advised to wipe off most of the product off the wand before using to prevent overloading on mascara.

i got this as a gift from my gf when she travelled to japan.

Selasa, 27 Mei 2014

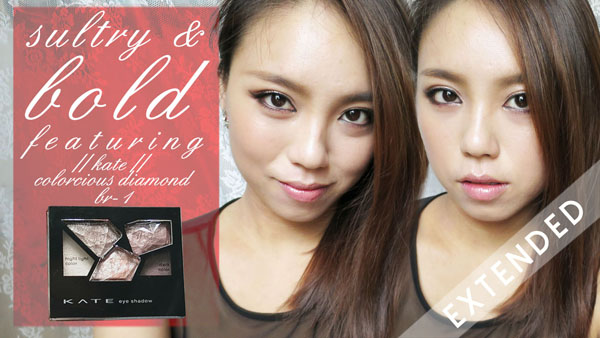
Kate Colorcious Diamond BR-1: MakeUpDiary #11C Femme Fatale

Kate Colorcious Diamond BR-1
MakeUpDiary #11C Femme Fatale Featuring Kate Colorcious Diamond BR-1

i saved the best for the last - my last look with colorcious diamond palette is called FEMME FATALE because i love how sexy this eye look makes me feel. that contrast of dark and shiny colours makes every batter of my eyes seem like i'm sending a morse code to my other secret agents who're aiding me in my mission. wanna feel sexy? this look is for you.

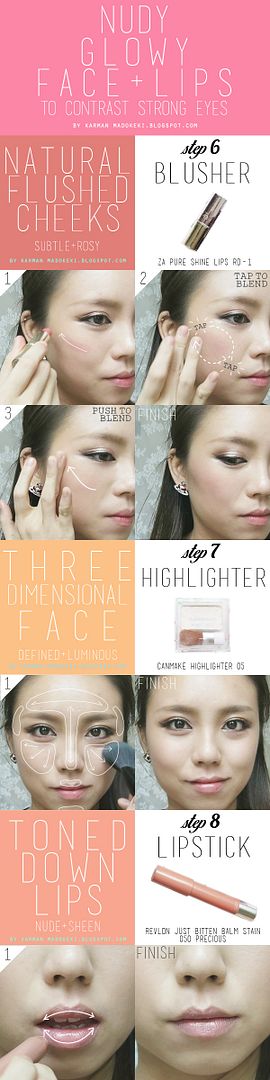
the main point of this look is the striking eyes and a seemingly pale face in contrast - well, it's not pale, it's just toned down so that it doesn't steal the spotlight away from the eyes. the face and lips were kept to a minimum - rosy and nudy shades were used. the face will have to depend on contours and highlights to make it stand out in harmony with the eyes.

to prepare your canvas for the makeup, you can refer to my base makeup steps (complete with pictorials and instructions).

watch the video here!


PRODUCTS USED____________________________________________________________


from left to right, clockwise:
1. maybelline eye studio gel liner (black)
2. canmake highlighter 05
3. maybelline volum'express hypercurl cat eyes mascara (black)
4. dollywink long mascara (black)
5. revlon just bitten balm stain 050 precious
6. za pure shine lips (RD-1)
7. kate colorcious diamond (BR-1)

COLOUR LEGEND___________________________________________________________


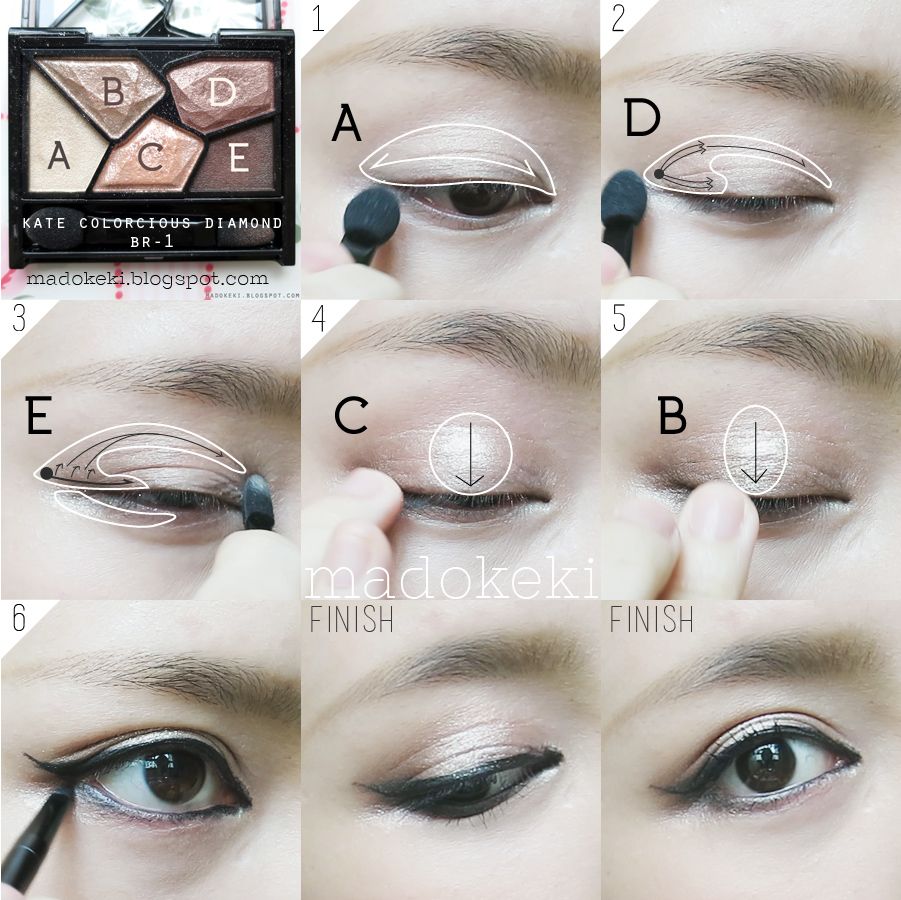
A: high light colour
B: shiny colour
C: medium shiny colour
D: medium colour
E: dark colour
(they have been swatched)

COLOUR MAP______________________________________________________________


1. apply A over entire lid.
2. apply D to the outer half of the lid and blend inwards.
3. apply E to darken the outer corner, blend well to smoke it out.
4. dab B onto the centre of the lid and blend out the sides.
5. dab C onto the centre and concentrate the product there.


1. apply E to the outer third of the lower lashline before and after lining the eyes.

PICTORIAL_________________________________________________________________ 


i just love how the pictorials look, i couldn't stop making them.

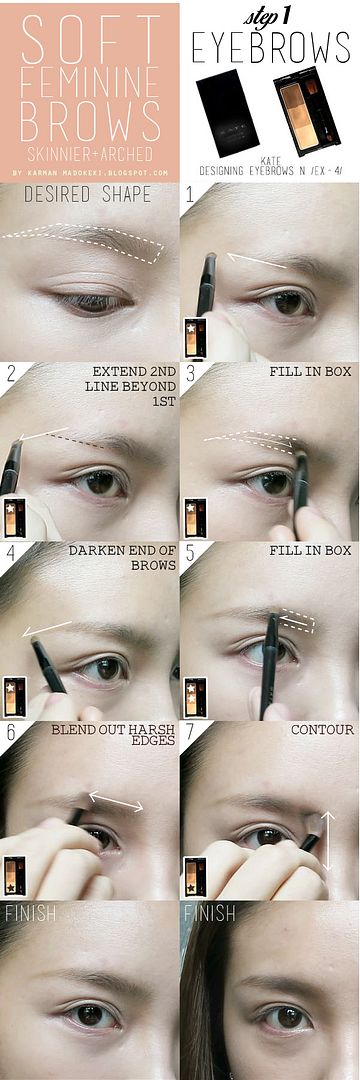
for the brows, it's the same style as the previous tutorial.


click on image to enlarge!


click on image to enlarge!

(NOTE: for step 3 (the eyeliner step), ONLY line the waterline in part 4, this is very important because you want to make sure your inner half of the lower eyeline is only confined to the waterline, or you'll look like a racoon. racoons are not sexy. and in part 5 where you line the lash line, you can only do this for the outer third of the lower lash line for the same reason - racoons are not sexy!)


click on image to enlarge!

i also made an instagram version :D


click on image to enlarge!

FINISHED LOOK____________________________________________________________


hope you like the look! it's much darker and heavier than my usual looks (just look at the number of steps for the eye look this time round..), and it's very suitable for night time events. if you're hitting the club, make sure you use a waterproof foundation and you may want to prime your lids so that your makeup don't melt! i really love this look, it's so sexyyyyyyyyy!

xoxo
karman

Kamis, 10 April 2014

dollywink eye shadow 02 grey pink (Swatches & Review)

Dollywink Eye Shadow 02 Grey Pink


dollywink is a cosmetic line produced by a japanese gyaru model, masuwaka tsubasa.
i think they are most famous for the eyelashes, as she was one of the first to produce a line specifically for gyaru? i'm not too sure on this, please don't quote me!

my girlfriend picked this palette up from japan when she was travelling. i believe dollywink was clearing their own stock as they recently underwent a brand and pacakaging renewal, so she got this palette for a steal!

the eyeshadow palette is encased in a black plastic case with some girly twirls embossed around the transparent heart shape window which allows you to see the shades directly.


Dollywink Eye Shadow 02 Grey Pink

Dollywink Eye Shadow 02 Grey Pink Swatch

Dollywink Eye Shadow 02 Grey Pink Swatch
swatched over powder foundation

over all, the shades are rather soft and blends easily, but not very pigmented, it requires 2 swipes to get the above intensity.
the first shade is a blue based hot pink and has a satin finish.
the second shade is a silver/grey shade with a slight metallic finish.
the third shade is a greyish blue with silver micro glitter and has a satin finish.
the last shade is a darker grey that has a satin/matte finish. although the colour blends out easily, but not as dark as it looks in the pan.

IMHO:
as the pigmentation of this palette is relatively lower than the other palettes that i have, it makes it a little harder to work with the colours as a washed out blue and grey will easily make it look as if i have a dirty eye instead of a made up eye. i know right.. it's just that easy for the makeup to go wrong!
however, if i follow the instructions given by this palette to create the look that it's meant for, it turns out pretty fine! i wish the pink is more pigmented though, because it's such a pretty pink, and i like it's finish!

with regards to the texture, it's not as soft as kate's eyeshadows. those are still the softest i've ever encountered, making them the easiest to be picked up by an eyeshadow brush. these required more effort. 

i got this as a gift from my gf when she was travelling in japan.

MAKEUP LOOK


xoxo
karman

Selasa, 04 Maret 2014

[GTL] StyleNanda Park Sora Make Up Look


if you are an avid fan of korean fashion, park sora will be a familiar name to you.
she models for stylenanda, a korean fashion brand that houses a lot of quirky and stylish clothings.
while i'm not too interested in the clothes it has to offer, i'm really drawn to park sora's makeup.
i know she uses mostly 3ce products, since that is the makeup line produced by stylenanda!
today, i'm taking up the challenge to create her look WITHOUT any 3ce products.
can i do it with just drugstore products?


read on to find out how i did it!


these were the main reference images that i used. thank you google!


DECONSTRUCTION:


FACE:
- extremely fair skinned with a glossy finish, either skip powdering of face, or to add extra sheen with a facial oil (either prior to foundation, or mixing it with the foundation).
- porcelain skin with no trace of a pore, can be achieved by using a skin smoothening primer prior to foundation.

EYES:
- bright eyes with orange toned eyeshadow
- high contrast eye make up by using bright eyeshadows and black eye liner
- close set eyes, line the inner corners and make it point towards the nose bridge for that long eye look
- straight and slightly droopy eyeliner that ends at the same level as the inner corner of eyes, this gives the illusion of lengthened eyes
- iris enlarging circle lens is a must for this look
- natural looking lashes that are rather volumous to contrast the bright eye look (especially so for the lower lash line). can be achieved with a volumnizing and lengthening mascara

CHEEKS:

- sun kissed cheeks, a bright coral/orange coloured blusher applied over the entire cheek
- highlighted and glossy, a pearl liquid/powder highlighter can be used on those areas

LIPS:
- orange pastel toned, requires either a very pigmented orange pastel lipstick, or simply conceal lips before applying regular orange lipstick

PRODUCTS USED:


(in clockwise direction, starting from the far left)
1. nature republic brightening CC cream
2. bourjois blusher 32 ambre d'or
3. dollywink long mascara
4. canmake highlighter 05 (used as eyeshadow and highlight)
5. dr jart+ black label bb cream
6. kate designing eyebrow N EX-4
7. sonia kashuk hidden agenda concealer 07
8. revlon just bitten balm stain 040 rendezvous
9. maybelline eye studio gel liner black
10. canmake cream cheek 05
NOT IN PHOTO: the circle lens i wore is the GEO HC-104


kate designing eyebrow N EX-4
this time round i'm using lighter shades for my eyebrow to get her softer brow look. i mixed A and B in a ratio of about 4:1 (brushing my brush in A for 4 times and B for 1 time)

COLOUR MAP:

EYESHADOW:


1. apply 1 all over the upper eyelid to brighten up the entier eye area
2. apply 2 to the outer half of the eyes.


1.brighten up the entire lower lid with 4
2. add a tinge of orange to the outer corner of the lower lid


a closer look at the eyeliner.
there is no eyeliner applied to the lower lash line, the contrast is constructed by the dark lower lashes and the highlighter lower eyelid.

BLUSHER:


1. apply 10 over the entire cheek, we're going for the sunburnt look. HAHAHA
2. i added some of 2 onto the apple of my cheek for a soft gradated look

FINISHED LOOK:


i think this look is pretty pictur perfect,i love how the contrast in the eyes brings out the sharp eye look. the sun kissed cheeks are also very summer-ready! i guess this look will suit most people, and especially those with fair skin. people with tanner skin might want to use a more vibrant cheek colour as opposed to the slightly pastel shades used here. as for the eye look, the eye shadow combination will suit everybody, but the way the eyeliner is drawn might need to be adjusted according to your own eye shape! but the general idea is the same: lengthening eyeliner that ends at the same height where the inner corner of the eyes is.