Kamis, 24 Juli 2014

Revlon ColorStay Ultimate Suede 025 Socialite (Swatches & Review)

Revlon ColorStay Ultimate Suede 025 Socialite

revlon is taking over my lipstick stash. the revlon colorstay ultimate suede lipsticks claims to be a moisturizing and long wearing formula (16 hours!). formulated with moisturizing ingredients like shea butter and aloe, it's supposed to keep my lips moisturized AND makes sure the colour stays on for the entire day! it's supposed to have a velvet finish, not matte nor shiny, but a velvet.

a claim is but a claim.

Revlon ColorStay Ultimate Suede 025 Socialite


Revlon ColorStay Ultimate Suede 025 Socialite Swatch
one swipe on the left, 2-3 swipes on the right.

Revlon ColorStay Ultimate Suede 025 Socialite Swatch

025 socialite is a very beautiful warm rose pink with a subtle hint of gold shiimmers (that is quite invisible on the lips). it applies VERY SMOOTHLY, you know how some lipsticks will tug your lips when you apply? this lipstick does not tug my lips at all! it deposits just the right amount of product on my lips, and it applies very evenly. 

the finish is velvety - i'll try my best to describe this - it has a slight plastic-ky sheen to it that makes it look smooth.

the lipstick is slightly scented with a faint sweet smelling floral scent.

as to the wear, after it sets, it doesn't transfer at all (for the first few hours). 

IMHO:
there are only 3 things i love about this lipstick. the colour, it's initial application, and the initial consistency. i love the way it melts onto my lips the first time the bullet touched my lips. i also love the way it deposits just the right amount of product to colour my lips evenly. immediately after application, my lips are moisturized and feels pretty good.

i'm not sure if it's the formula for this colour that makes it the way it is - after the lipstick sets, my lips feels sticky. moments after it sets, the product starts to gather around my lip lines, such that when i smile, my lip lines appears to have no product on them! and when i do a lip smack, the product will stick to each other - those from my bottom lip get transferred to my upper lips. i have to be mindful not to smack my lips when i wear this lipstick, which isn't a problem. the worse is when i eat - some of the product comes off unevenly and what's left is a patchy lip. the worst is.. those that stay on my lips will not budge when i try to remove them so i can reapply this lipstick. it's disappointing that the product's staying power is not constant.

anyway, i have found a way to remove this lipstick most efficiently, that is to applying vaseline and let sit for a while before wiping it off with a tissue.

i tried wearing this lipstick for the entire day without touching it up, i realize i hate the feeling at the end of the day as it feels like a piece of plastic encasing my lips. i guess this is how long wear formula feels like? i didn't feel that it was any more moisturizing than the usual lipsticks that i own.

i wish the formula didn't set. i wouldn't mind it being a normal wear lipstick at all as i would prefer touching up anyway because i need that moisture on my lips. even though i don't like the feeling of it on my lips, i still wear this once in a while because i really love the colour.

i got this in the DFS for hkd$78.

MAKEUP LOOK


Selasa, 22 Juli 2014

Etude House Precious Mineral Any Cushion First Impression Review

etude house any cushion review
Etude House Precious Mineral Any Cushion First Impression Review

here comes my first bb cushion. i know i'm very late into the game because i couldn't justify buying yet another foundation when i already have an existing bb cream to finish. my mentality back then was different - bb cushions are a waste of product (since the cushion will hold on to the last drops of the product) and a waste of my money (because i still haven't finished my bb cream yet).

i changed my mind after i studied more about the product. i realized what the bb cushion offers is unlike any other bb creams that i used to know of. it's designed to help make the application more even, to speed up the makeup process, and to allow for easy touch up on the go (mind you, we're talking about a liquid product here! it's a revolution from the pressed powder era!).

SHUT UP AND TAKE MY MONEY! i want to try it out if it's really that convenient. since i'm on a budget, i chose the etude house precious mineral any cushion as it's one of the more affordable ones as compared to laneige, hera, and iope. plus etude house's precious mineral bb cream was so raved about, this thing should be pretty good too, right?

let's see.


PACKAGING==========================================================

etude house precious mineral any cushion
the bb cushion comes in a round pact that reminds me of a macaron. the pearlescent cover added about 40 points to the sweet packaging.

etude house precious mineral any cushion
the pact is slightly bulky because it contains the cushion and the puff! the puff is designed to be non-absorbent, and the patting motion helps to create a flawless finish (it made my skin look buffed. BUT please smoothen out your skin with a primer if you have larger pores! it'll make a world of a difference!)


PRODUCT INFO=========================================================

etude house precious mineral any cushion
i got it in W13, natural beige. i mentioned in the video that they only have 3 colours for this product. this is the middle shade.

it comes with SPF50 and PA+++.

this product claims to brighten, reduce wrinkle, control sebum, and offer you a flawless finish.

the ingredients list are on the right. i'll list out the things that stood out from the rest to serve its stated purpose.
brightening: zinc oxide, titanium oxide (both are sunscreen which give you the white cast), niacinamide
wrinkle reducing: niacinamide, adenosine
hydration: sodium hyaluronate

for 18000won, i got 15g worth of product. refills go for 10000won.


SWATCHES==========================================================

etude house precious mineral any cushion W13
W13 natural beige, in the cushion.

etude house precious mineral any cushion W13 swatch
W13 natural beige, on the back of my hand. blended out with the puff on the right.


FIRST IMPRESSION====================================================

a few plus points first!

1. easy and quick makeup application
you don't need any extra tools or skills, all you need is your fingers in the puff and pat away to get the most beautiful finish and glow. the good thing about cushion on cushion (or puff on cushion) application is that it allows for a very even distribution of product thanks to the larger surface area of contact between the puff and the product. it is unlike the traditional bb cream or foundation where you have a concentrated source of product (which you have to spread it out on the back of your hand before applying to your face to help with the evenness). fuss free, fool proof, and very beginner friendly.

2. touch up on the go
this pact was designed to be carried around without worrying about getting the liquid product everywhere. it's indeed a new innovation as most ladies touch up with pressed powder. i don't remember seeing anyone touch up with a liquid product before. definitely another plus point for ladies on the go. but that also means that this makeup probably isn't very long lasting huh, since it was designed for touching up???? HMMM.

3. affordable price
very affordable as compared to the other cushions in the market! this cost 18000won in korea, and you can probably find it online for around the same price (exclusive of shipping) if you know where to look.

4. flawless and dewy finish
i am totally in love with the flawless finish. they weren't kidding! i think the puff deserves some love when it comes to this. the rubber surface did some magic to the product, giving me a buffed out look even though all i did was to pat. and look at that dewy glow!

etude house precious mineral any cushion
full makeup done without powdering my face. only had blusher and some shading powder along the hair line.


on to the parts that it can improve upon!

1. not as sweat resistant
to be fair, it was never touted to be a sweat resistant nor a long wear product. i wish it's more summer proof because i'm in singapore and there's no way i can escape heat and sweat. i'll have to face it: dewy finish makeup is good for photo taking and indoor only. the product transfers slightly when i blot off my sweat with a piece of tissue paper.

2. overly strong scent
the scent did smell good at first, but it got to me after 4 hours of constantly smelling a whiff of it. korean products are usually scented, this is just too much for my liking.

3. limited colour selection
they have 3 colours for you to choose from, super fair, fair, and not so fair. hahaha they do have product names for it but i thought my description of the names would give you a better idea. of course, 3 colour choices are a vast improvement from the original one-colour-fit-all bb cream, but it's very asian oriented. as with all other bb creams, this will not suit those with slightly darker skin tones because of the white cast, which will make you look ashy. if you have the typical asian skin, then you don't have to worry too much about the colours. i think you don't even have to bother about matching it your skin colour because the product will sheer itself out eventually to match your skin. all you end up with is the white cast which will brighten your face.

4. what's with the white cast!?
even though it fades with time, the initial application scared me. honestly speaking, i bet it's mostly due to the physical sunscreen. hopefully i get more used to the amount i use for my face so that i don't turn into a ghost again in the future.

5. the product may oxidize throughout the day
my forehead (far away from where i applied the shading powder) turned darker with time but the center of my face remains relatively bright. i may have gotten some of the products off my face when i blot off my sweat. or the part on my forehead just oxidized more due to more oils being produced there? i don't know. just stating a possibility based on the colour change i observed.

there's one point which makes me sit on the fence.

1. sebum control
i forgot to mention this in the video as i was too taken away by the other points. also, i didn't really pay attention to the oil control part as i was perspiring too much to take notice. the heat makes me produce oil and sweat. however, my skin appears semi matte towards the end of the day. i did blot off my sweat with tissue, i'm not sure if it took away the oils too? i'll have to try it out a few more times before arriving at a conclusion for this.


FULL FACE MAKEUP=====================================================


etude house precious mineral any cushion W13


products used:

etude house precious mineral any cushion
foundation: etude house precious mineral any cushion (W13 natural beige)
shading powder: nature republic shine blossom blusher (05 shading beige)
blusher: bourjois little round pot blusher (32 ambre d'or)
eyeshadow: etude house look at my eyes cafe (L-R: BR401 cafe latte, BE102 honey milk)
eyeliner: maybelline masterliner (BR-1)
mascara: maybelline the falsies mascara (black)
lipstick: nature republic botanical lipstick 04 berry peach


IN A NUTSHELL===========================================================

i'm liking this product so far. i wish the staying power is as lasting as the fragrance.. this product does come across as very convenient and time saving, but i seriously don't recommend you patting this all over your face and use this as your sunscreen because that white cast is very terrible. wear a separate sunscreen (with lesser/no white cast) beneath this if you don't mind the hassle. i do that personally because the white cast from the bb cushion will enlarge my already not-so-tiny face.

may not be the best product if you're prone to perspiring like me. powdering may help, but will also take away some of the dewiness it imparts.

other than that, i foresee myself trying more cushion products! now i just have to pray for a long wear formula that is good for hot weathers.

have you tried any bb cushions before? what are you experience with them?

xoxo
karman


Minggu, 20 Juli 2014

Maybelline Volum'Express Cat Eyes VS Heroine Make Volume&Curl

Maybelline Volum express cat eyes heroine make volume curl
Maybelline Volum'Express Cat Eyes VS Heroine Make Volume&Curl

out of my mascara stash, there are two mascara that are both waterproof and volumnizing. i compare them below.

Maybelline Volum express cat eyes heroine make volume curl
i'm pitting the maybelline volum'express hypercurl cat eyes mascara waterproof against the heroine make volume and curl mascara.

Maybelline Volum express cat eyes heroine make volume curl

let's talk about the similarities first.
1. both holds up curls VERY WELL, long lasting and budge proof.
2. both are volumnizing and adds some thickness to my really thin lashes. i feel that both have similar volumnizing power to me.

and on to the differences.
1. heroine make has a slight lengthening effect while the maybelline doesn't (even when it's fresh it doesn't lengthen my lashes as well as heroine make).
2. heroine make separates the lashes better due to the brush design, giving me a more fanned out and one-by-one look.
3. maybelline is slightly easier to remove.


you can read my full review above, i've linked them :)

xoxo
karman
Jumat, 18 Juli 2014

White Formula Extreme Hyaluronic Acid Essence First Impression

White Formula Extreme Hyaluronic Acid Essence
White Formula Extreme Hyaluronic Acid Essence First Impression

my first essence! i've been eyeing one for a while, this seems to fit my needs and budget well, so i purchased it after seeing pretty good reviews on urcosme, the taiwanese peer review site for beauty products.

white formula is a taiwanese brand, i think it's pretty new in town, for they have just reached the singaporean shore a few months ago. i got this from hong kong because just 6 months ago, it wasn't in singapore yet.

this is purely for hydrating and moisturizing - packed with hyaluronic acid. read on.

White Formula Extreme Hyaluronic Acid Essence

on the back the product description.
let me do some translation!

"complete hydration - the ultimate and improved version. get hydration in just one drop thanks to the high density hydration delivery technology.

the high density water delivery techonology couple concentrated hyaluronic acid allows for the instantaneous release of moisturizing factors. with 4 patented beefed up hyaluronic acids, it is able to penetrate the skin to supply strong and long lasting effects of moisture induction, moisture replenishment, and moisture retainment. you just need one drop for perfect hydration.


- high technology moisture induction hyaluronic acid SYN-HYCAN, aims to inject dry skin with water, works in synergy with collagen.

- low molecular weight hyalurnoic acid Hyalo-Oligo, able to penetrate deep into the skin, allows the skin to be hydrated inside out.

- high density water retaining hyaluronic acid Sodium Hyaluronate, forms a strong net to keep the water in.

- concentrated hyaluronic acid Hyaloveil-P, powerful moisturizing capabilities, constantly supplies the skin with hydration."

White Formula Extreme Hyaluronic Acid Essence Ingredients
ingriedients list.
even though it's a taiwanese brand, it's made in korea!

it comes with suggested usage instructions:

suitable for extremely dry, dehydrated, and sensitive skin.
use it twice a day, morning and night. after cleansing your face, take an appropriate amount of the essence and gently massage it into the face and neck.


White Formula Extreme Hyaluronic Acid Essence
pump dispenser.

White Formula Extreme Hyaluronic Acid Essence
i really like the blue bottle, looks pleasing and relaxing to my eyes! there are also simple instructions (same as the one on the box) at the back of the bottle.


White Formula Extreme Hyaluronic Acid Essence

it's slightly more viscous than the whitening lotion.

White Formula Extreme Hyaluronic Acid Essence

similar to the whitening lotion this is extremely slippery, and there is a slight stickiness to it, when i apply it on my face and pat it with my palms, it will resist me from pulling it away from my face (as with all other products containing hyaluronic acid).

IN A NUTSHELL

texture: slightly viscous, very slippery, spreads easily and absorbed quickly.
after-feel: a slight adhesive feeling, skin feels soft and hydrated.
fragrance: no fragrance. in fact, there's a chemical smell to it because they didn't add any fragrance to cover it up.

IMHO

i've only started using it recently, so i can't give too much comments yet. as far as the texture goes, i kinda like it. the slippery feel makes me think of the snail mucin products (even though i've never tried it, but i've linked slippery-ness to moisture retaining effects). the scent is a little turn off because the chemical scent is quite apparent, and the thought of slathering chemicals on my face isn't that appetizing at all. nonetheless, it is a very hydrating product and i can get away with it as my creams at night, perhaps even in the day. but that sticky feeling is something i try to avoid during day time because i need it to be compatible with my make up (meaning, my face should feel hydrate and smooth, not hydrated and slightly sticky, which may result in uneven application of my powders!).

full review will be up in at least 2 months time for me to observe any differences.

my gf picked this up from HK for HKD$110.

Selasa, 15 Juli 2014

How To: Makeup For Glasses and Spectacles


How To: Makeup For Glasses and Spectacles

this is a response to a request after i posted a photo of me wearing glasses on my instagram one day. i never thought what i know about makeup for glasses would be sought after by others! so here is my tips and tricks whenever i have to wear my glasses.

it's all about brightening. this time, it's more than just using the regular highlighter (pearly/shimmery powder). we need to up it a notch by playing with the intensity of light directly - to influence the lightness on the centre of your face. you can achieve it by using a pinkish-toned highlighting pen, or a concealer/foundation that is one shade lighter than your original skin tone. pink undertone brightens better especially on people with yellow skin like me.

for the refreshing look (as glasses tend to make me look tired), i threw in a flirty winged eyeliner and a super vibrant (but juicy) lips. the gloss helps to take some age off that strong colour.

watch the video here!


PRODUCTS USED____________________________________________________________


from left to right, clockwise:
1. dr jart+ detox healing black label bb cream
2. l'oreal lucent magique highlighting pen (01 fair)
3. kate mineral foundation powder (OC-B)
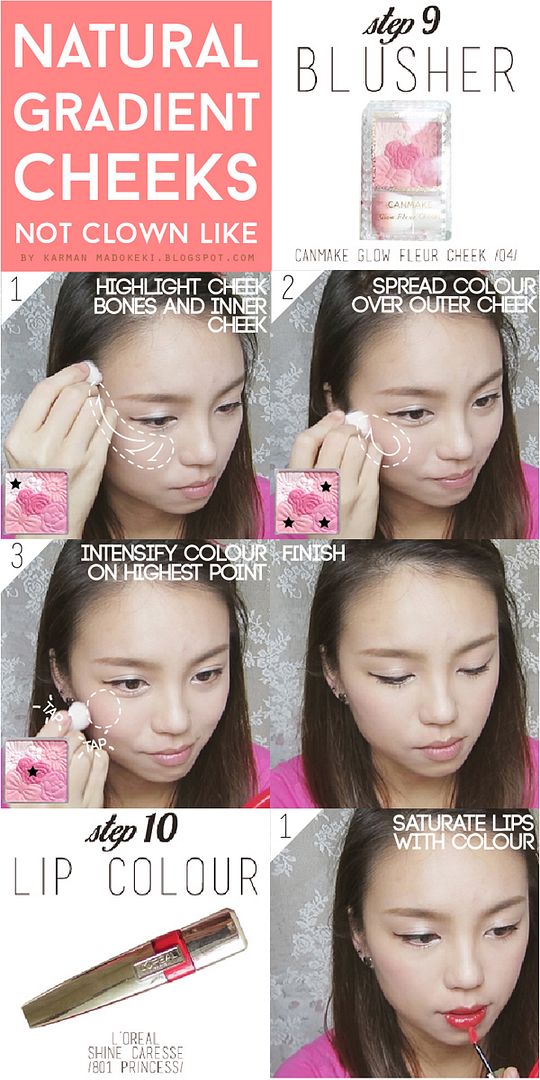
4. canmake glow fleur cheeks 04
5. kate designing eyebrow N (EX-4)
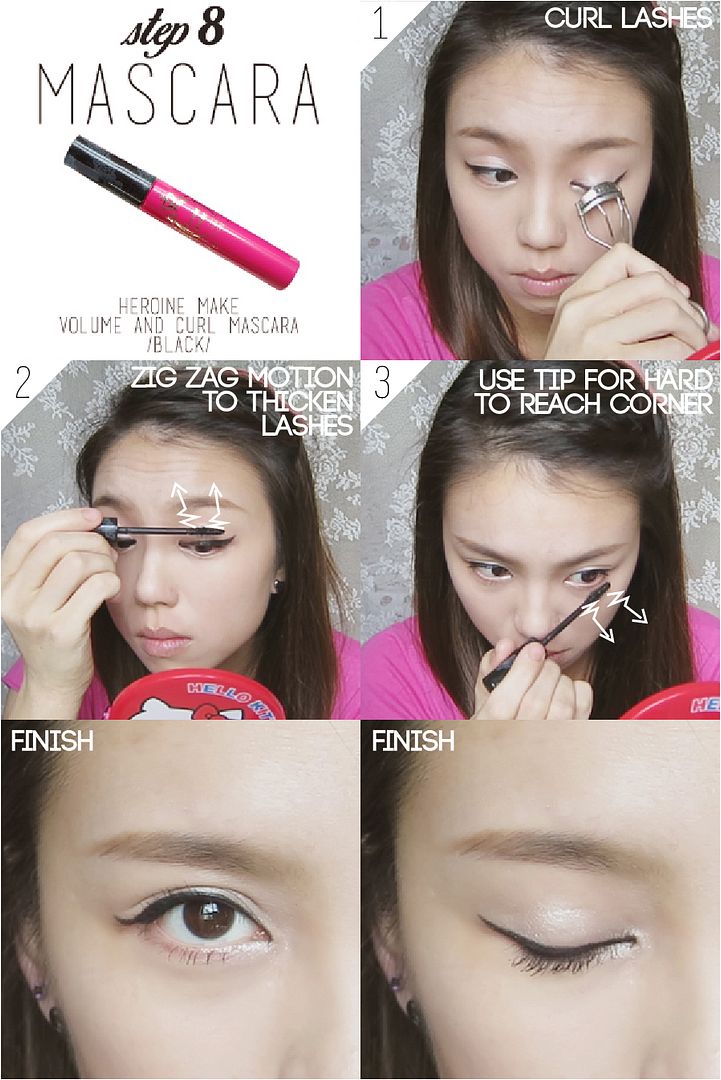
6. heroine make volume and curl mascara (black)
7. l'oreal shine caresse 801 princess
8. canmake color stick 09
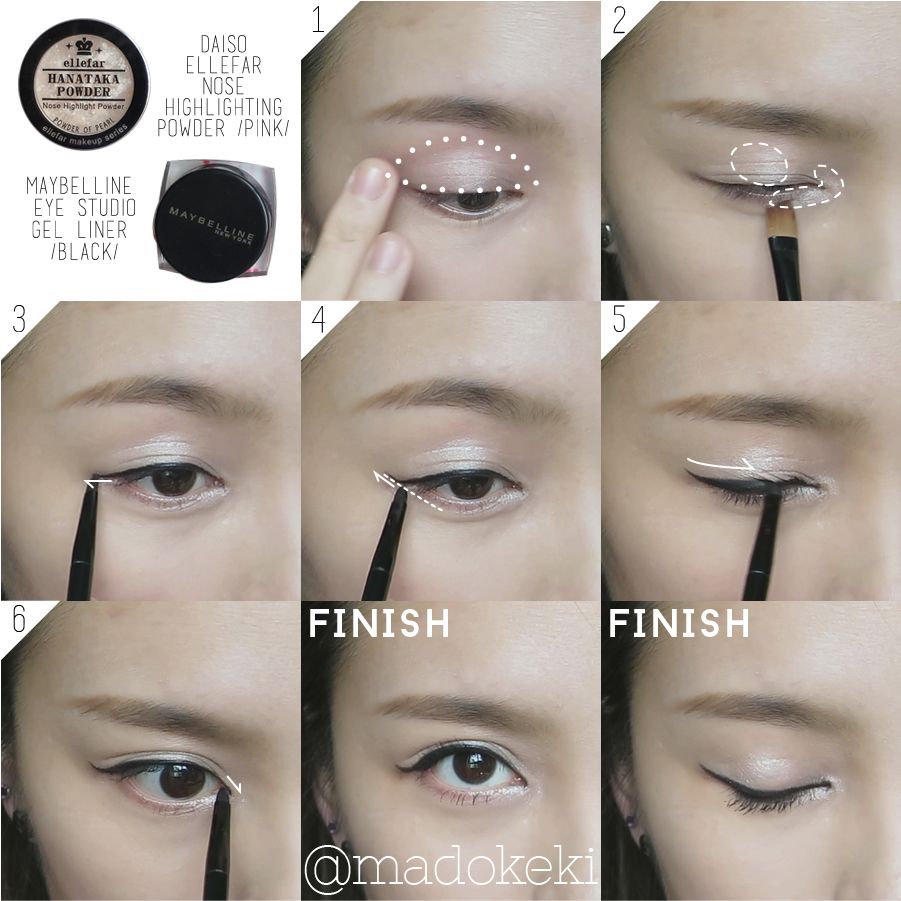
9. maybelline eye studio gel eyeliner (black)
10. daiso ellefar nose highlighting powder (pink)

BRUSHES


from left to right
1. maybelline eyeliner brush
3. generic eyeshadow brush (i highly suspect it's a concealer brush) i got from sasa.
3. elf studio complexion brush

PICTORIAL_________________________________________________________________

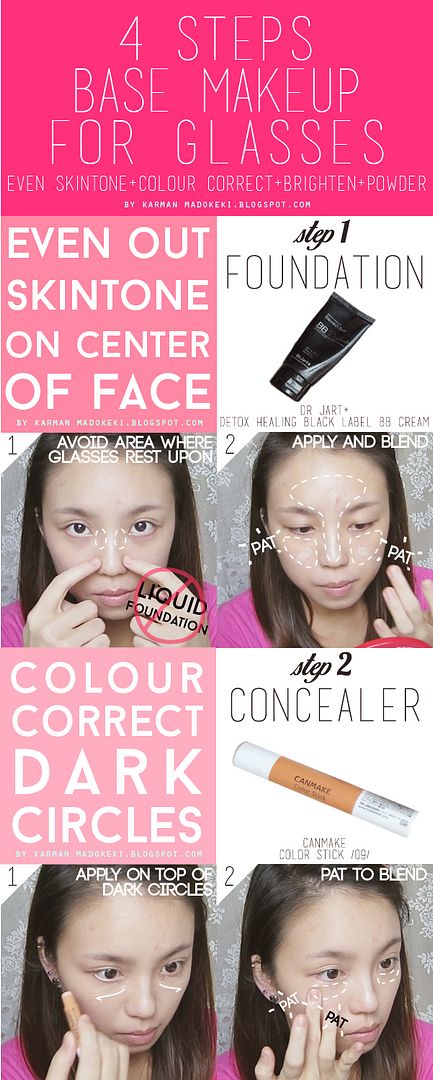
STEP 1. BASE MAKEUP

FOUR STEPS to achieving a base makeup well suited for glasses:

1. foundation - even out skin tone and brighten skin subtly. AVOID spots where the glasses rest on your face - the side of your nose bridge - so that your glasses won't slide off your nose, nor will it be stained with your foundation.
2. colour correct - most girls have dark circles since we have thinner skin. FINE! just make sure to colour correct before further concealing so as to prevent greyish looking undereye area.
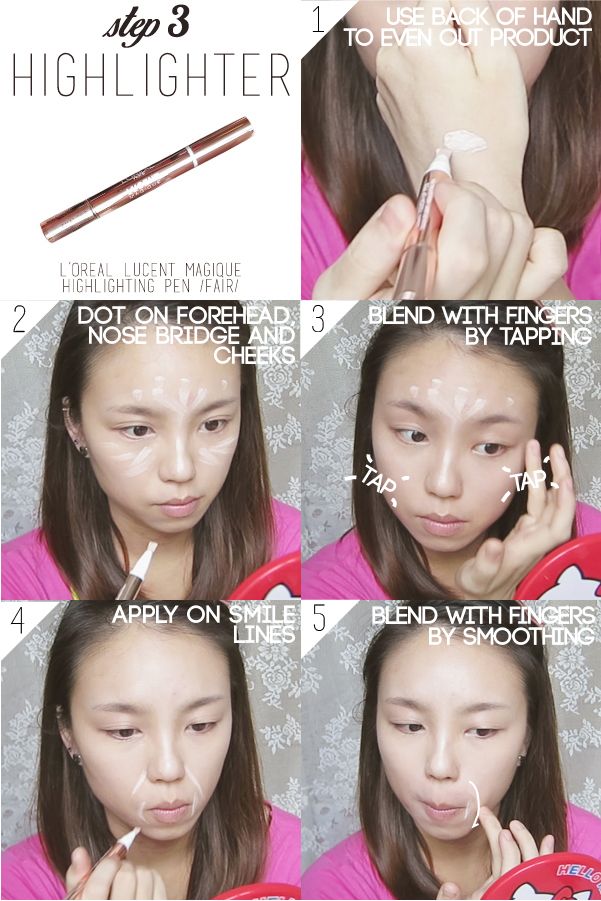
3. brightening - brighten up the centre of the face so that it stands out from behind the glasses.
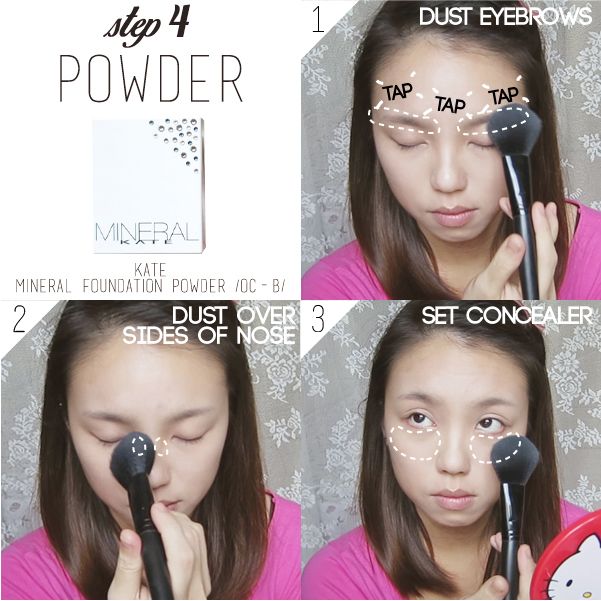
4. powder - use a powder to set the concealer, AND the side of your nose bridge too to absorb any oils/sweat that you may produce.


click on image to enlarge!for more information on colour correcting and concealing, watch my tutorial on that.


click on image to enlarge!

it's a personal preference thing when it comes to blending out the product on the back of your hands. i didn't find the pen to be dispensing the product evenly enough for me, i ended up with globs of product on my face and i didn't like it. a workaround is to place that glob on my hand and spread it out thoroughly throughout the pen before drawing on my face. i feel like an avatar character with all that on my face.


click on image to enlarge!

STEP 2. EYE MAKEUP

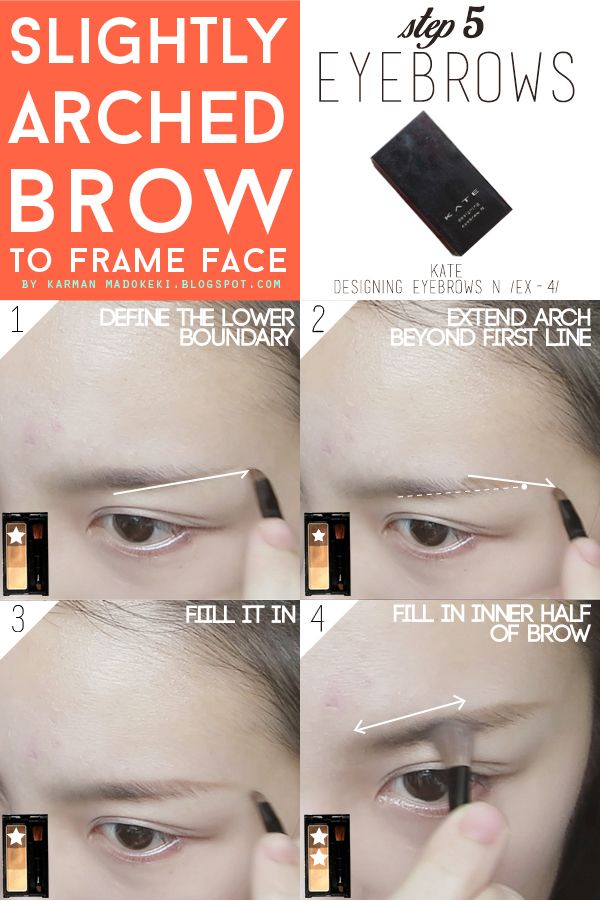
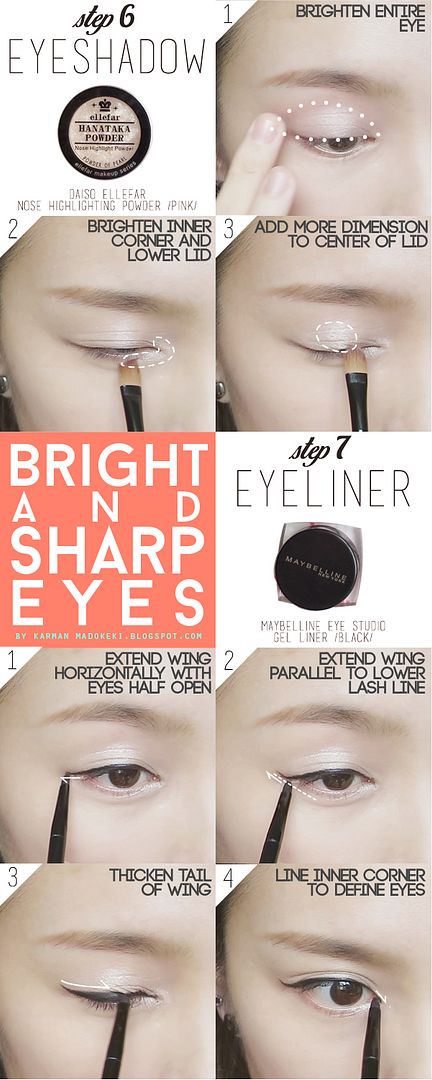
there's nothing new with how i draw my eyebrows, but just in case you haven't seen how i do it before, here's a rather detailed version :) i'm always using kate's designing eyebrow because that's the only brow product i have. of course you can use any matte brown eyeshadow that will suit your hair colour!

i thought a slightly arched brow will help with the awake look. also, since the frames are already pretty horizontal, i want to add some angles to my brows to differentiate it.


click on image to enlarge!


click on image to enlarge!

i did the demure kitten eyeliner here (but a little thicker and a longer wing), you can choose any eyeliner that complements your eyes :)


click on image to enlarge!MUST curl lashes to open up the eyes. it's VERY VERY important if you want your eyes to appear brighter and more awake behind the frames.

STEP 3: CHEEKS AND LIPS


click on image to enlarge!

if you only have a single colour blusher, you can still apply the same "gradient effect" rules, like in my previous tutorial where i spread a bit of colour over my entire cheek before going back in to intensify it. don't worry if you don't have the lip stain/lacquer/whatever you call it, use a lipstick and add gloss over it. we want a vibrant lip for this look.

i also made an instagram version :D


click on image to enlarge!

FINISHED LOOK____________________________________________________________

makeup glasses spectacles before after wing liner
from sleepy nerd to awake nerd :D

makeup glasses spectacles wing liner red lips madokeki
close up on face.

makeup spectacles glasses wing eye liner red lips madokeki
close up on face.


so here are my tips on makeup for glasses! hope it helped you in some way or another ;)

if you tried this look out, take a photo, share it on instagram and tag me @madokeki, because i'd love to see your version of it! remember to always tweak the makeup looks to suit yourself!

xoxo
karman
Minggu, 13 Juli 2014

Media Cheek Color A OR-1 (Swatch and Review)

Media Cheek Color A OR-1
Media Cheek Color A OR-1 (Swatch and Review)

i can't recall if i bought the PK-1 first, or this one first. i remember picking one up, tried it, loved the formula for the petite price i'm paying for, so i decided to pick another one up.

media is a brand under kanebo, it's a drugstore brand so it's price is really affordable. surprisingly, this is targeted at mature woman, so the finish of all of their product are very natural - colours are soft and diffused, not overly shimmery and glittery.

just like the PK-1, i feel that i get superb quality for the price i pay for it. this colour is slightly more pigmented than the PK-1, so i need lesser product to get colours on my cheeks. what's more, this orange shade looks really natural on me, imparting a slight sun-kissed look to my face. the powder is silky smooth, but not overly soft that may result in you picking up too much product at one go. it is also enriched with collagen (since it came from the same line).

it is slightly pearly too, giving me a natural sheen :) I LIKE.

Media Cheek Color A OR-1
it comes with a brush (made of horse hair?).

Media Cheek Color A OR-1

Media Cheek Color A OR-1
in the pan, it looks like a soft pastel orange. it's not too light, so it'll go well on most asian skintone.

Media Cheek Color A OR-1
concentrated swatch on the left, blended out on the right.

when applied on the hand, it appears redder than in the pan. it's actually quite pigmented as you can see from the blended side.
the orange looks like a beautiful coral on my skin, and that pearly sheen is less obvious in this colour than the PK-1. there are micro shimmers when viewed very closely, however they are almost invisible to naked eye when viewed from a normal distance.

Media Cheek Color A OR-1
seen from three different angles to show the sheen and finish.
the sheen is most obvious in the 2nd photo.


IMHO:
i need to make a confession here: I LOVE WHAT THIS BLUSH DOES TO MY SKIN! it gives me a very natural glow of colour, perhaps it's because the colour isn't a saturated orange. this really suited my skin tone, making me look that much more energetic and awake when i do wear this colour! and that slight sunkissed look is just adorable.

i love the texture of the powder - it's silky and creamy, the brush picks up just the right amount of product. as this shade is a little more pigmented than PK-1, i need lesser product for the colour to show through.

i've already mentioned before that i really like the blush. i use it most of the time, but there are times when i use the elf studio complexion brush for application over a wider area to get a more diffused look.

i bought this for HKD$49 in hongkong's aster.

MAKEUP LOOK:

Media Cheek Color A OR-1
applied across my cheeks for a natural glow.


applied on the apples of my cheek softly.

Media Cheek Color A OR-1
used as an eye shadow (together with PK-1)!

Media Cheek Color A OR-1 bourjois ambre d'or 32 blush
comparison with bourjois ambre d'or.