Tampilkan postingan dengan label media. Tampilkan semua postingan

Senin, 22 September 2014

Media Cheek Color A PK-1 (Swatch and Review)

Media Cheek Color A PK-1 (Swatch and Review)

i used to think that we only need one blusher, but i was wrong. i had a coral blusher prior to this, i thought i'd pick up a pink since i never tried pink. and i thought the japanese models carried baby pink on their face really nicely!

media is a brand under kanebo, it's a drugstore brand so it's price is really affordable. surprisingly, this is targeted at mature woman, so the finish of all of their product are very natural - colours are soft and diffused, not overly shimmery and glittery.

i feel that the quality of the product far exceeds the price of the blusher. i didn't want my blusher to be super pigmented as i feel that a sheer product gives me more control over the colour intensity. the powder is soft and is easily picked up. enriched with collagen as its moisturizing component, this blush claims to help with the moisture retention of your makeup. it contains micro pearl powder, giving it a very subtle and natural sheen to it when applied to my cheeks.

Media Cheek Color A PK-1 (Swatch and Review)
it comes with a brush (made of horse hair?), and i love using it! soft and very fluffy! for the price of HKD$49, you get 3.5g of product and a brush. why not?

Media Cheek Color A PK-1 (Swatch and Review)

Media Cheek Color A PK-1 (Swatch and Review)
in the pan, it looks like a beautiful reddish-pink. not too light like a pastel pink.

Media Cheek Color A PK-1 (Swatch and Review)
concentrated swatch on the left, blended out on the right.

when applied on the hand, it appears lighter than in the pan (maybe because it is not constrasted against my skin).
the pink looks more cool toned on my skin, and that pearly sheen is more obvious in this colour than the OR-1. there are micro shimmers when viewed very closely, however they are almost invisible to naked eye when viewed from a normal distance.

Media Cheek Color A PK-1 (Swatch and Review)
seen from three different angles to show the sheen and finish.

IMHO:
this is a nifty little blush that i enjoy using a lot. the fact that it's pearly means i can skip highlighter on my cheeks. this gives me a very natural glow. it's not overly pearly so i don't shine like a disco ball! i can use this to create soft romantic looks, or cute looks depending on where i apply this blush.

what i like the most is the brush that came with it. sometimes i use it to apply highlighter as well because it's soft and fluffy enough to disperse the product well. it's amazingly soft, so it's really nice for blending things out.

the only thing i wished for is.. a nicer packaging :X well, the packaging has no ultility and does not affect the quality of the blush at all, but i just like to see pretty things..! and the packaging is too simple to me. no frills design - hence the no frills price too.

i bought this for HKD$49 in hongkong's aster.

MAKEUP LOOK:

Media Cheek Color A PK-1 (Swatch and Review)
soft romantic: applied across my cheek bones.

Media Cheek Color A PK-1 (Swatch and Review)
young and fun: applied on the apples of my cheek, close to my eyes.

Media Cheek Color A PK-1 (Swatch and Review)
japanese gyaru style: applied across my cheek, as well as near my eyes.

Media Cheek Color A PK-1 (Swatch and Review)
used as an eyeshadow (together with OR-1)!

Minggu, 13 Juli 2014

Media Cheek Color A OR-1 (Swatch and Review)

Media Cheek Color A OR-1
Media Cheek Color A OR-1 (Swatch and Review)

i can't recall if i bought the PK-1 first, or this one first. i remember picking one up, tried it, loved the formula for the petite price i'm paying for, so i decided to pick another one up.

media is a brand under kanebo, it's a drugstore brand so it's price is really affordable. surprisingly, this is targeted at mature woman, so the finish of all of their product are very natural - colours are soft and diffused, not overly shimmery and glittery.

just like the PK-1, i feel that i get superb quality for the price i pay for it. this colour is slightly more pigmented than the PK-1, so i need lesser product to get colours on my cheeks. what's more, this orange shade looks really natural on me, imparting a slight sun-kissed look to my face. the powder is silky smooth, but not overly soft that may result in you picking up too much product at one go. it is also enriched with collagen (since it came from the same line).

it is slightly pearly too, giving me a natural sheen :) I LIKE.

Media Cheek Color A OR-1
it comes with a brush (made of horse hair?).

Media Cheek Color A OR-1

Media Cheek Color A OR-1
in the pan, it looks like a soft pastel orange. it's not too light, so it'll go well on most asian skintone.

Media Cheek Color A OR-1
concentrated swatch on the left, blended out on the right.

when applied on the hand, it appears redder than in the pan. it's actually quite pigmented as you can see from the blended side.
the orange looks like a beautiful coral on my skin, and that pearly sheen is less obvious in this colour than the PK-1. there are micro shimmers when viewed very closely, however they are almost invisible to naked eye when viewed from a normal distance.

Media Cheek Color A OR-1
seen from three different angles to show the sheen and finish.
the sheen is most obvious in the 2nd photo.


IMHO:
i need to make a confession here: I LOVE WHAT THIS BLUSH DOES TO MY SKIN! it gives me a very natural glow of colour, perhaps it's because the colour isn't a saturated orange. this really suited my skin tone, making me look that much more energetic and awake when i do wear this colour! and that slight sunkissed look is just adorable.

i love the texture of the powder - it's silky and creamy, the brush picks up just the right amount of product. as this shade is a little more pigmented than PK-1, i need lesser product for the colour to show through.

i've already mentioned before that i really like the blush. i use it most of the time, but there are times when i use the elf studio complexion brush for application over a wider area to get a more diffused look.

i bought this for HKD$49 in hongkong's aster.

MAKEUP LOOK:

Media Cheek Color A OR-1
applied across my cheeks for a natural glow.


applied on the apples of my cheek softly.

Media Cheek Color A OR-1
used as an eye shadow (together with PK-1)!

Media Cheek Color A OR-1 bourjois ambre d'or 32 blush
comparison with bourjois ambre d'or.

Selasa, 06 Mei 2014

How to apply makeup: Brows, cheeks, and lips


How to draw eyebrows, apply blusher, highlighter, and lip colour (for beginners)

finally getting down to the last part of whatever's remaining on the face: eyebrows, cheeks, and lips. it's been two weeks since the first installment of this series, hopefully no one actually walked around with a fully done base make up as well as eye makeup, but without the brows, cheeks and lips.

if you're blessed with extremely full and luscious brows, naturally rosy cheeks and healthy pink lips, good for you! i'm not that lucky, so it's essential to tie up the loose ends. you'd be surprised at how the lip colour can make such a big difference to the entire face! if the eyes are not the main point of the face, then it better be the lips. it's an either/or thing. the make up is not considered complete until i put on my lip colour to tie everything together to form a happy union.

watch the video if you haven't! it's quick and easy to follow :)


PRODUCTS USED____________________________________________________________


from left to right, anti clockwise:
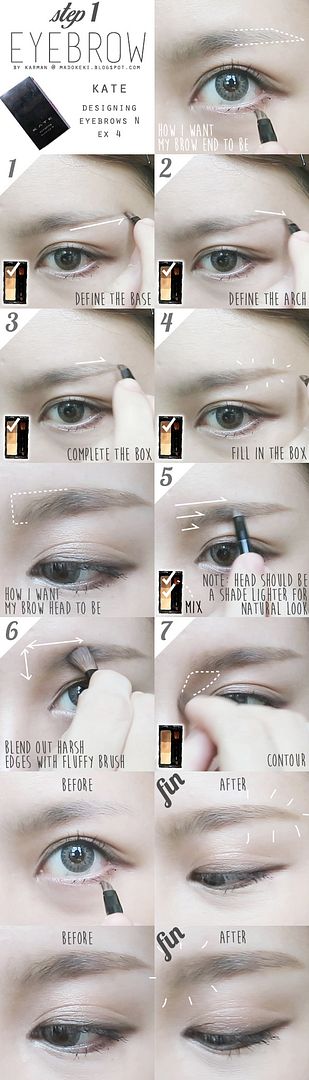
1. kate designing eyebrow N (EX-4)
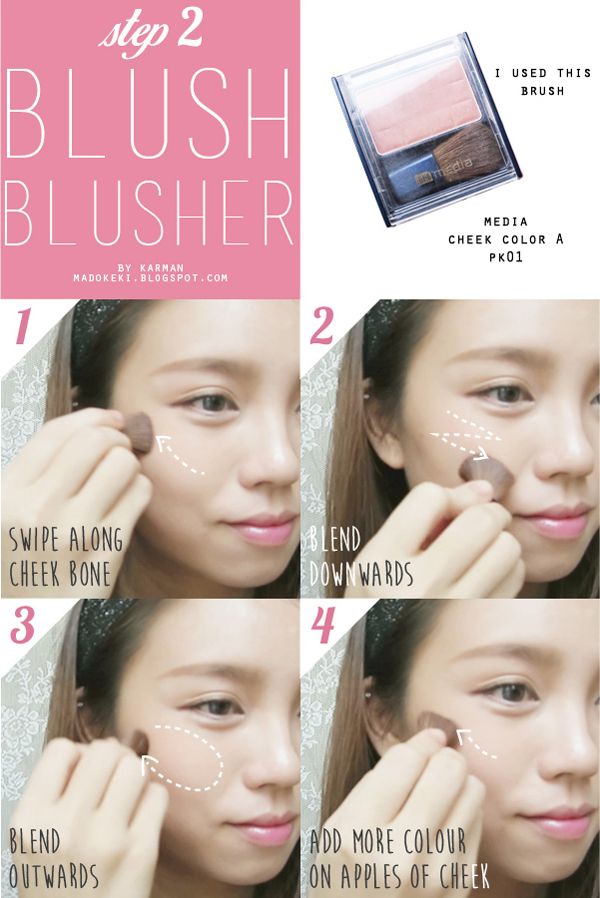
2. media cheek color A (PK-1)
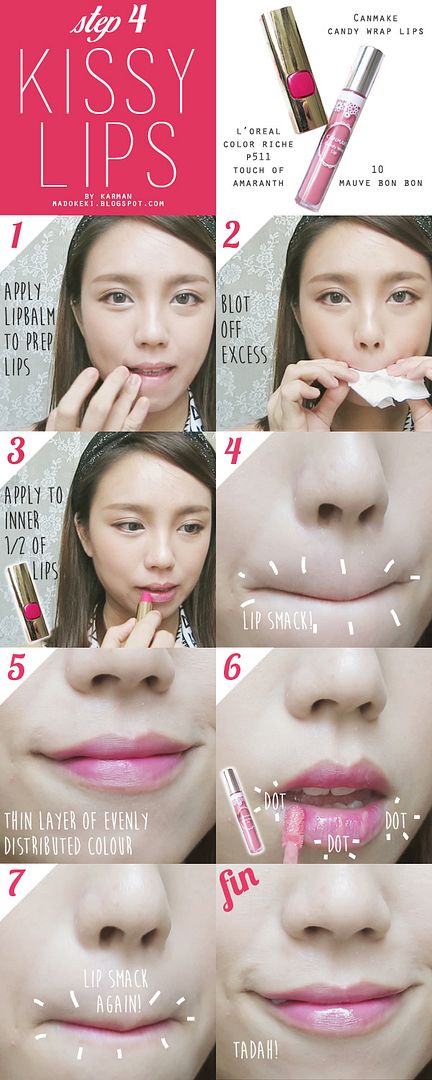
3. loreal color riche lipstick P511 touch of amaranth
4. canmake candy wrap lips 10 mauve bon bon
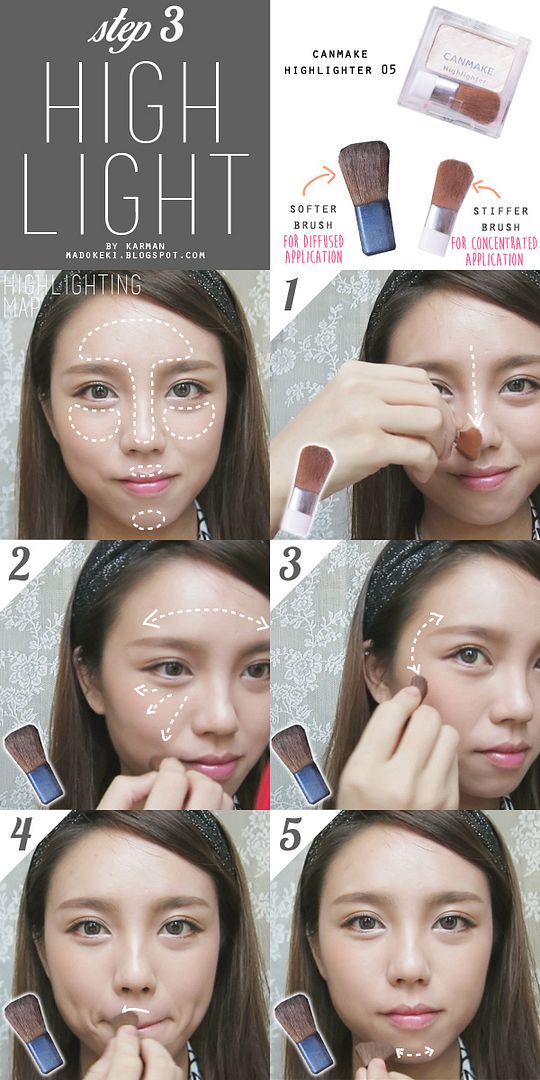
5. canmake highlighter 05

PICTORIAL_________________________________________________________________ 

for those of you who don't have the time to watch the video!


click on image to enlarge!


click on image to enlarge!


click on image to enlarge!


click on image to enlarge!

hope you all like this series, and the pictorials i made!
most importantly, i hope you found these useful :)

xoxo

karman

don't forget to check out the other entries from this series
Makeup For Beginners [part 1]: How to apply foundation
Makeup For Beginners [part 2]: How to apply eyeliner, eyeshadow, and mascara

Kamis, 17 April 2014

MakeUpDiary M.U.D. #9 NO MAKEUP MAKEUP


this is my version of a back-to-school makeup look.
i wanted it to look refreshing, so i paid extra attention in concealing my undereye circles and brightening that area.
minimal eye make up :P

FINAL LOOK

no makeup makeup
no one will believe you studied through the night looking this refreshed!


PRODUCTS USED

product used
1. maybelline lashionista mascara
2. canmake highlighter 05
3. sonia kashuk concealer hidden agenda 07
4. kate designing eyebrow N EX-4
5. kate gradical eyes BR-1
6. kanebo media cheek color A OR-1

(not in photo)
7. maybelline eye studio gel liner brown
8. revlon just bitten balm stain 045 romantic

COLOUR LEGEND

kate designing eyebrow N EX-4
using this as my eyeshadow on top of using it on my brows.
matte colours are able to contour my eyes naturally.

kate gradical eyes BR-1
only using the highlighting shade from this palette to do some highlighting!

COLOUR MAP


eyelid map
1. apply A all over lid.
2. apply B on the eyelid crease. blend.

lower lashline map
1. apply B on the lower lash line.
2. apply C on the inner corner, and the lower lid.

eyeliner map
1. draw the winged eyeliner. i drew a very thin line in my inner half, only thickening it towards the outer half. extend it just a little bit.
2. don't forget the mascara! i'm using the lashionista macara which gives very natural looking lashes. they lengthen quite well, so i really like using it for natural looking make up.


 THE LOOK

inu/neko 2
the highlight on the lower lid makes me look more refreshed and awake (or so i think)!

inu/neko 3
i really like this fresh faced look. i think guys will like it too!

the trick is using the matte colours to return the shadows to the eyes.
do you know that our eye lid has a slight tinge of colour on its own that gives it depth? after we apply our foundation, it'll cover those colours up, which ends up making my eyes look puffy and swollen. so it's essential to contour the eyes with a colour that is similar to the original eye lid colour to make it look natural again.

this, together with long and curled lashes are my secret to the no-makeup make up look! don't forget the mascara as it really helps to open your eyes, especially for light make up likes this, this will make you look more awake instantly!

xoxo
karman

Minggu, 30 Maret 2014

MakeUpDiary M.U.D. #8 VINTAGE ROSE

MakeUpDiary M.U.D. #8 VINTAGE ROSE

i did this look for a vintage themed photoshoot with my gf.
romantic pink with the classic winged eyeliner.

FINAL LOOK
no makeup makeup
going for that pin up look!

PRODUCTS USED


product used
1. kanebo media cheek color A PK-1
2. sonia kashuk concealer hidden agenda 07
3. maybelline eye studio gel liner black
4. heroine make long and curl mascara
5. revlon just bitten balm stain 045 romantic
6. maybelline hyperdiamond eyeshadow PK-1
7. kate designing eyebrow N EX-4
8. revlon colorburst lipstick 012 cherry ice (used as blush)

COLOUR LEGEND
maybelline hyper diamond PK-1
maybelline hyperdiamond eyeshadow,
only using 3 shades this time.
C is the main lid colour, A the contouring colour, and B the highlighting colour.

kate designing brow N EX 4
using the darkest shade of the brow powder to line my lower lash line,
giving it the illusion of natural fuller looking lashes.

COLOUR MAP

eyelid map
1. apply C all over lid.
2. apply a tiny bit of A on the crease and slowly work it in.
3. apply B to add dimension to the eyes.

lower lashline map
1. apply D on the lower lash line.
2. apply B on the lower lid to achieve the youthful eye look.

eyeliner map
1. draw the winged eyeliner. extend it!

 THE LOOK

vintage rose 2
i love the final look!
so elegant and classy :)

Selasa, 25 Maret 2014

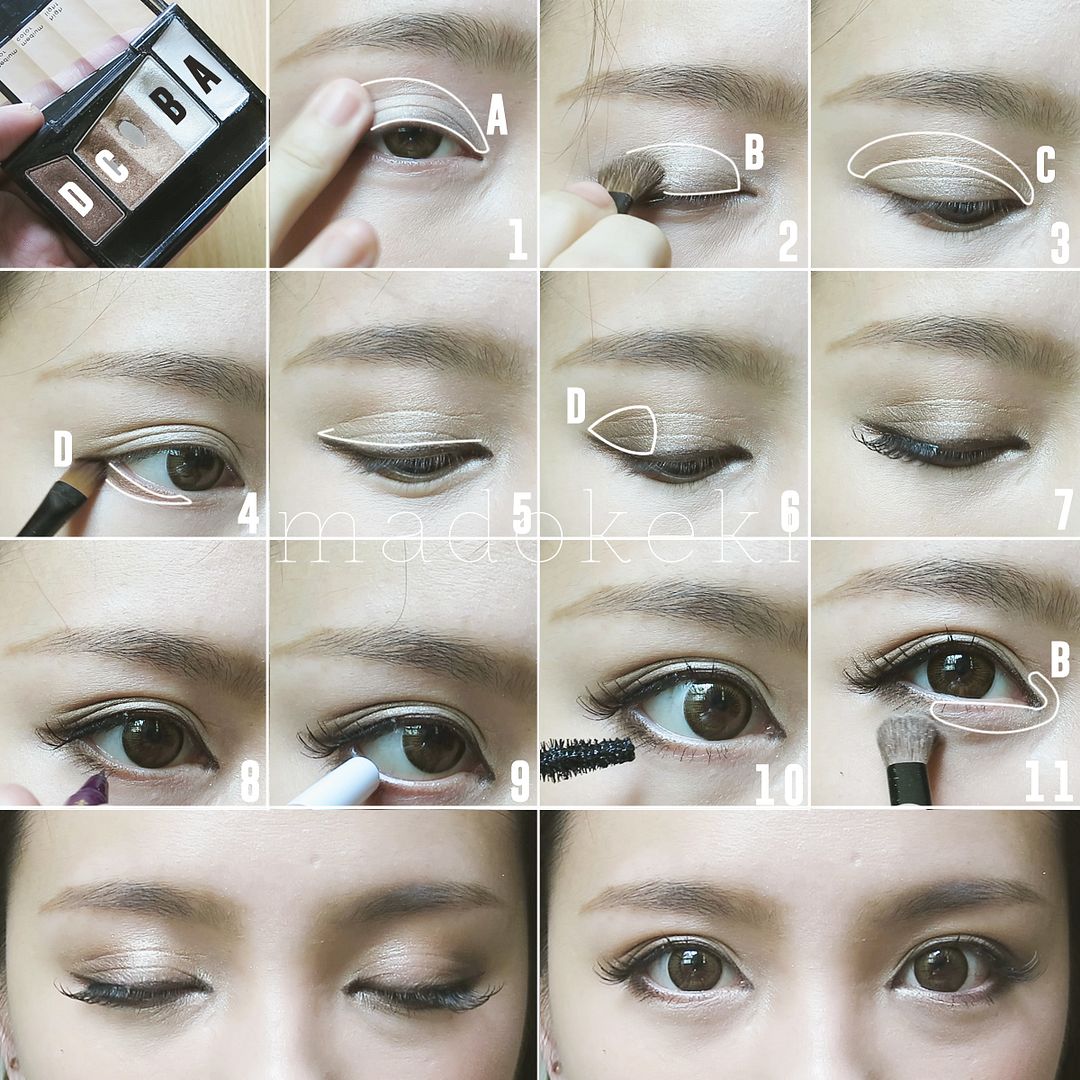
HOW TO enlarge your eyes with makeup! (with video tutorial)


How to enlarge your eyes with makeup

people always say make up does wonder, and boy it sure do!!!
with a little help from circle lenses, falsies, and eyeshadow, everyone can get bigger eyes!
do note that this look will require double eye lid tape if you have narrower double eyelid folds, this is because the added double lid width will add "height" to your eyes, making them look bigger.

check out this week's video tutorial ;)


read on for more info!


PRODUCT USED:________________________________________________________________


1. media cheek color A (PK-1)
2. canmake highlighter (05)
3. kate designing eyebrow N (EX-4)
4. catrice made to stay highlighter pen (010 eye like)
5. heroine make smooth liquid eyeliner
6. heroine make volume & curl mascara
7. maybelline eye studio gel liner (brown)
8. revlon colorburst lip butter (080 strawberry shortcake)
9. loreal shine caresse lip stain (801 princess)
10. kate gradial eyes A (BR-1)
11. demi lashes
12. (NOT IN PHOTO) GEO hurricane brown HC-104 circle lens.


i actually cut up a piece of false lash to get the pair of demi lashes,
just make sure the original lash is shorter on the outside and longer at the center.


the eyeshadow palette used for this look is the gradical eyes palette from kate,
it allows me to achieve a smooth gradient across my eyes easily :)

COLOUR MAP_______________________________________________________


1. apply the eyeshadow base A over the entire lid.
2. apply B, the highlighting shae on the centre of the lid.
3. using D to contour the eye lid fold/crease area.
4. add more depth to the outer corner of the eyes using E.


1. apply E onto the outer half of the lower lash line.
2. mix B and C together to highlight the inner corner and the inner half of the lower lash line.
3. using the liquid liner (5), draw tiny strokes on the lower lid to make it look like long lashes.
4. apply the pink highlighter pen (4) to the lower water line to open up the eyes.


when apply the falsh lash, extend it beyond the original lash line slightly as shown in the image above,
this will lengthen your eyes!
i also stuck them slightly away from my lash line towards the end to open up my eyes more.


the lashes look quite subtle form the front even though from the top it looks long and kind of unnatural.
the longer ends pulls the eyes longer, making them look bigger than they actually is :P

FINISHED LOOK________________________________________________________


before,


and after!

PICTORIAL____________________________________________________________

a step by step pictorial for the eyeshadow i did for instagram!


click to enlarge!

hope you enjoyed this look!