Tampilkan postingan dengan label loreal. Tampilkan semua postingan

Jumat, 12 Desember 2014

L'oreal Lucent Magique Touch Up Pen (Fair)

L'oreal Lucent Magique Touch Up Pen (Fair)

this was kind of an impulse buy. i've heard a lot about the YSL touche eclat highlighting pen. considering how loreal manufactures YSL's products, i can expect them to use similar formulations to achieve similar results, right? that's what i hope for, since i'm only paying a fraction of the cost for this little pen.

these are sold under the name "lumi" in the states. in asia, they're launched udner the lucent magique line.

IN A NUTSHELL:
1. very brightening
2. i can't tell if it really has the lit from within look
3. low concealing powder
4. rather thick consistency

L'oreal Lucent Magique Touch Up Pen (Fair)
the pen comes with a twist mechanism - twist the back and product will extrude from the plastic fiber tip. it takes about at least 3-5 clicks to get enough product streaming out for smooth application. there's no need to worry about getting too much product out at one twist.

the product claims to be infused with liquid light technology, a transparent liquid silver that helps to reflect light. !?!? i can't source any information on the "byron technology". but what this pen aims to do is to "cover" by reflecting.

you hear me right. if you can make something reflective like a mirror, then you won't be able to see what's behind the reflective surface, instead, you see light - the area will appear brighter and whiter.

L'oreal Lucent Magique Touch Up Pen (Fair) Ingredients
suggested instructions and ingredient list.

there are two colours in the series, fair and light.
fair has a pink undertone, while light has a yellowish undertone.


L'oreal Lucent Magique Touch Up Pen (Fair) Swatch
fair is a light pinkish beige, several tones lighter than my original skin tone.

once it blends out, it becomes more subtle and seeks to brighten in a subtle manner. it performs pretty horribly in flash, be warned.

IMHO

the highlighter pen is a different kind of highlight to me. as opposed to the pearly kind of highlighter that we're familiar with, this is more of a whitening kind of highlighter. most of the highlight is due to it being in such a fair shade when contrasted next to my skin. while it can't cover or colour correct my dark circles, it did reflect light in a way that made them less visible.

i really can't say much about the "lit from within" look when i use this product, as i've tried flashing myself with the camera flash wearing this on one side of my face and my normal concealer on the other, both of them appear to have the same kind of brightening effect.

perhaps the difference is only noticed under ambient light, as i did notice some "blurring" effect on my skin after i used this product.

the consistency is slightly thicker than what i expected, making it a little hard to blend unlike the foundation from the same series. it helps to use a little more product as it allows it to be blended a little easier. it dries down pretty quickly, so tap and blend fast.

i find that i can use this as a brightener on my face to substitute foundation if i just want a brighter look. i usually use my foundation as a brightener, but thanks to its packaging, it makes it much more easier to deposit products onto my face. i think they should totally consider packaging foundation in this kind of packaging next time, it makes it travel friendly too.

i purchased this for SGD$10 when it was on 50% off at john little.

Jumat, 05 Desember 2014

L'Oreal Lucent Magique Foundation

L'Oreal Lucent Magique Foundation
L'Oreal Lucent Magique Foundation N2 Pure Porcelain Swatch and Review

after eyeing for quite a while, i finally snapped it up when it went on 30% off in watson's. i thought i got a really good deal and was happy for a few weeks, until the next deal happened - buy 1 get 1 free. that's 50% off! WHATEVER!

i don't regret buying this anyway, because i LOVE it.

the entire lucent magique series aims for a lit-from-within look with its light infusing technology. from its official website, they say this is achieved with a silver transparent liquid that amps up the reflection.

L'Oreal Lucent Magique Foundation
it's quite a standard size for most foundation, fits in my hand nicely, and it has a pump. the gold part is just plastic paint though. i wish it's metal. i love the feeling of cold metal in my hand.


so gold. one of the things that loreal do to differentiate itself from their sister brand maybelline - loreal is more classy.


"first light creating foundation", oh really? :/ that's kind of misleading. the formula is oil free, while it's hydrating, don't expect it to lock in moisture for you.

it also comes with SPF 20, PA+++. however i didn't experience too much of the dreaded white cast that most foundation with SPF have.  

L'Oreal Lucent Magique Foundation Swatch N2
N2 pure porcelain is a light yellowish beige. N2 is the lightest shade they offer here in singapore.

after blending, it appears slightly fairer than my original skin tone. GOOD :) since i use this on the center of my face for brightening only. you can compare the way it looks under different lighting - in natural light it appears to have a white cast, but under flash it actually looks a lot more natural as light is reflected un-uniformly, which gives my hand dimension.

L'Oreal Lucent Magique Foundation Swatch N2
comparing between my hands, i almost couldn't tell which one has the foundation. this foundation performs very well in flash photography because it doesn't give that uniform white cast that most foundation product. instead, it reflects light according to your natural contours to highlight those areas. my hand on the left looks a little brighter than my hand on the right, also, it looks more dewy and hydrated, however, the "lit from within" effects is really subtle.

L'Oreal Lucent Magique Foundation N2 Pure Porcelain Swatch
i only applied the foundation on half of my face, can you tell which side? it's on the right hand side of the photo. this is one thin layer of foundation. coverage is pretty damn low (i used a flat foundation brush).

IMHO

the foundation has a very light coverage, you can build it up but it'll take quite a few layers. it can't cover up my blemishes on my forehead, but it brightens very naturally. this doesn't produce a white cast unless you've layered on too much.

the foundation is very runny and thin, which explains for the coverage of the product. it blends easily, and unlike the revlon colorstay, this won't set that quickly so you can have all the time in the world to blend. once it sets after some time, it is slightly sweat resistant. don't expect it to rival the colorstay in this aspect.

as for the lit from within look and all that light infusing and light creating claims.. i can't say that it's entirely bullshit since this foundation did manage to reflect light in a way that no other foundation that i currently own can, but i'm pretty sure if i were to mix my nature republic blending highlighter into my foundation, i can get much or less the same result.

what i love the most is how natural the brightening effect is, perhaps it's because this colour matches the undertone of my skin. i usually use a slightly pinkish product for brightening, which make look a little odd when i didn't blend it into the side of my face well enough.

the watery consistency also helps to achieve that light coverage.

as with all foundation, this will accentuate any dry skin. moisturizing before hand can reduce the appearance of dry skin.

while the brightening effect is really awesome, i can't agree to what it claimed - a dewy, k-pop look. it's not as dewy as i expected. i guess you'll need to get the primer (which you can use as a highlighter as well) to achieve that look. i have the liquid highlighter with me so it's fine.

i bought this from watson's for SGD$16.90.

IN A NUTSHELL
1. brightening and light weight
2. light to medium coverage
3. not long wear
4. diffuse light very naturally and beautifully (especially so in flash photography)

MAKEUP LOOKS


Minggu, 22 Juni 2014

L'oreal Shine Caresse 801 Princess (Swatches & Review)


L'oreal Shine Caresse 801 Princess

also known as the Colour Caresse Wet Shine Stain in america, this lip product is both a lip gloss and a lip stain. i guess the asian head quarters decided that the name is too long and shorten it to just shine caresse. 801 princess is equivalent to "coral tattoo" in america.

the lip stain aims to provide lasting moisture, while doing what a lip gloss don't usually do - to impart a vibrant and pigmented colour to your lips. in other words.. this is a very pigmented lip gloss.


applied thinly and spreaded out on the left, and applied thick on the right.


shine caresse 801 princess is a very vibrant orange. it was so vibrant that my camera almost failed to capture it's true colour, because it looks almost red. it actually appears redder whem i'm indoor under fluorescent light.

on its website it claims to give a lightweight colour, but the application is quite tacky in reality, not as lightweight as i thought it'd be (if i were to compare it to the nature republic by flower triple volume tint, the latter is more watery and hence more lightweight). it actually feels sticky and viscous, and yes, it's a hair magnet too. the finish is a glossy finish as expected, judging from the gooey-ness of the product. i don't know what's the usual percentage of water content in lip glosses, but this has 30% apparently, but i don't feel that it helps to keep my lips hydrated throughout the day even though it remains shiny. you know that feeling when your skin feels dehydrated even though on the surface it looks shiny and glossy? my lips just don't feel soft anymore after prolonged wear.

the pigmentation is alright, i like that i can control the level of pigmentation by toggling with the amount of product i wear. if i want to use this as a lip tint, i'll go light handed. conversely, i will wear at least 2 coats when i feel like wearing a bold orange lip.


this is a lipstain, i realized it takes some time for the staining action to occur. i wasn't able to capture the stain left by the product as i cleaned it off too quickly (within 5 minutes). but they do stain the lips after i tried to remove it at the end of the day, only realizing i can't. if you want to make sure you get all of them off, apply vaseline after removing your lip makeup with a lip makeup remover, give it a night before wiping the vaseline off your lips the next morning. you'll realize some of the colours that seeped into your skin will be transferred to the piece of tissue.

this product is scented, the best i can describe it is a lemon tea scent. a long time ago, the body shop used to have a perfume that is called lemon tea, and this smells exactly like that even though lemon tea in reality do not smell like this. but it got lodged in my scent memory as lemon tea from then onwards. i love this scent, and enjoy smelling it from my lips :) well, until the scent wears off (or is it because my nose got used to it?) that is.

IMHO:
i love the scent, i love the initial surge of moisture, i love the wet look, and of course the colour too. and i totally don't mind having to clean this off after a few hours to reapply again to get rid of that hidden dry feeling in the lips. it's weird, because a lip gloss is supposed to be more hydrating than a usual lipstick. maybe i shouldn't be greedy and just reapply when necessary :P

if you're looking for a bold lip colour with a wet and glossy finish, and would like to stain your lips so that you won't have to worry about the colour being uneven, you may like this product.

i bought this from guardian for $18.90 when it was having a promotion.

MAKEUP LOOK


Jumat, 30 Mei 2014

L'oreal RevitaLift Double Lifting Eye Cream [Full Review]

L'oreal RevitaLift Double Lifting Eye Cream
L'oreal RevitaLift Double Lifting Eye Cream and its Full Review

this may be the worst review i can ever do. worst in terms of quality because i realized i finished the bottle before i took any photos of the actual product, threw away the packaging that contains the list of ingredients.. and this was quite a while ago, so i have to recall based on memory.

from its website, it claims to

"Smoothes wrinkles under eye. Instantly lifts the eyelids."

" RevitaLift® Double Eye Lift is L’OrĂ©al’s first double-action eye treatment that combines two exclusive, complementary formulas: fortified Pro-Retinol A® to minimize under-eye wrinkles and puffiness and Pro-Tensium E to instantly firm and lift the upper eye area." 

claims are but claims.


L'oreal RevitaLift Double Lifting Eye Cream

even though i already threw out the packaging, nothing is impossible with google.

from paula's choice,

Water, Glycerin, Cyclopentasiloxane, Alcohol Denat., Isocetyl Stearate, Butylene Glycol, Lithium Magnesium Sodium Silicate, PEG-100 Stearate, Cera Alba (Beeswax), Glyceryl Stearate, PEG-20 Stearate, Stearyl Alcohol, Cetyl Alcohol, Acrylamide/Sodium Acryloyldimethyltaurate Copolymer, Stearic Acid, Caprylyl Glycol, Isohexadecane, Acetyl Trifluoromethylphenyl Valylglycine, Triethanolamine, Retinyl Palmitate, Polysorbate-80, Polycaprolactone, Methylparaben, Diazolidinyl Urea, Butylparaben, Chlorphenesin, Yellow 10, Red 33, Fragrance, Linalool, Benzyl Salicylate, Citronellol, Alpha-Isomethyl Ionone, Geraniol, Limonene, Coumarin, Hydroxyisohexyl 3-Cyclohexene Carboxaldehyde, Butylphenyl Methylpropional

looking at the ingredient list, this thing should hydrate the eye area at the very least. after sifting through the ingredients that makes up the bulk volume of the cream and gel, what's left is probably the active ingredients: retinyl palmitate, which is probably the pro-retinol a. i have no idea where is pro-tensium e. but you know what? it doesn't matter at all.
L'oreal RevitaLift Double Lifting Eye Cream
the cream comes in a double tube packaging. one pump is sufficient for both eyes unless you have eyes as big as the big grey wolf.

the colour of the pump corresponds to the colour of the product.

the white cream is meant for the under eye to get rid of wrinkles. it doesn't have a fragrance, but it has a scent to it. it's a scent that's quite off putting because it smells like chemicals. it has a texture of a rich cream.

the red gel cream is meant for the upper eye to give it an instant lift. it doesn't have a fragrance too, and is unscented, unlike the white cream. this is a gel based cream which will dry up to reddish gel balls when left in the air for excessively long period of time.

IMHO

remember i said that the ingredients doesn't matter at all? because this thing didn't work for me. so there's no point in trying to point out the ingredients that make it work. i got this cream with the intension of helping with my puffy eyes. obviously, i have gotten the wrong product for this purpose. i admit i got carried away when it claims to get rid of "under-eye wrinkles and puffiness". they must be talking about a different kind of puffiness, like, saggy kind of puffiness. mine are water retention, what i needed was probably a product loaded with caffeine.

i didn't experience any eye lifting action too. i thought i can see myself transform into mulan, but no.

as this product didn't meet my needs, i won't be repurchasing this.

i purchased this for ~SGD$16.

Selasa, 06 Mei 2014

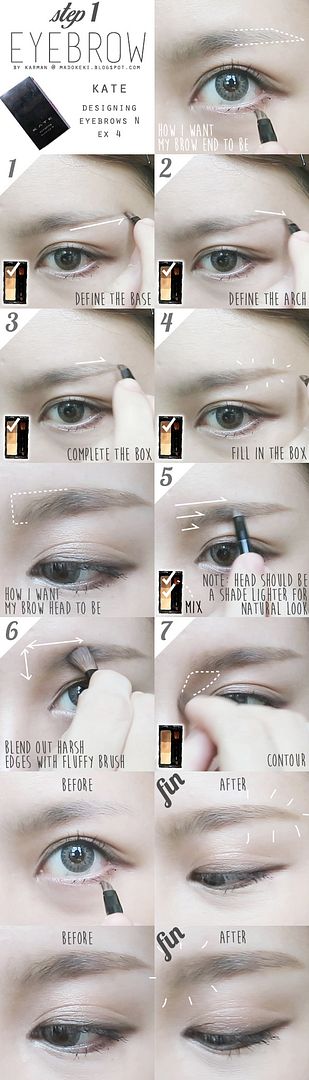
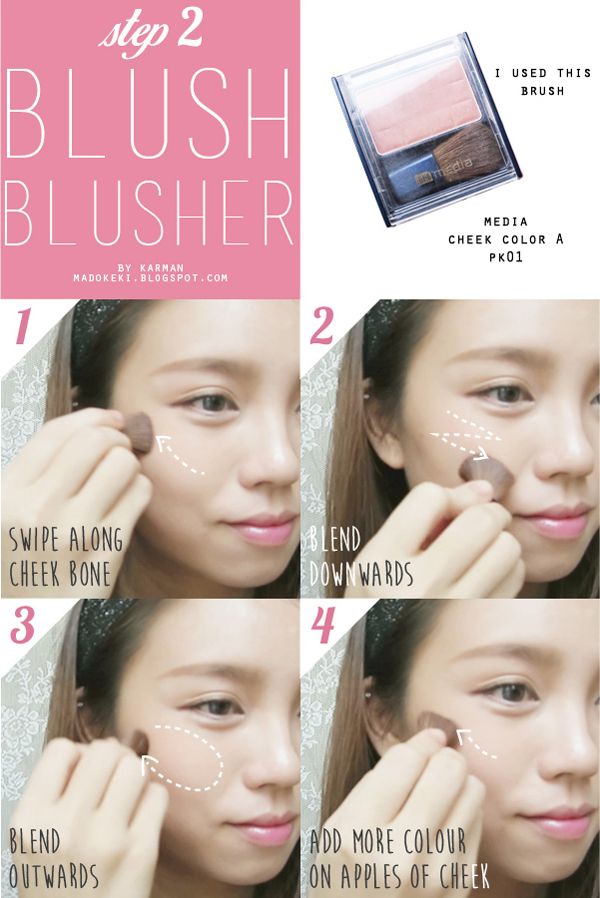
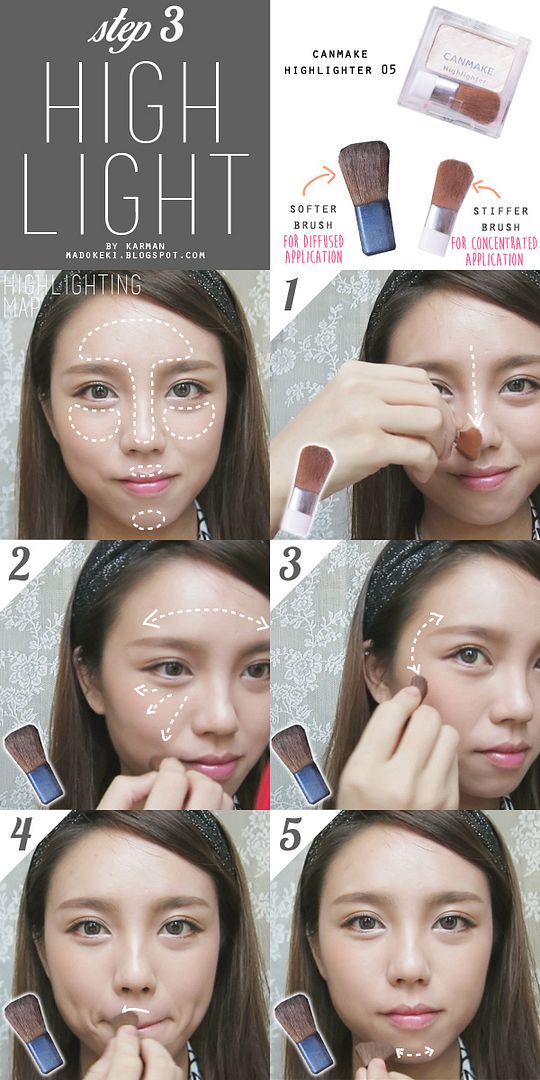
How to apply makeup: Brows, cheeks, and lips


How to draw eyebrows, apply blusher, highlighter, and lip colour (for beginners)

finally getting down to the last part of whatever's remaining on the face: eyebrows, cheeks, and lips. it's been two weeks since the first installment of this series, hopefully no one actually walked around with a fully done base make up as well as eye makeup, but without the brows, cheeks and lips.

if you're blessed with extremely full and luscious brows, naturally rosy cheeks and healthy pink lips, good for you! i'm not that lucky, so it's essential to tie up the loose ends. you'd be surprised at how the lip colour can make such a big difference to the entire face! if the eyes are not the main point of the face, then it better be the lips. it's an either/or thing. the make up is not considered complete until i put on my lip colour to tie everything together to form a happy union.

watch the video if you haven't! it's quick and easy to follow :)


PRODUCTS USED____________________________________________________________


from left to right, anti clockwise:
1. kate designing eyebrow N (EX-4)
2. media cheek color A (PK-1)
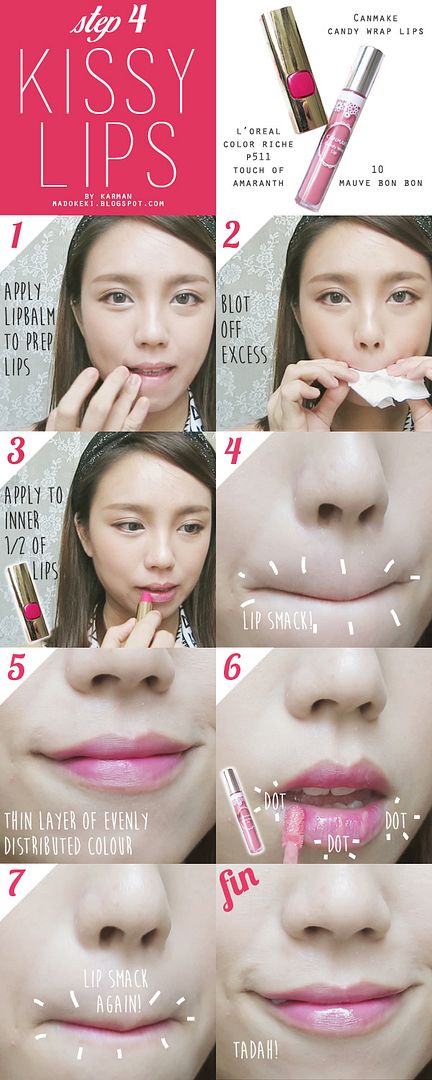
3. loreal color riche lipstick P511 touch of amaranth
4. canmake candy wrap lips 10 mauve bon bon
5. canmake highlighter 05

PICTORIAL_________________________________________________________________ 

for those of you who don't have the time to watch the video!


click on image to enlarge!


click on image to enlarge!


click on image to enlarge!


click on image to enlarge!

hope you all like this series, and the pictorials i made!
most importantly, i hope you found these useful :)

xoxo

karman

don't forget to check out the other entries from this series
Makeup For Beginners [part 1]: How to apply foundation
Makeup For Beginners [part 2]: How to apply eyeliner, eyeshadow, and mascara

Kamis, 03 April 2014

make up haul #1 and their short reviews

Make Up/Cosmetic Haul
Make Up Haul #1 (and a very short review) for the year of 2014

i prefer to collect beauty purchases because it makes me think that i'm not dealing a heavy blow to my wallet. self deception at its best!

over the first quarter of the year i've added a few items to my make up collection.

essence sun club shimmer bronzing powder in 10 sunkissed is really more of a shimmer than a bronzer, perhaps it'll work better as a bronzer on very fair skin. not a big fan of the vanilla scent.

bourjois small little round pot blush in 32 ambre d'or is a beautiful orange toned blush flourished with golden specks of metallic dust, it's too small to be called a glitter or shimmer. it imparts a beautiful glow to the face, i love to use it as either a blush or an eyeshadow.

catrice made to stay highlighter pen in 010 eye like! is a pink toned shimmery highlighting pen that really does what it claims - it is made to stay! perfect for lining the waterline and lower lids where it's prone to smudging or creasing.

l'oreal color riche lipstick in P511 touch of amaranth is a super pigmented and creamy lipstick in one of my favourite colour right now - hot pink. it's a pretty blue based pink which shows me gorgeously on photos, it helps to brighten up my skintone too! not sure if this is a good thing, it stains your lips.

l'oreal lucent magique liquid light touch-up pen in fair is supposed to help diffuse light off your face to fill out any sunken areas. i've yet to give this a good try, full review will be up soon!

what are your latest beauty buys?

xoxo
karman

Selasa, 25 Maret 2014

HOW TO enlarge your eyes with makeup! (with video tutorial)


How to enlarge your eyes with makeup

people always say make up does wonder, and boy it sure do!!!
with a little help from circle lenses, falsies, and eyeshadow, everyone can get bigger eyes!
do note that this look will require double eye lid tape if you have narrower double eyelid folds, this is because the added double lid width will add "height" to your eyes, making them look bigger.

check out this week's video tutorial ;)


read on for more info!


PRODUCT USED:________________________________________________________________


1. media cheek color A (PK-1)
2. canmake highlighter (05)
3. kate designing eyebrow N (EX-4)
4. catrice made to stay highlighter pen (010 eye like)
5. heroine make smooth liquid eyeliner
6. heroine make volume & curl mascara
7. maybelline eye studio gel liner (brown)
8. revlon colorburst lip butter (080 strawberry shortcake)
9. loreal shine caresse lip stain (801 princess)
10. kate gradial eyes A (BR-1)
11. demi lashes
12. (NOT IN PHOTO) GEO hurricane brown HC-104 circle lens.


i actually cut up a piece of false lash to get the pair of demi lashes,
just make sure the original lash is shorter on the outside and longer at the center.


the eyeshadow palette used for this look is the gradical eyes palette from kate,
it allows me to achieve a smooth gradient across my eyes easily :)

COLOUR MAP_______________________________________________________


1. apply the eyeshadow base A over the entire lid.
2. apply B, the highlighting shae on the centre of the lid.
3. using D to contour the eye lid fold/crease area.
4. add more depth to the outer corner of the eyes using E.


1. apply E onto the outer half of the lower lash line.
2. mix B and C together to highlight the inner corner and the inner half of the lower lash line.
3. using the liquid liner (5), draw tiny strokes on the lower lid to make it look like long lashes.
4. apply the pink highlighter pen (4) to the lower water line to open up the eyes.


when apply the falsh lash, extend it beyond the original lash line slightly as shown in the image above,
this will lengthen your eyes!
i also stuck them slightly away from my lash line towards the end to open up my eyes more.


the lashes look quite subtle form the front even though from the top it looks long and kind of unnatural.
the longer ends pulls the eyes longer, making them look bigger than they actually is :P

FINISHED LOOK________________________________________________________


before,


and after!

PICTORIAL____________________________________________________________

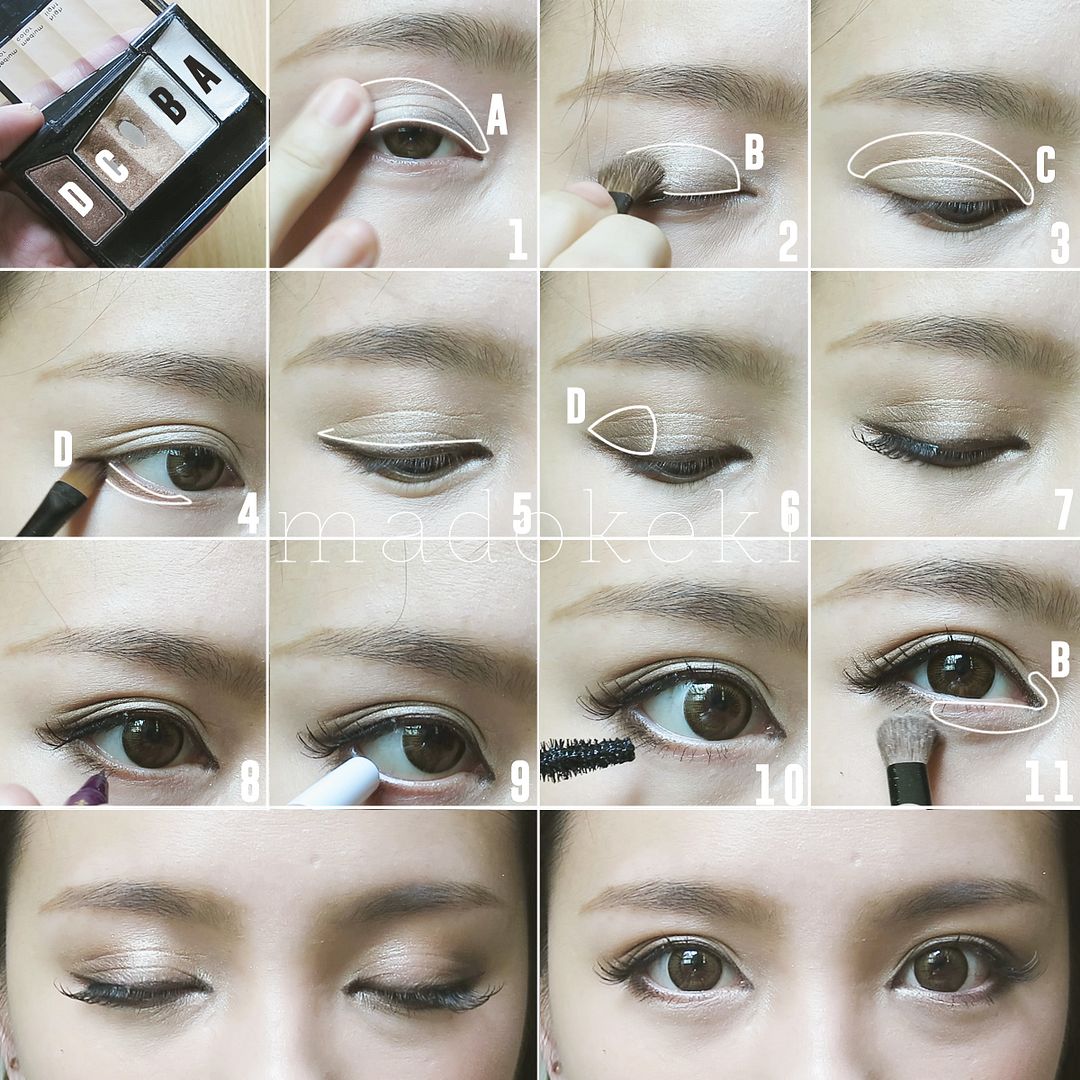
a step by step pictorial for the eyeshadow i did for instagram!


click to enlarge!

hope you enjoyed this look!

Jumat, 21 Maret 2014

l'oreal color riche P511 touch of amaranth (Swatch)

L'oreal Color Riche Lipstick P511 Touch of Amaranth

firstly, a girl can never have too many lipsticks even though we only have 1 pair of lips.
secondly, you'd think "just how many different shades of red, pink, corals, and plums are there?", my answer is.. almost close to the number of stars in the universe. HAHAHAH!

the l'oreal color riche lipstick impresses me with its classy packaging, shiny shiny gold casing (it does attract finger prints though, but hey, that's life!), with a plastic "jewel" that reflects the colour of the lipstick within. sorry, i know i'm getting carried away by it's appearance.. but packaging do matter!
of course, what matters the most is still what's inside.
i am in love: a super creamy formula and awesome pigmentation.

the lipstick is unscented.


L'oreal Color Riche Lipstick P511 Touch of Amaranth

L'oreal Color Riche Lipstick P511 Touch of Amaranth
i really love the gold packaging :D

L'oreal Color Riche Lipstick P511 Touch of Amaranth Swatch
one swipe is enough to get this opacity!!!

L'oreal Color Riche Lipstick P511 Touch of Amaranth Swatch
my bare lips vs after applying the lipstick.

P511 is a bright blue based hot pink with no shimmer or glitter, JUST PURE COLOUR. what can i say, this lipstick is SUPER PIGMENTED! no signs of my original lip colour after application.
i prefer to have a softer lip line, so i applied the lipstick onto the inner part of my lips before blending it out to achieve this effect. the inner parts shows the true intensity of the lipstick.

the lipstick melts onto my lips smoothly and glides over it to deposit a thin layer of product, hence the lightweight feel of the overall application. the colour is really intense considering how much product there is on my lips (it feels close to nothing!). this is a creamy finish lipstick, but it's not slick like the revlon lip butter. it feels like the chanel rouge coco shine actually, but packed with even more pigments than that! the sheen does wear off over some time to reveal a matte lip colour.

this lipstick is unscented.

L'oreal Color Riche Lipstick P511 Touch of Amaranth Swatch
don't this shade look gorgeous!? i think it is able to bright up my entire skin tone!

IMHO:
i daresay i love everything about this lipstick. the colour, the application, the finish, as well as the wear time. even though this is a creamy formula and i do expect to get transfers, if i do decide to blot it with a tissue paper after fresh application, it will get most of the oils out of the lipstick and what remains is a thin layer of pigments on my lip - looking very much like a stain, and that stain lasts the entire day. after prolong wear, the sheen will wear off on it's own and i get the same effect as blotting it off with the tissue. this product did not emphasize my lip lines, nor did it visibly settle into any of them. i love using this to create korean makeup as the matte stain makes it look like it's my natural lip colour :X fake it until i make it!

it stains the lips a great deal. good for you if you don't like to touch up your lip colour. bad for people who tries to scrub it off at the end of the day!

i got this from guardian when it was having sales for SGD$16.

MAKEUP LOOK