Tampilkan postingan dengan label japanese make. Tampilkan semua postingan

Jumat, 06 Maret 2015

VISEE 2015 Spring MakeUp

VISEE 2015 Spring MakeUp
Get ready for un unconventional spring look

the theme is classical glam this spring! that's rather bold for visee to try something different (because most brands are totally pushing the pastel and soft shades, see jill stuart). i embrace differences, because it adds to the variety. as always, there're no hard rules in makeup! it's fresh to see something other than the usual pastels to be honest. also, who actually wears pastel eyeshadows!?

let's take a look at the new items that's released this spring.

VISEE nudy rich eyes be-7 
NUDY RICH EYES BE-7 is an ash beige eyeshadow. the nudy rich series help you create natural dimensions with its 5 shades.

VISEE super slim gel liner  
SUPER SLIM GEL LINER is a 1.5mm slim gel eyeliner pencil, probably really awesome for drawing that flick at the end of the eye.
comes in three colours, BK001 (DISTINCT BLACK), BR320 (NATURAL BROWN), GR720 (STYLISH KHAKI)

VISEE eyebrow pencil
EYEBROW PENCIL comes in 4 spanking new shades:
GY001 olive grey (warm toned)
BR303 pinkish brown (warm pink brown)
BR304 ash brown (cool ash brown)
BR305 dark brown (mature-ish dark brown)

VISEE color polish lipstick
COLOUR POLISH LIPSTICK is a new lipstick line. it pigmented and shiny, giving your pouts a voluminous look. comes in 10 shades.
RD421 - described as a pure red, it is featured in the classical glam look.
BE320 - a cool toned pink beige, featured in the casual glam look.
PK820 looks like a electric hot pink from my monitor :P i'm eyeing it very intently.

VISEE classical glam
CLASSICAL GLAM makeup points:
skin tone nude eyes
sharp defining black eyeliner
red lips
click here for a simple tutorial and list of items used for this look!

VISEE casual glam
CASUAL GLAM makeup points:
natural beige brown eyes
modern khaki eyeliner

the most eye catching things in this line up are perhaps the COLOUR POLISH LIPSTICK and the SUPER SLIM GEL LINER. the addition of a screw brush to the back of the EYEBROW PENCIL is a nice touch too :) i might just pick up their eyebrow pencil instead of kate's because of the brush!

QUESTION
fingers crossed that the lipsticks are available in hong kong by the time i'm back. are there any colour you'd like me to swatch? LEAVE ME A COMMENT TO LET ME KNOW!

image credits: official visee website

Selasa, 02 September 2014

Japanese Harajuku Makeup (Zipper Inspired)


Japanese Harajuku Makeup (Zipper Inspired)

minna-san konnichiha (konnichiwa)! that's about as much japanese i can speak, but i can't help it because wearing such a japanese look make me wanna speak some japanese (even if mine is really bad).

if you don't know what is Zipper, here's a front page of the magazine that focuses on harajuku fashion that targets young teenage girls, which sort of explains the loud colours and style.


there're many different models in the magazine, the more well known one is probably amo (i've done an inspired look meant for daily wear before). this time, i am more interested in another model by the name of ayumi as her vibrant and colourful makeup is something i find really interesting.


inspiration for the look i did!


the main points of the look are:
1. very fair skin
2. light coloured eyebrow
3. vibrant/pastel/light colours on the eyes and winged kitty eyes
4. blusher is applied above cheek bone and below eyes
5. berry toned lips (the only thing that's slightly darker on the entire face)

watch the video tutorial here!


PRODUCTS USED____________________________________________________________


from left to right, clockwise:
1. etude house precious mineral any cushion W13
2. kate mineral powder foundation OC-B
3. kate designing eyebrow N EX-4
4. heavy rotation coloring eyebrow 03
5. revlon super lustrous matte lipstick 010 wine not
6. makeon super long lasting waterproof gel pencil liner S05 gold
7. canmake highlighter 05
8. canmake glow fleur cheeks 04
9. canmake color stick 09
10. maybelline hyper diamond shadow PK-1
11. maybelline eye studio lasting drama gel liner BLACK
12. loreal color riche lipstick P511 touch of amaranth
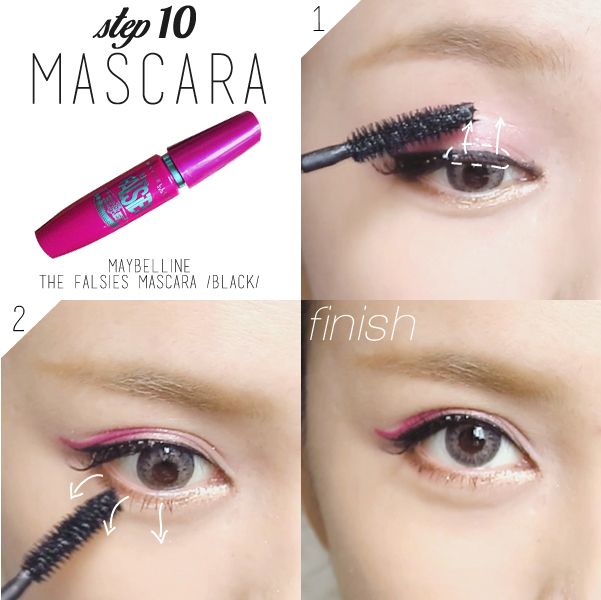
13. maybelline the falsies mascara BLACK


BRUSHES USED:

1. elf studio complexion brush
2. kate eyeliner brush (cut into an angled brush for eyebrow)
3. maybelline eyeliner brush
4. generic flat top eyeshadow brush


PICTORIAL_________________________________________________________________

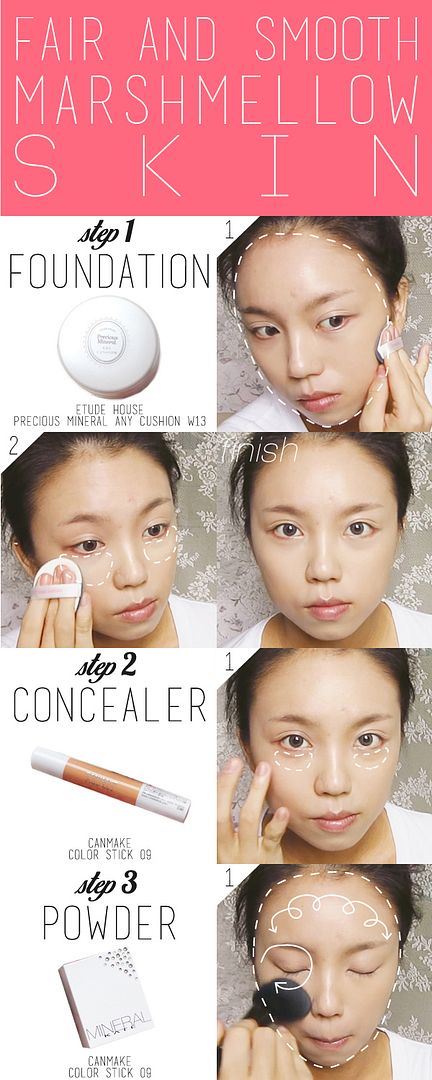
simple pictorial to supplement the video! i've marked out all the different areas for different products!

FACE:

if you are just like me with slightly darker and yellower skin, you'd want to apply the foundation over the entire face generously. making sure to brighten the area under the eyes especially. conceal any dark circles and set with a powder after that.

marshmellow skin is referring to the soft and smooth skin of a marshmellow, japanese dig that!!! to prevent caking, it's best to apply the powder with a large fluffy brush.


click on image to enlarge!

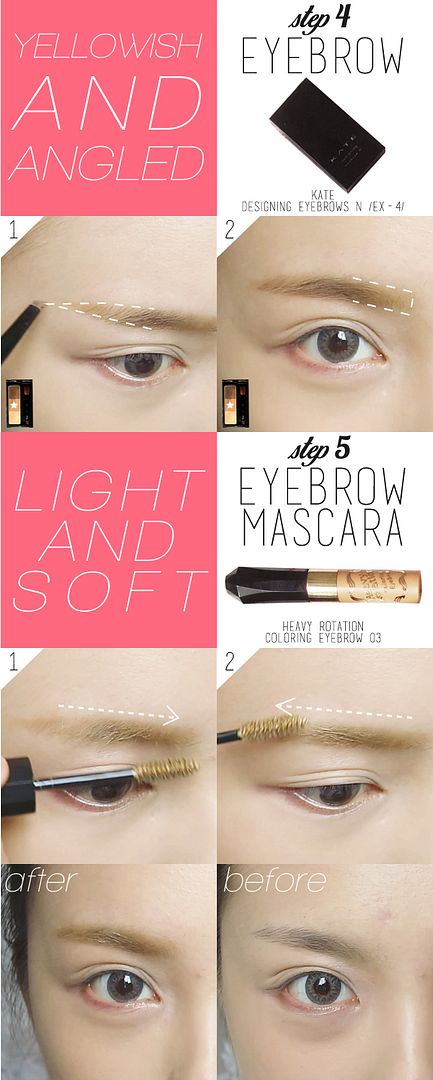
EYEBROWS:

i think japanese brow products tend to be on the yellowish side because people usually dye their hair towards that side of the colour spectrum. so much so that yellowish and light coloured eyebrow soon became the "japanese eyebrow". of course, it has got to be slightly angled upwards too! arch is optional.


click on image to enlarge!


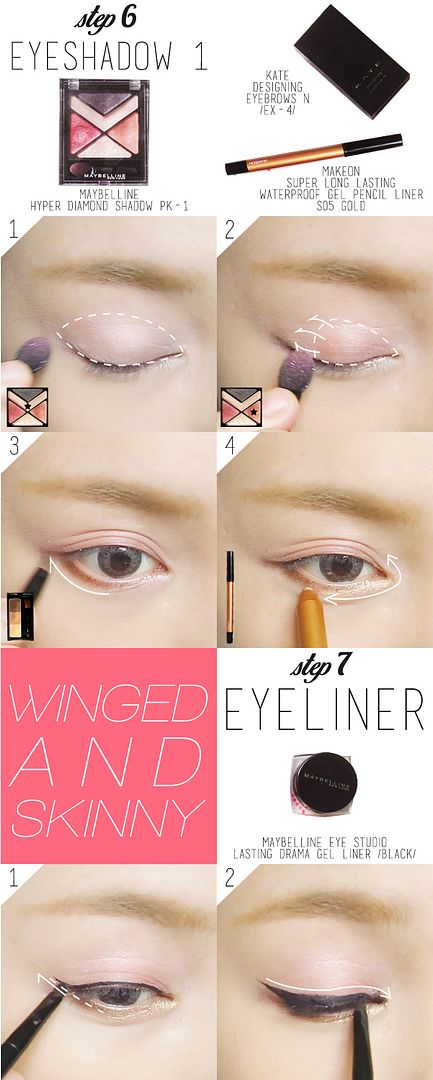
EYES:

this time's instruction for the eyes seems a little more complicated than usual because i keep going back and forth with the eyeshadow. you save the eyeliner for the last step if you know exactly where to put the pink colour. i only did my eyeliner first because it gives me a guide for filling in the pink later on.

do keep all of the colours WITHIN your eyelid folds so that when you open your eyes, the lid area above your folds are clean.

try your best to give yourself a really elongated wing that's pretty steep because it helps to give you kitty eyes (which is another point of this look).


click on image to enlarge!

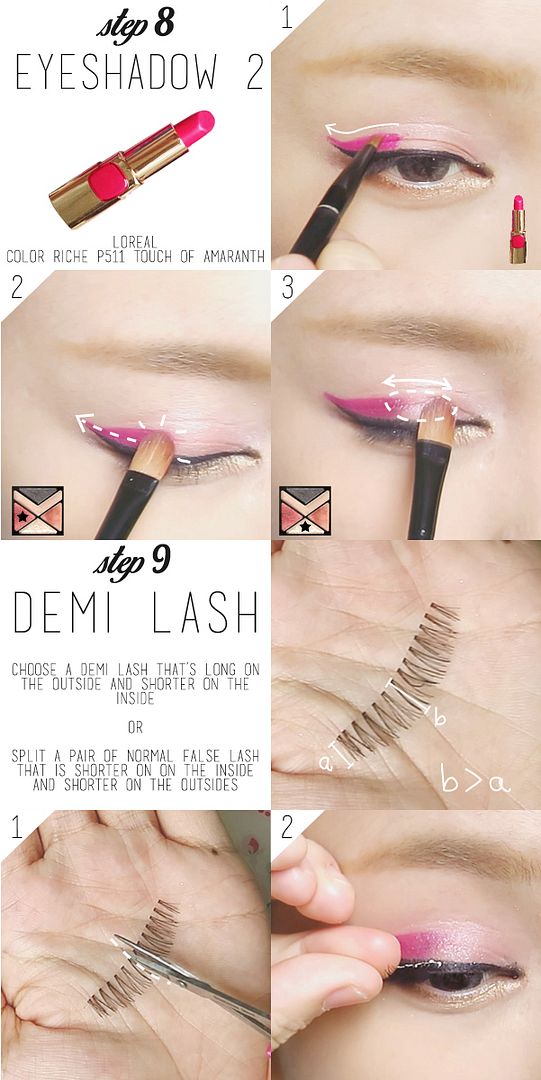
if you have a pink eyeliner that's long lasting and waterproof, you can skip part 2 of step 8 as it's mean to set the lipstick. fill in the pink lipstick on the entire width of your eyelid fold, do not go beyond that.

false lashes are optional, but if you like to, choose those that are longer on the outside to enhance that kitty look. remember to curl your lashes first!


click on image to enlarge!

apply mascara on parts of the lashes that aren't covered by the falsies. load up on the lower lashes too! looking at the photo, i should have went for another 3 coats.


click on image to enlarge!

CHEEKS AND LIPS:

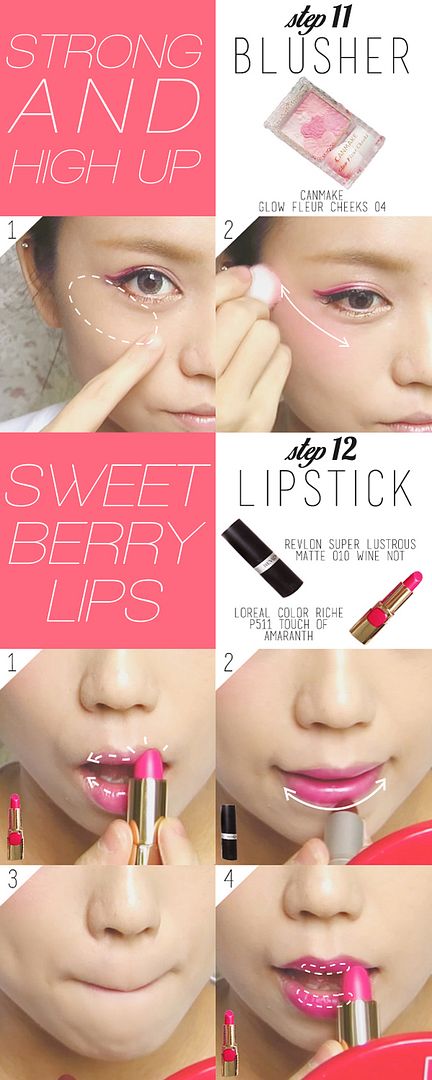
probably the most distinctive part of the zipper harajuku makeup: the placement of the blusher. it's between the highest point of your cheek bone and the lower lash line. you can choose to work from below the eyes and slowly bring it down, or do it like me - starting from the cheek bones, bring it up. it doesn't really matter since we'll make sure that the entire area will be just as pigmented in colour. smoothen out any edges and boundaries.

i used 2 lipsticks for my lips to create the berry shade as i don't have such a lipstick yet. if you already have one, just use it!


click on image to enlarge!

CONTOURING:

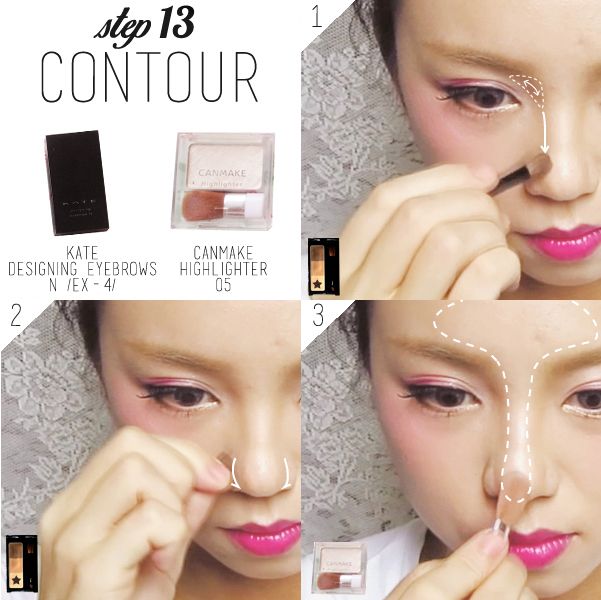
this isn't a main point of the makeup, but it's essential as we have lightened up our face (which takes away the natural contours). focus on the nose bridge, especially the triangular area between the eyebrow and nose bridge. you can ignore the rest of the contouring (especially if you're used to the western style) because this look IS MADE FOR PEOPLE WITH CHUBBY FACE LIKE ME. round is good :D

i had to sharpen the tip of my nose a little because most japanese have a skinny nose bridge!


click on image to enlarge!


FINISHED LOOK____________________________________________________________

i REALLY REALLY LOVE this look i created. but the sentiments seem to be divided amongst my girl and guy friends. girls find it really cute and dolly looking, while guys.. they just don't know how to appreciate it.

feel free to play around with the colours on the eyes! the most important thing is to lighten the skin with a foundation so that the lighter shades will show up well on the skin. next time i'll attempt a pastel look.

while this may not be the most useful makeup tutorial i've created since this is hardly a daily look for most of us, it's fun to play around with makeup once in a while right? and also to prepare us for the day we set foot in japan so that we can look like one of them :'D


i played around with photoshop to "dye" my hair HAHAHHA which looks the best!?

hope you like the look and find this sharing useful!

xoxo
karman

Selasa, 25 Maret 2014

HOW TO enlarge your eyes with makeup! (with video tutorial)


How to enlarge your eyes with makeup

people always say make up does wonder, and boy it sure do!!!
with a little help from circle lenses, falsies, and eyeshadow, everyone can get bigger eyes!
do note that this look will require double eye lid tape if you have narrower double eyelid folds, this is because the added double lid width will add "height" to your eyes, making them look bigger.

check out this week's video tutorial ;)


read on for more info!


PRODUCT USED:________________________________________________________________


1. media cheek color A (PK-1)
2. canmake highlighter (05)
3. kate designing eyebrow N (EX-4)
4. catrice made to stay highlighter pen (010 eye like)
5. heroine make smooth liquid eyeliner
6. heroine make volume & curl mascara
7. maybelline eye studio gel liner (brown)
8. revlon colorburst lip butter (080 strawberry shortcake)
9. loreal shine caresse lip stain (801 princess)
10. kate gradial eyes A (BR-1)
11. demi lashes
12. (NOT IN PHOTO) GEO hurricane brown HC-104 circle lens.


i actually cut up a piece of false lash to get the pair of demi lashes,
just make sure the original lash is shorter on the outside and longer at the center.


the eyeshadow palette used for this look is the gradical eyes palette from kate,
it allows me to achieve a smooth gradient across my eyes easily :)

COLOUR MAP_______________________________________________________


1. apply the eyeshadow base A over the entire lid.
2. apply B, the highlighting shae on the centre of the lid.
3. using D to contour the eye lid fold/crease area.
4. add more depth to the outer corner of the eyes using E.


1. apply E onto the outer half of the lower lash line.
2. mix B and C together to highlight the inner corner and the inner half of the lower lash line.
3. using the liquid liner (5), draw tiny strokes on the lower lid to make it look like long lashes.
4. apply the pink highlighter pen (4) to the lower water line to open up the eyes.


when apply the falsh lash, extend it beyond the original lash line slightly as shown in the image above,
this will lengthen your eyes!
i also stuck them slightly away from my lash line towards the end to open up my eyes more.


the lashes look quite subtle form the front even though from the top it looks long and kind of unnatural.
the longer ends pulls the eyes longer, making them look bigger than they actually is :P

FINISHED LOOK________________________________________________________


before,


and after!

PICTORIAL____________________________________________________________

a step by step pictorial for the eyeshadow i did for instagram!


click to enlarge!

hope you enjoyed this look!

Sabtu, 27 Juli 2013

[GTL] - AMO's harajuku inspired make


原宿病容妝 harajuku "sickly" make.

GTL stands for Get The Look, it'll help me remember what products i used to achieve a certain look!
(yes i'm forgetful like that..! sometimes i look back at my past photos and wonder how i got that look..)
i want to try a new type of "make up tutorial", the apostrophe is there because it's not really a tutorial.
it merely serves as a reference for you and i!

more details under the cut.
while i'm not a fan of the harajuku fashion entirely, i do like the harajuku sickly look.
it was made famous by their model, AMO.


source: zipper august 2013

i really like the soft brown eye liner look, it makes the entire look less heavy and more lovable!
it does make me look a tad more weak and sickly, in a sense that it gives off that "please protect me!" aura (which was why it's called the sickly look).
i didn't use false lashes to create this look, perhaps next time!
i have made some adaptations as there is no way i can carry off that much blusher on my cheeks.
people might think i've had a make up disaster!
so this is the toned down version of the original harajuku make,
something more suitable for day to day situations!

the key points of this look is as follows:
1. straight eyebrows, or even slightly droopy ones.
2. brown eye liner for the softer look.
3. pink blush applied to the entire upper cheeks.

PRODUCTS USED:


1. dr jart bb cream
2. sonia kashuk hidden agenda concealer
3. lavshuca melting eyes eyeshadow (BR)
4. kate designing eyebrow N (EX-4)
5. panasonic electric eyelash curler
6. maybelline eye studio creamy gel liner (brown)
7. media cheek color-A (PK-1)
8. canmake highlighter (05)
9. revlon just bitten kissable balm stain (045 romantic)
10. maybelline volum' express cat eyes mascara waterproof (feline black)
11. maybelline the false lash volum' express waterproof everlasting (01 black)

EYESHADOW: 


i only used 3 colors from the palette. i did away with the shimmery gold.

color map:


1. use C to apply on the lid close to lash line. bring the shadow across the lower lid as well, stay close to the lash line.
2. use B to slowly blend out any harsh lines but keep it within the lid. (zig zag line denotes main areas to be blended)
3. apply A on the center of the lid to give it some definition(in this case, to give it some pop since it makes that part pop out)

EYELINER: 

color map:


1. apply the eyeliner as usual, extend the line by approximate 8mm (there's no need to measure it with a ruler! hahaha, just extend it enough so that you can clearly see it from the front view). i made it look droopy (but with a very small upward wing towards the end) to enhance the weak look.
2. bring some of the eyeliner down to the lower lash line to darken it slightly.

EYEBROWS AND SHADING:


color map:


1. using A to darken the end of my brows.
2. using a mixture of A and B, i filled in gaps between my brows and shaped it into a straight brow.
3. using C, i contoured my nose bridge starting from the brow (the intersection between green and orange lines) and blending it downwards, forming this triangular shape.

BLUSH, HIGHLIGHTING AND LIPS:

color map:


1. apply pink blusher (number 7 from the product image) on cheeks (region in pink line), bringing it as close to the eyes as possible. this look calls for the blusher to be applied really high up on your cheeks. you can decide how much blusher you want to apply.
2. using the highlighter (number 8), apply to regions enclosed by yellow lines.
3. apply lip color (number 9) to the inner part of the lips as depicted by the white lines. blend the edges using finger. you can apply some lip balm on the remaining part of the lips.

CIRCLE LENS:


no japanese make up look is ever complete without circle lens!


wearing the GEO HC-104 14.2mm lens.

VOILA!

EDIT (05/14) /// PICTORIAL

it's not exactly the same as the original steps above, over time, i tweaked the shadow positions to suit my eyes better. but the main idea remains the same!


click to enlarge!