Tampilkan postingan dengan label lavshuca. Tampilkan semua postingan

Sabtu, 17 Mei 2014

Lavshuca Melting Eyes BR

Lavushuca Melting Eyes BR

i hope this is the last palette that is being discontinued.
i don't mean to show you something that you can't get anymore!

before lavshuca underwent a brand renewal, they used to be princess-y and elegant (unlike their currently brand image, which is a more lively and playful kind of girly-ness).
can i say i actually prefer the older packaging and brand image?

this palette comes with 4 shades, this is a brown palette, moreover the finish is vastly different from kate's gradical eyes palette.
hahaha you know what, even if they are very similar, i'd find some excuses to justify me owning this palette :P
my girlfriend bought this for me when she was in japan 4 years ago, it was a seasonal special that came with a stick eye base.


Lavushuca Melting Eyes BR

Lavushuca Melting Eyes BR Swatch

Lavushuca Melting Eyes BR Swatch
swatched over foundation powder.

(top left, top right, bottom left, bottom right)

lightest shade: light golden shade with a frosty and shimmery finish, loaded with gold micro shimmer and glitter. highly reflective!
medium light shade: a gold shade with a shimmery finish, with micro shimmer.
medium dark shade: a copper shade with red undertone, shimmery finish with no glitter.
dark shade: a blackish brown shade that has a satin finish, with minimal gold shimmer.

IMHO:
i used to compare this to the gradical eyes palette a lot.
the gradical eyes have a more satin finish and less shimmer, which the melting eyes palette has a lot more shimmer to it.
i like this palette for its neutral brown darkest shade as it allows me to use it as an eye liner. the kate palette has too much red tone to the darkest shade, and its finish is a little more satin/metallic than the darkest shade from the melting eyes palette.
i also like the shimmer when i feel like looking a little more pixie like :) as it is high reflective, it allows me to highlight my lower lids just the way i like!
say yes to pixie dust!

MAKEUP LOOK


LOOK 1


LOOK 1


LOOK 2


AMO IMSPIRED LOOK click on image to see the tutorial!

Rabu, 12 Maret 2014

[GTL] Girls Generation Mr. Mr. MV - Tiffany and Yoona's Makeup Look


have you watched girls generation's come back video, mr. mr.?
i think it upholds all their past standards in terms of the entire production, the theme, as well as the dance sequence!
the entire video seems to be a pink barbie kinda theme to me,
with very classic pin up looks for some of them, while very typical and bold korean looks for others.
this time i take up the challenge to create two of their looks :)


REFERENCE IMAGE & DECONSTRUCTION:

TIFFANY_____________________________________________________________


tiffany has a classic pin up look, oh god i love this look so much.
i hope someone can do my hair for me :P

1. thick, strong and short eyebrow
2. classy black winged eye liner that lifts and elongates her eyes
3. volumous lower lashes with no obvious lower eye liner
3. deep red lips that has clear borders
4. that beauty mark..!!!!!

YOONA______________________________________________________________


yoona wears the bolder look that is very typical of korean makeup, as they often line the entire eyes.

1. slightly thinner and longer eyebrows without too much arch
2. brown/gold eyeshadow that can be visible even with her eyes opened, can be achieved by applying the eyeshadow above the part where the eyelid folds
3. she definitely wore false lashes, it looks long in the centre and even longer at the end to give that fanned out look
4. lower eye line elongates the eyes, blended out with a darker eyeshadow
5. the angle of the wing is not as wide as tiffany's, this looks more horizontal
6. berry shade for the lips in full opacity

PRODUCTS USED:


these are all of the products i've used to create this 2 looks!

TIFFANY'S___________________________________________________________


1. koji white fix glue for eyelash
2. canmake highlighter 05
3. kate designing eyebrow N EX-4
4. l'oreal color riche lipstick P511 touch of amaranth
5. canmake eye nuance 13
6. lavshuca stick eye shadow (stick eye base)
7. maybelline volum'express cat eyes mascara water proof black
8. za pure shine lips RD1 rouge indulge (used as blusher)
9. revlon super lustrous matte lipstick 010 wine not
10. maybelline eye studio gel liner black


canmake eye nuance


kate designing eyebrows, used to draw my brows as well as to line the lower lash line for tiffany's volumous lower lashes look.


these are the lashes i wore for the look. they suited tiffany's look perfectly, but it is too natural for yoona's look.
i cut them into halves in the middle to create the demi lashes.


YOONA'S____________________________________________________________
(additional eyeshadows)


5. canmake eye nuance 13
11. lavshuca melting eyes BR
12. kate dual blend eye shadow BK-2


lavshuca melting eyes (BRONZE) | kate dual blending eyes (BLACK) | canmake eye nuance (GOLD)
i used one shade from each palette to get her look!


TIFFANY'S___________________________________________________________
COLOUR MAP:

eyeshadow:


1. apply the eyeshadow base over entire lid
2. apply vanilla shade from the canmake palette on top of the eyeshadow base to brighten it up


1. add some of D on to the lower lash line to add some shadows to the lashes, giving the illusion of fuller lower lashes

eyeliner:


if you didn't watch the video, here's a pictorial representation of what took place.
1. use the eyeliner brush as a guide to decide on the angle of the wing
2. draw a guide line
3. draw another line to make a triangle, this will form the wing
4. fill in the triangle
5. complete the eye liner by bringing it into the inner corner
6. extend the inner corner downwards to further elongate the eyes

eyebrow:


start by defining the boundaries of the brow.
1. draw a straight line that is slightly angled upwards
2. define the arche
3. define the upper limit to the brow
4. fill it in!

FINISHED LOOK:


YOONA'S______________________________________________________________
COLOUR MAP

eyeshadow:


continuing with tiffany's eye make up,
1. apply the bronze shade A over the entire lid
2. add the black shade B onto the outer corners of the eye in this particular shape, blend it out around the centre of the lid
3. add a dollop of gold shade C onto the centre of the lid, make sure it's above the area where the eyelids fold.


use some of B to soften the eyeliner drawn on the lower lash line.

eyeliner:


to get yoona's look, it's very important to
1. only line the water line for the inner half of the lower lid
2. line the lash line and eye lid on the outer half (around 1/3)
because this will elongate the eyes.
if you were to line the lash line and lower eye lid area for the inner half of the lid, the eyes will end up looking rounder.

FINISHED LOOK:


Rabu, 11 Desember 2013

MAKEUPDIARY M.U.D. #3V LONGBLACK with video!


oh my gosh, i'm finally back into making videos!
my first makeup video this year!

FINAL LOOK


this is just a simple variation one of the looks i've published earlier, M.U.D. #3,
except that i used a black liner instead of the brown liner.
also, i used an orange blush instead of the pink blush!
so i'm calling this M.U.D. #3V, V stands for variation :P

this is the look that i almost always fall back on if i'm not adventurous enough.
a neutral shade like brown will match ANY colours of clothings that i wear,
my motto is..
WHEN UNSURE, GO BROWN.

PRODUCTS USED


1. Media - cheek color A (OR-1)
2. Canmake - highlighter (05)
3. Maybelline - eye studio gel liner (black)
4. Canmake - candy wrap lip lipgloss (10)
5. Heroine Make - volume and curl mascara
6. Kate - designing eyebrow N (EX-4)
7. Lavshuca - melting eyes eyeshadow (BR)
8. Revlon - super lustrous lipstick, matte (010 wine not)

the makeup map and the steps are exactly the same as M.U.D. #3!

THE LOOK


there you go! :)

Selasa, 19 November 2013

MakeUpDiary M.U.D. #3 CHOCOLATTE


this look was originally named "safest brown" because it really is my go-to makeup whenever i need to play safe.
brown eyeshadow + brown eyeliner, the safest combo known to mankind.

FINAL LOOK

chocolatte!


PRODUCTS USED


product used
0. bearbrick series 25 artist
1. sonia kashuk concealer hidden agenda 07
2. revlon colorburst lipstick 012 cherry ice
3. kanebo media cheek colour A PK-1
4. kanebo lavshuca melting eyes BR
5. revlon just bitten balm stain 045 romantic
7. maybelline eye studio gel liner 02 brown

there's no 6!
the concealer is used normally this time to cover my undereye circles.
i didn't want to wear bb cream that particular day because the weather was hot and stuffy,
i wanted to do spot concealing instead of slathering bb cream (which is likely to melt off my face) on my face.

COLOUR LEGEND

lavshuca  melting eyes BR

COLOUR MAP

face map
1. apply A on outer corner of lids
2. apply B on entire lid and blend in with A.
3. apply revlon colorburst lipstick (2) on cheeks, a few daps with do.
4. apply media blush (3) over the entire cheek to help seal in the lip color (that's now used on the cheeks).

lashline map
1. this is straight forward: use C to line the lower lashline, keeping it as close to the lash line as possible.

THE LOOK

chocolatte 2
i really elongated the eyeliner but kept it thin and pretty horizontal for the innocent dolly look.

chocolatte 3
when viewed from the front the eyeliner looks like an extension of the lashes!
i really like this effect, adds to the dolly look :D

chocolatte 4
once again, brown as saved the day.


Sabtu, 27 Juli 2013

[GTL] - AMO's harajuku inspired make


原宿病容妝 harajuku "sickly" make.

GTL stands for Get The Look, it'll help me remember what products i used to achieve a certain look!
(yes i'm forgetful like that..! sometimes i look back at my past photos and wonder how i got that look..)
i want to try a new type of "make up tutorial", the apostrophe is there because it's not really a tutorial.
it merely serves as a reference for you and i!

more details under the cut.
while i'm not a fan of the harajuku fashion entirely, i do like the harajuku sickly look.
it was made famous by their model, AMO.


source: zipper august 2013

i really like the soft brown eye liner look, it makes the entire look less heavy and more lovable!
it does make me look a tad more weak and sickly, in a sense that it gives off that "please protect me!" aura (which was why it's called the sickly look).
i didn't use false lashes to create this look, perhaps next time!
i have made some adaptations as there is no way i can carry off that much blusher on my cheeks.
people might think i've had a make up disaster!
so this is the toned down version of the original harajuku make,
something more suitable for day to day situations!

the key points of this look is as follows:
1. straight eyebrows, or even slightly droopy ones.
2. brown eye liner for the softer look.
3. pink blush applied to the entire upper cheeks.

PRODUCTS USED:


1. dr jart bb cream
2. sonia kashuk hidden agenda concealer
3. lavshuca melting eyes eyeshadow (BR)
4. kate designing eyebrow N (EX-4)
5. panasonic electric eyelash curler
6. maybelline eye studio creamy gel liner (brown)
7. media cheek color-A (PK-1)
8. canmake highlighter (05)
9. revlon just bitten kissable balm stain (045 romantic)
10. maybelline volum' express cat eyes mascara waterproof (feline black)
11. maybelline the false lash volum' express waterproof everlasting (01 black)

EYESHADOW: 


i only used 3 colors from the palette. i did away with the shimmery gold.

color map:


1. use C to apply on the lid close to lash line. bring the shadow across the lower lid as well, stay close to the lash line.
2. use B to slowly blend out any harsh lines but keep it within the lid. (zig zag line denotes main areas to be blended)
3. apply A on the center of the lid to give it some definition(in this case, to give it some pop since it makes that part pop out)

EYELINER: 

color map:


1. apply the eyeliner as usual, extend the line by approximate 8mm (there's no need to measure it with a ruler! hahaha, just extend it enough so that you can clearly see it from the front view). i made it look droopy (but with a very small upward wing towards the end) to enhance the weak look.
2. bring some of the eyeliner down to the lower lash line to darken it slightly.

EYEBROWS AND SHADING:


color map:


1. using A to darken the end of my brows.
2. using a mixture of A and B, i filled in gaps between my brows and shaped it into a straight brow.
3. using C, i contoured my nose bridge starting from the brow (the intersection between green and orange lines) and blending it downwards, forming this triangular shape.

BLUSH, HIGHLIGHTING AND LIPS:

color map:


1. apply pink blusher (number 7 from the product image) on cheeks (region in pink line), bringing it as close to the eyes as possible. this look calls for the blusher to be applied really high up on your cheeks. you can decide how much blusher you want to apply.
2. using the highlighter (number 8), apply to regions enclosed by yellow lines.
3. apply lip color (number 9) to the inner part of the lips as depicted by the white lines. blend the edges using finger. you can apply some lip balm on the remaining part of the lips.

CIRCLE LENS:


no japanese make up look is ever complete without circle lens!


wearing the GEO HC-104 14.2mm lens.

VOILA!

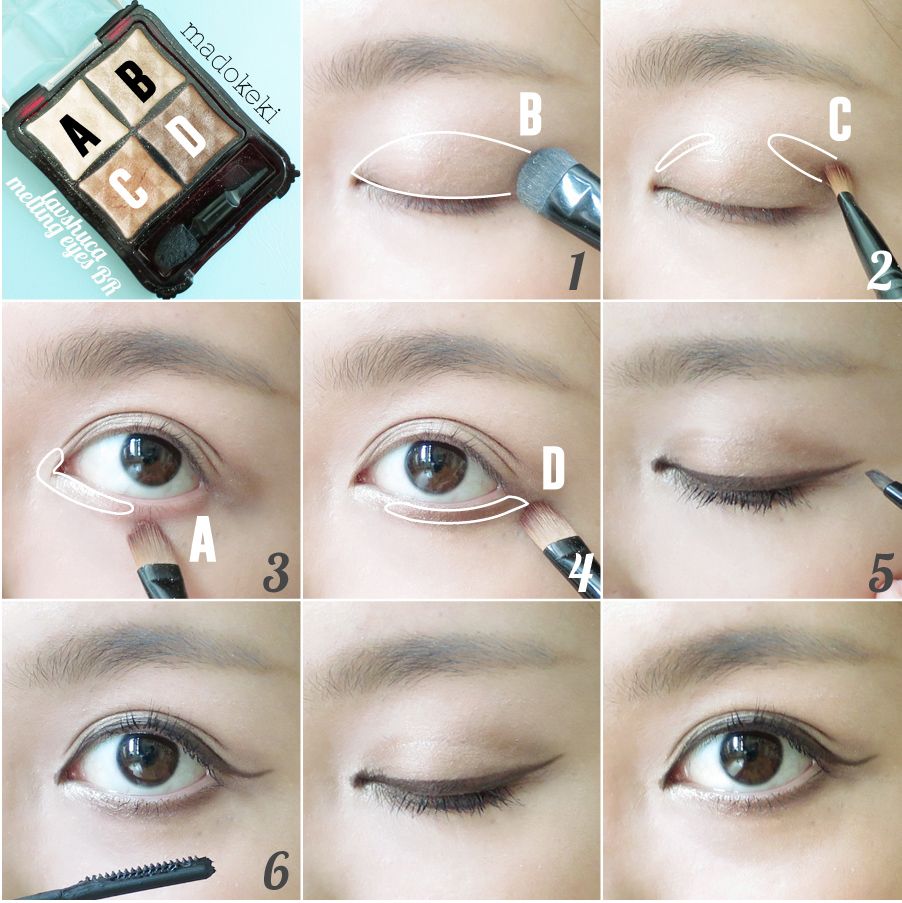
EDIT (05/14) /// PICTORIAL

it's not exactly the same as the original steps above, over time, i tweaked the shadow positions to suit my eyes better. but the main idea remains the same!


click to enlarge!