Sabtu, 23 November 2013

MakeUpDiary M.U.D. #4 STRAWBERRY FUZZ

this is a slight variation from the peachy smoothie look,
it's along the same idea - using lip/face products for the eyes,
but this time round i did away with the lipstick+concealer blend on the eyes and went straight with just the blush alone.
what i got was a very soft look that i wore behind my spectacles.

it's such an easy look, i got it done in record time since i'm only working with 1 colour.

FINAL LOOK

bespectacled strawberry


PRODUCTS USED


product used
1. maybelline eye studio gel liner 01 black
2. sonia kashuk concealer hidden agenda 07
3. kanebo media cheek colour A PK-1
4. maybelline lashionista mascara 01 black
5. revlon colorburst lipstick 012 cherry ice
6. bearbrick series 24 cute

i featured the concealer here because instead of wearing bb cream (when i do wear bb cream i skip the concealer), i was wearing concealer to cover my undereye circles that day. :P

why? because i was gonna wear my specs and i want to brighten up my eyes, that would require me to do colour correction AND brightening. perfect concealer palette for that purpose :D

COLOUR LEGEND

there's no legend for this look! just refer to the product list above.

COLOUR MAP

face map
1. apply blush (3) all over lid.
2. dap on some revlon lipstick (5) on cheeks, blend.
3. apply a wash of the blush (3) over the cheeks.

THE LOOK

strawberry fuzz 2
barely noticeable pink in the eyes (it's more obvious in real life actually)!

strawberry fuzz3

- the end -


Selasa, 19 November 2013

MakeUpDiary M.U.D. #3 CHOCOLATTE


this look was originally named "safest brown" because it really is my go-to makeup whenever i need to play safe.
brown eyeshadow + brown eyeliner, the safest combo known to mankind.

FINAL LOOK

chocolatte!


PRODUCTS USED


product used
0. bearbrick series 25 artist
1. sonia kashuk concealer hidden agenda 07
2. revlon colorburst lipstick 012 cherry ice
3. kanebo media cheek colour A PK-1
4. kanebo lavshuca melting eyes BR
5. revlon just bitten balm stain 045 romantic
7. maybelline eye studio gel liner 02 brown

there's no 6!
the concealer is used normally this time to cover my undereye circles.
i didn't want to wear bb cream that particular day because the weather was hot and stuffy,
i wanted to do spot concealing instead of slathering bb cream (which is likely to melt off my face) on my face.

COLOUR LEGEND

lavshuca  melting eyes BR

COLOUR MAP

face map
1. apply A on outer corner of lids
2. apply B on entire lid and blend in with A.
3. apply revlon colorburst lipstick (2) on cheeks, a few daps with do.
4. apply media blush (3) over the entire cheek to help seal in the lip color (that's now used on the cheeks).

lashline map
1. this is straight forward: use C to line the lower lashline, keeping it as close to the lash line as possible.

THE LOOK

chocolatte 2
i really elongated the eyeliner but kept it thin and pretty horizontal for the innocent dolly look.

chocolatte 3
when viewed from the front the eyeliner looks like an extension of the lashes!
i really like this effect, adds to the dolly look :D

chocolatte 4
once again, brown as saved the day.


Kamis, 07 November 2013

MakeUpDiary M.U.D. #2 PEACHY SMOOTHIE

peachy smoothie

i get a little uncreative with names, whatever that comes into my mind are all related to food.
HEHEHE that's because i'm a glutton. a major glutton.

below i'll share the look with both the black and brown liner. there's a different feel to it!

FINAL LOOK
brown liner
brown liner
VS
black liner
black liner


PRODUCTS USED
products used
0. bearbrick series 24 cute
1. sonia kashuk concealer palette hidden agenda-07
2. revlon just bitten balm stain 040 rendezvous
3. maybelline lashionista 01 black
4. maybelline eye studio gel liner black
5. kanebo media cheek colour A OR-1

are you wondering where's the eye shadow?

COLOUR LEGEND
sonia kashuk hidden agenda 07
we're only using the lighter shade denoted by A.

for this make up there's an extra step.
mixing the balm stain (2) with the concealer (A) to make a cream eyeshadow base.
mixing
you take the bride and the groom and announce "you may kiss each other".

mixed
there you go, a creamy peachy shade.

COLOUR MAP

1. apply the creamy peachy shade from above on the lids as follows.
2. then apply a wash of the coral blush (5) over the same area to lock in and to intensity the colour.

eyelid map brown

eyelid map black

as you can see, the area to apply the colour is the same.
this is the easiest this make up can get, there's only 1 area to work on, no need to blend crazily like when you work with multiple colours.

i only showed the two images so you can see the difference between the brown and black liner, it does change the tone of the intensity of the peach colour!

THE LOOK
brown liner
brown liner
VS
black liner
black liner

i think i prefer this look with the black liner, because it makes the peachy/coral colour a little more obvious due to the stark contrast. the brown takes away the contrast and makes the look softer, it still looks good to be honest, it really depends on what look i want.
if i want to emphasize the peachy eyeshadow, i'll go with black liner.
if i want a sweet look, i'll go with the brown liner.


Minggu, 20 Oktober 2013

MakeUpDiary M.U.D. #1 DUSTY PINK

MakeUpDiary M.U.D. #1 DUSTY PINK

another series i'm starting so that i can keep track of the make up looks i'm doing!
i find myself looking back at my photos and wonder how i did that particular look. blame my bad memory!!!
so this is actually a good way for me to document it so i can easily recreate it if i feel like it.

this is slightly different from the GetTheLook series.
that series is done with a reference makeup look in mind.
M.U.D. is to purely document the looks and products used.

i named this look dusty pink because it's a mixture of pink and grey, the perfect colour combination in my opinon :P
this particular entry will focus more on the eyes and face only.

because of the way i winged my eyeliner, it gave me such a kitty cat look, i thought that the pink color softened the otherwise strong eyeliner look, making me look like a cute kitty instead of a cool (and unapproachable) kitty.

MEOW. hope you like the look.


dusty pink 1


PRODUCTS USED

products used
1. kanebo media cheek colour A OR-1
2. kanebo kate dual blending eyes BK-2
3. maybelline hyper diamond shadow OR-1
4. canmake highlighter 05

COLOUR LEGEND
maybelline hyper diamond PK-1

kate dual blending eyes BK-2

COLOUR MAP
eyelid map
1. apply A all over lid.
2. apply B on the inner half.
3. then apply C. blend towards the borders of B.
4. D is the last to get on. blend towards C.
+ fuzzy line denotes blending required.
+ black eye shadow D was applied lightly only.


lashline map
+ i also tightlined the lower lash line with left over gel liner after lining my upper lashline.

THE LOOK
dusty pink 2
+ a light tinge of pink showing through the outer third of the eyes.

dusty pink 3

dusty pink 4

it's not that visible from this photo, but the green lens sort of brought out the pinkness in the eyeshadow!


Rabu, 09 Oktober 2013

geo hurricane brown


geo hc 104 hurricane brown
FINALLY, i'm getting back to writing about contact lenses, circle lens in particular.
this time it's the GEO HC-104, better known as the hurricane brown (or hurricane hazel? i might have remembered wrongly)
mine came with prescription.

i decided i'm not going to do full length reviews on contact lenses anymore,
instead, i'm going to share with you how it looks like and the makeup looks that I wear with the lens.
moreover, these lenses are NOT meant to be worn for more than 8 hours a day, i kept to the advise and didn't have any problems.
the occasional dry eyes when i'm a dry environment is relieved by eye drops.


ENLARGING EFFECT:


geo hc 104 hurricane brown
the diameter of the lenses are 14.2mm, they are good enough for me as the opening of my eyes aren't that huge.
if i were to go for the 14.5mm or even larger lenses, i'm afraid i'll look like an alien with no more sclera (eye white).

CLOSE UP:


geo hc 104 hurricane brown
the brown color actually diffuses into the centre of the lense, making it look more natural than the dolly lens (the angel browns) i used to wear.
i have to say i really like this pair of lens because it looks natural but still gives my eyes the pop that i want.

LOOKS&VARIATIONS:

geo hc 104 hurricane brown
a full face shot to give you a perspective of how the proportions look like.

if you already have long eyes, good for you! because the roundness of the lens will compliment your long eyes very well.
if you have round eyes like me, it'll look more proportionate if we balance out the roundness of the lens by lengthening our eyes.
remember, we're trying to make things look proportionate at the end of the day.
even though people always try to go for the super big eye look, i think i don't suit that big and round eyes at all, it makes me look like.. a disfigured doll T.T

black liner

make up look 2

[keypoints]
- brown eye shadow over lid
- thin black gel liner on top lash line only
- generous coats of mascara on top and bottom lash to open eyes up

i did away with lining my lower lash line because sometimes i feel that it actually opens my eyes a little more as compared to when i do line them.
why is this so?
when i don't frame my lower lash line,
the water line sort of become an extension of my eye whites,
making it look like my eyes are bigger.
you can judge for yourselves later ;)

brown liner

make up look 3

[keypoints]
- brown eye shadow over lid
- brown gel liner on top lash line.
- tiny bit of left over brown gel liner on the outer third of the lower lash line, just a TINNNNYYYY bit will do.
- generous coats of mascara as usual.

i'd say the look is more natural and soft with the brown gel liner.
the black liner gives a very crisp look, whereas the brown sort of melds into the skin and became part of my eyes.
i think it's the sort of look that guys will like.
well.. i think.... :P

eyeliner variations

various looks
by switching up the way you draw your eye liner, you can achieve different looks with this pair of lens!

[keypoints]
from top left in clockwise direction:
1. simple and sweet look with a thin black eyeliner on the top lash line.
2. seductive look with winged black eyeliner (that's thicker towards the end of the eye) on the upper lash line. the outer third of the bottom lash line is lined and extended to meet the top eyeliner.
3. innocent and doe eye look with a thin and long brown eyeliner on the upper lash line, soft lining really close to the lower lash line to retain part of the roundness of the eyes.
4. sweet and elegant look with a thin and straight (meaning it doesn't wing up) black eyeline on the upper lash line. soft lining of the outer third of the bottom lash line.


ENDING NOTES:

i want to highlight once again that i have round eyes, hence i try to make my eye look longer by extending my eyeliner.
it’s funny how we always go in opposite directions:
if you have round eyes, lengthen them. 
if you have almond eyes, make them rounder. 
i guess the grass is always greener on the other side! hahaha!
i must admit i love this pair of lens more than the angel brown lens, i'm into the more natural look these days..
NOT.
you'll figure in the next contact lens post.. :P

Sabtu, 27 Juli 2013

[GTL] - AMO's harajuku inspired make


原宿病容妝 harajuku "sickly" make.

GTL stands for Get The Look, it'll help me remember what products i used to achieve a certain look!
(yes i'm forgetful like that..! sometimes i look back at my past photos and wonder how i got that look..)
i want to try a new type of "make up tutorial", the apostrophe is there because it's not really a tutorial.
it merely serves as a reference for you and i!

more details under the cut.
while i'm not a fan of the harajuku fashion entirely, i do like the harajuku sickly look.
it was made famous by their model, AMO.


source: zipper august 2013

i really like the soft brown eye liner look, it makes the entire look less heavy and more lovable!
it does make me look a tad more weak and sickly, in a sense that it gives off that "please protect me!" aura (which was why it's called the sickly look).
i didn't use false lashes to create this look, perhaps next time!
i have made some adaptations as there is no way i can carry off that much blusher on my cheeks.
people might think i've had a make up disaster!
so this is the toned down version of the original harajuku make,
something more suitable for day to day situations!

the key points of this look is as follows:
1. straight eyebrows, or even slightly droopy ones.
2. brown eye liner for the softer look.
3. pink blush applied to the entire upper cheeks.

PRODUCTS USED:


1. dr jart bb cream
2. sonia kashuk hidden agenda concealer
3. lavshuca melting eyes eyeshadow (BR)
4. kate designing eyebrow N (EX-4)
5. panasonic electric eyelash curler
6. maybelline eye studio creamy gel liner (brown)
7. media cheek color-A (PK-1)
8. canmake highlighter (05)
9. revlon just bitten kissable balm stain (045 romantic)
10. maybelline volum' express cat eyes mascara waterproof (feline black)
11. maybelline the false lash volum' express waterproof everlasting (01 black)

EYESHADOW: 


i only used 3 colors from the palette. i did away with the shimmery gold.

color map:


1. use C to apply on the lid close to lash line. bring the shadow across the lower lid as well, stay close to the lash line.
2. use B to slowly blend out any harsh lines but keep it within the lid. (zig zag line denotes main areas to be blended)
3. apply A on the center of the lid to give it some definition(in this case, to give it some pop since it makes that part pop out)

EYELINER: 

color map:


1. apply the eyeliner as usual, extend the line by approximate 8mm (there's no need to measure it with a ruler! hahaha, just extend it enough so that you can clearly see it from the front view). i made it look droopy (but with a very small upward wing towards the end) to enhance the weak look.
2. bring some of the eyeliner down to the lower lash line to darken it slightly.

EYEBROWS AND SHADING:


color map:


1. using A to darken the end of my brows.
2. using a mixture of A and B, i filled in gaps between my brows and shaped it into a straight brow.
3. using C, i contoured my nose bridge starting from the brow (the intersection between green and orange lines) and blending it downwards, forming this triangular shape.

BLUSH, HIGHLIGHTING AND LIPS:

color map:


1. apply pink blusher (number 7 from the product image) on cheeks (region in pink line), bringing it as close to the eyes as possible. this look calls for the blusher to be applied really high up on your cheeks. you can decide how much blusher you want to apply.
2. using the highlighter (number 8), apply to regions enclosed by yellow lines.
3. apply lip color (number 9) to the inner part of the lips as depicted by the white lines. blend the edges using finger. you can apply some lip balm on the remaining part of the lips.

CIRCLE LENS:


no japanese make up look is ever complete without circle lens!


wearing the GEO HC-104 14.2mm lens.

VOILA!

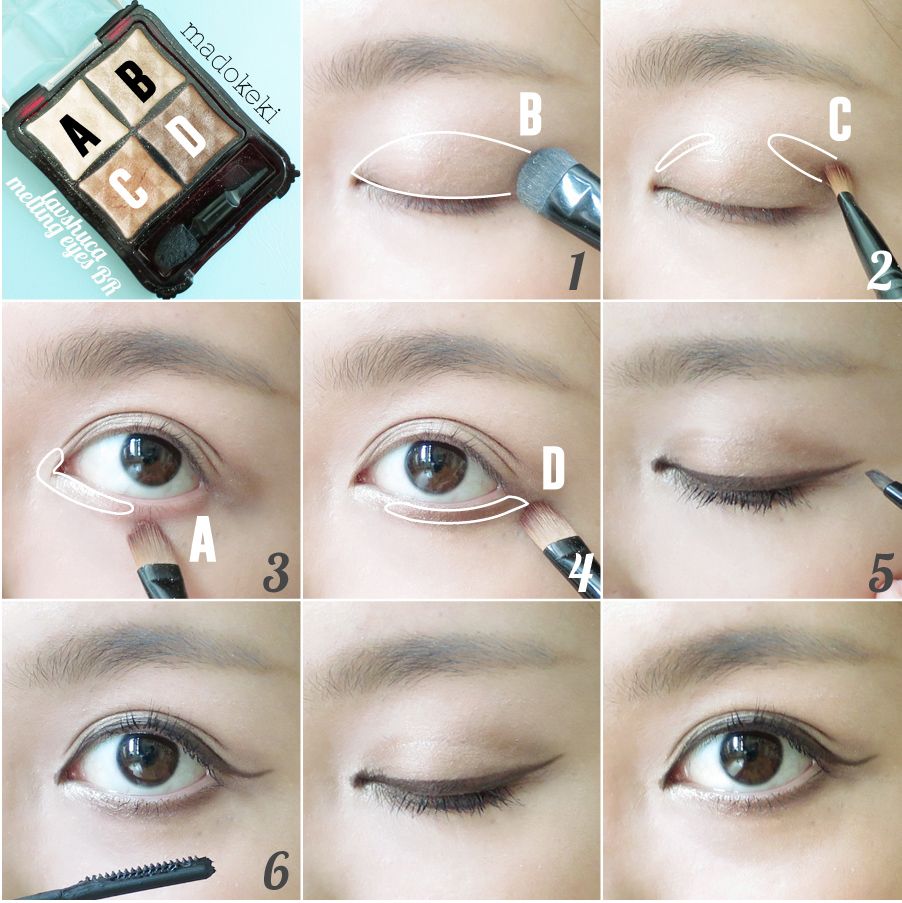
EDIT (05/14) /// PICTORIAL

it's not exactly the same as the original steps above, over time, i tweaked the shadow positions to suit my eyes better. but the main idea remains the same!


click to enlarge!

Jumat, 21 Juni 2013

from afar

HELLO EVERYBODY!
i'm slowly preparing my things so that i can get back into blogging once again.
i've always been blogging, just that it's for another purpose.
after a 2+ years hiatus, i'm happy to say i'm finally coming back to this world which i've missed so dearly.

i really want to share with you some of the new make up items and techniques i've explored while i was away!

in the mean time, i shall end this short post with a recent photo of me.
i must say i look quite different after 2 years!


i've been told i look more mature now, which isn't exactly the kind of look i'm going for, but i'm also glad to know that i'm able to pull off different looks. :)

MORE TO COME SOON!