Tampilkan postingan dengan label korean make. Tampilkan semua postingan

Selasa, 17 Juni 2014

How To : Korean Ulzzang/Uljjang Make Up (Ft. Aegyo Sal)


How To : Korean Ulzzang/Uljjang Make Up (Ft. Aegyo Sal)

back with a makeup tutorial! this is a look that i never thought of wearing because i have an eye bag that may interfere with the aegyo sal, but i figured out a way to overcome that.. until i start smiling that is. i guess you probably already know what the aegyo sal is if you are interested in this look, so i'll save my breath.

the most important thing for this look is none other than concealing the dark circles. "resetting" it to a canvas that we can work on is always a goal, but this look will draw attention to the lower eye lid area, driving the need for perfect concealing more so than usual.

your base makeup should look natural yet brightening - being visually flawless is the aim. the eye makeup will remain bright and light, paired with sharp, black and thin eyeliner that will elongate the eyes naturally. korean straight eyebrows and the aegyo sal are definitely part of the package. the lips and cheek are really up to you, but i went with a vibrant yet tinted look so that the entire look remains refreshing and light.

watch the video here!


PRODUCTS USED____________________________________________________________


from left to right, clockwise:
1. innisfree olive real skin (emulsion type toner)
2. dr jart+ detox healing black label bb cream
3. sonia kashuk hidden agenda concealer 07
4. nature republic provence blending highlighter
5. kate designing eyebrow N (EX-4)
6. maybelline lashionista mascara
7. heroine make smooth liquid liner (black)
8. innisfree no-sebum mineral powder
9. lavshuca melting eyes (BR)
10. innisfree creamy lip mousse (05 vitamin red)

PICTORIAL_________________________________________________________________

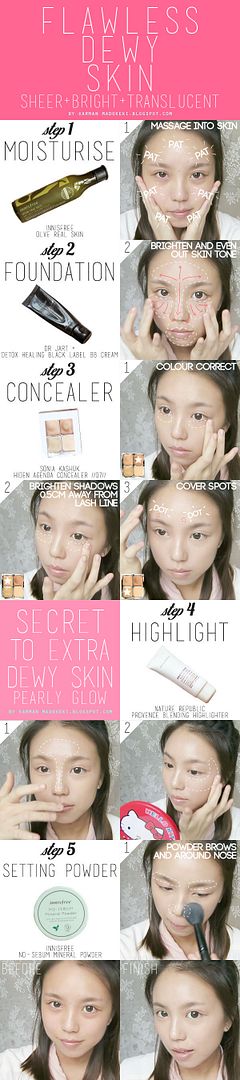
1. BASE MAKEUP

click on image to enlarge!

step 1: massage and pat the lotion until everything is absorbed into skin. the lotion keeps the face hydrated and helps to impart some dewiness to it.
step 2: brighten and even out skin tone with a moisturizing foundation of your choice, as long as the foundation is NOT matte.
step 3: conceal the under eye circles!!! colour correct with the darker shade before brightening with the lighter shade. cover any other spots too.
step 4: apply the liquid highlighter onto the forehead, nosebridge, and cheek area for the extra glow.
step 5: powder the brow and nose area to absort any oils. stay away from the forehead as we want to retain that glow, and powdering it will mattify it.

click on image to enlarge!

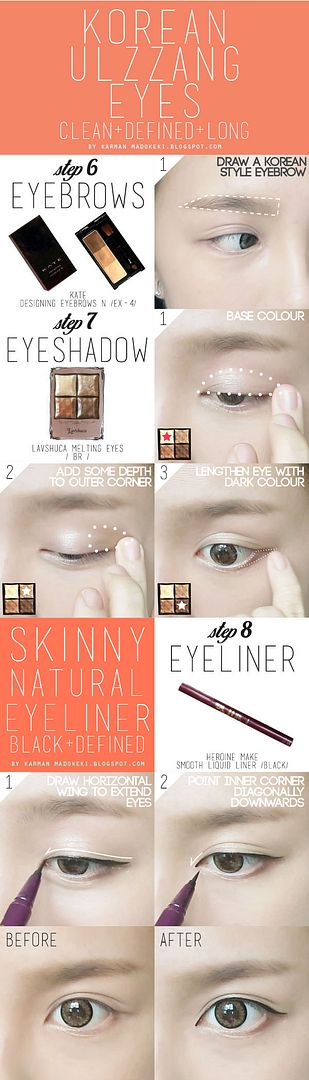
step 6: fill in your brows, keep it short, straight and full. if you don't know how to get a korean style eyebrow, don't worry! i've done a separate tutorial (both video and pictorials included).
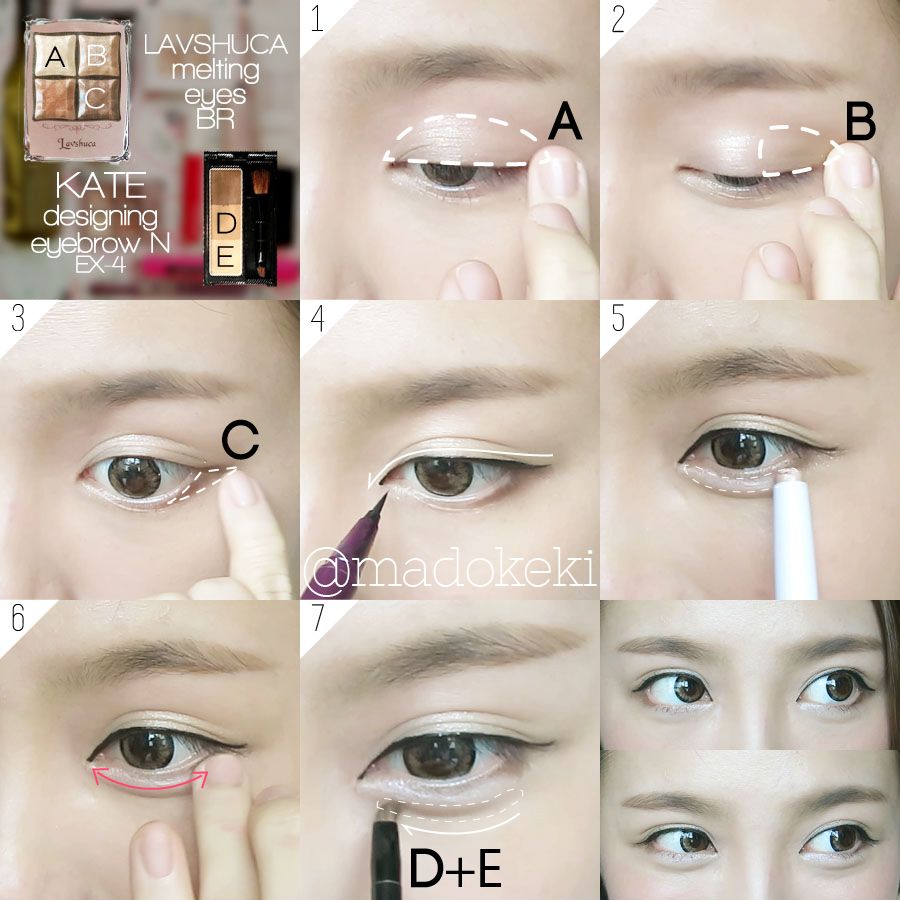
step 7: apply the eyeshadow according to the steps above. the shimmery eyeshadows will add a jewel effect to brighten up the eyes.
step 8: line your eyes accordingly. the aim is to lengthen the eyes. keep the eyeliner as thin as possible, according to your own eye shape.
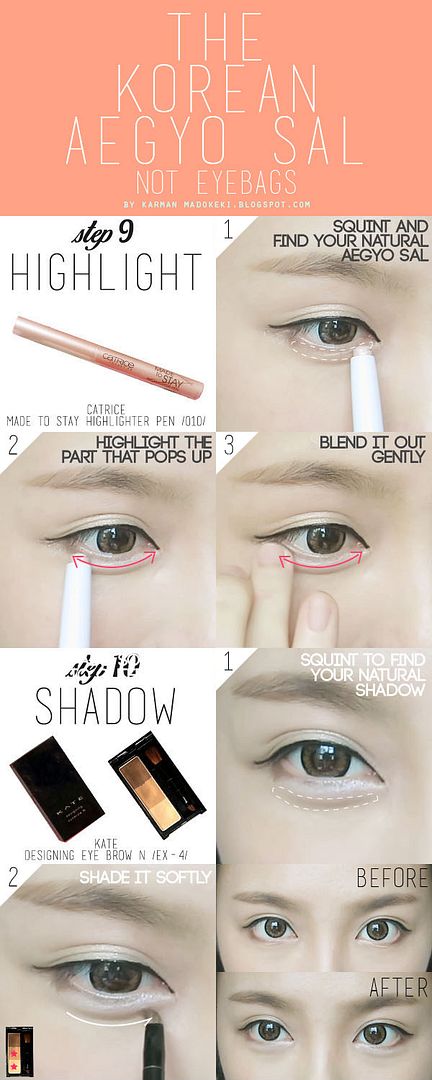

click on image to enlarge!step 9: squint to locate the muscle that makes your eyes look puffy, it's the one that pops up. highlight along it and blend it out a little.
step 10: squint again to locate the natural shadows, mix the two shades of brown together and swipe along the shadow gently.
doing so will give your eyes the puffy look without you squinting/smiling all the time.

click on image to enlarge!

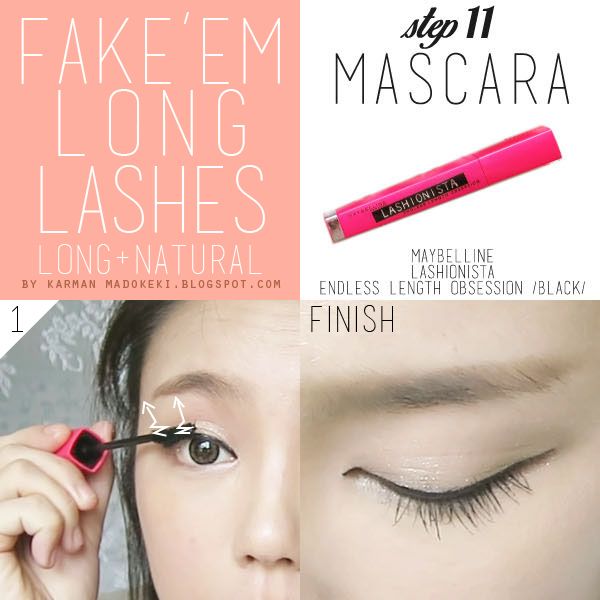
step 11: lash up! for lenghtening formula, wiggle just a little bit to make sure the lashes are captured by the wand, and then pull it upwards and outwards to distribute the fibres in that direction. you'll end up with natural and long lashes.
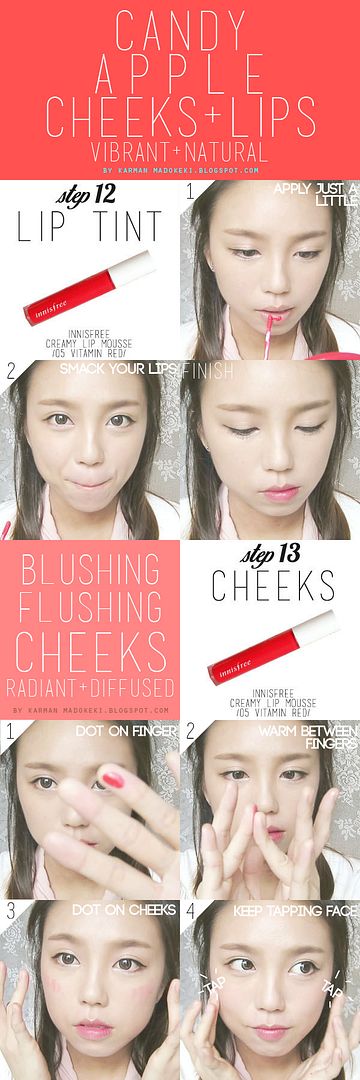

click on image to enlarge!step 12: apply the lip product onto your lips and smack it to blend it out into a light tint.
step 13: warm a dot of lip product between your fingers and apply to cheeks.

i also made an instagram version :D

click on image to enlarge!

FINISHED LOOK____________________________________________________________


hope you all like the look! the eyes are so crisp and clean, i really like how it looks. however i'd go without the aegyo sal on a normal day because my uni-eye bag (i only have it on one side of my eye!) makes it hard for me to rock this look. there are just some looks that i can't work it, this is one of them. but that doesn't stop me from sharing my tips with you all!

if you tried this look out, take a photo, share it on instagram and tag me @madokeki, because i'd love to see your version of it! remember to always tweak the makeup looks to suit yourself!

xoxo
karman

Selasa, 18 Maret 2014

HOW TO get Korean gradient lips: 1 product, 2 steps, 5 ways


5 ways to get korean gradient lips

this is nothing new, many people have created tutorials to teach how to achieve the korean gradient lips before, but like they say, laziness is the mother of invention. i have come up with a way to get this look with the minimal number of steps and ease!

check out the video if you haven't already! vvv


PRODUCT USED:________________________________________________________________


1. Dr. Jart+ black label bb cream
2. kate stick concealer light beige
3. kate mineral powder foundation OC-B


1. nature republic by flower triple volume tint (05 peony)
2. revlon super lustrous matte lipstick (010 wine note)
3. l'oreal colour riche lipstick (P511 touch of amaranth)
4. revlon just bitten balm stain (045 romantic)
5. revlon just bitten balm stain (050 precious)
6. revlon matte balm (210 unapologetic)

while the typical method that most people employ is to apply foundation/concealer to lighten the lips first prior to applying lipstick, i prefer to apply my lipstick first before lightening the edges.
this is because it's much more easier to apply the concealer on the outer part of the lips, and it also gives you more control over the opacity of the blending region, allowing you to create the gradient that you want.
of course, this will work best for pigmented lip colour. if you have a pair of slightly darker lips to begin with, you might still want to consider lightening your lips first so that that the colour will show through better.

a summary of the steps:________________________________________________________
liquid based product (liquid foundation/bb cream) & concealer (stick/cream/liquid):
1. apply lipstick to the inner part of the lips
2. apply foundation/concealer on the outer part of the lips and blend out the edges
3. using your finger, blend the region between lipstick and foundation/concealer to create gradient

powder based product (powder foundation):
1. apply lipstick to the inner part of lips, lip smack to blend out harsh edges and to create a natural gradient across the lip
2. apply powder to the outer part of lips to lighten the lip colour

lipstick & lipstick:
1. apply darker shade to inner part of lips
2. blend out the edges using a lighter shade of lipstick, no need for fingers!

lipstick only:
1. apply the lipstick to the inner part of lips
2. KEEP SMACKING YOUR LIPS to create natural gradient, no need for finger too!

give it a try and let me know if you think this method works better for you too!

xoxo
karman

Senin, 03 Maret 2014

MakeUpDiary M.U.D. #6a Korean Style Pink Eyeshadow Look (pink lady)


i'm on a video roll lately,
much more active in making videos as compared to before!
finally getting my act together :D
the video is recorded in chinese, but i've added english subtitles to it!

this is a variation to the pink feline look i did a while ago.
this is the more natural and subtle version to it.
if there is a term for it, i'll called it "korean style", because it's more natural looking and gentle.

if the pink feline look is sassy kitty,
then this is definitely hello kitty, cute and adorable. :)

FINAL LOOK


PRODUCTS USED

product used
(in chronological order, being used first to being used last)
1. dr jart black label bb cream
2. sonia kashuk hidden agenda concealer 07
3. kate mineral powder foundation OC-B
4. maybelline hyper diamond eyeshadow (PK-1)
5. maybelline eye studio gel liner (brown)
6. kate designing eyebrow N (EX-4)
7. maybelline volum'express cat eyes mascara waterproof black
8. kanebo media cheek colour A (PK-1)
9. canmake highlighter (05)
10. ZA pure shine lips BE-1
11. revlon just bitten balm stain 045 romantic [i took the wrong lipstick to take the photograph above >_<]

COLOUR LEGEND

maybelline hyper diamond eyeshadow PK-1
maybelline hyper diamond eyeshadow in PK-1.


kate designing eyebrow N EX-4
using the darkest shade to line my lower lash line.

COLOUR MAP

face map
1. apply A all over lid.
2. apply B on the outer half of the lid, keeping it within my eyelid folds.
3. apply eyeliner first! i'm using brown this time, and there are no angles this time, just an honest eye liner that enhances my original eye shape.
4. apply C at the end of the lid, slightly above the eyeliner for a dash of pink.

lower lashline map
1. apply D close to lower lash line.
2. apply A on the inner corner as well as the lower eyelid.


another look at the eyeliner.
really honest this time!
it lengthens and makes my eyes slightly rounder, everything is in the same proportion so it looks much more natural than the usual eyeliner that i draw.
note that i followed the original fold of my lids when i'm drawing the tail of the eyeliner.


and to show you how the eyeliner changes the shape of my eyes.
it lengthened in proportionally to the roundness of my eyes :)


THE LOOK

lady pink
another gorgeous looking pink eyeshadow look.
i love how this palette doesn't make my eyes puffy at all :)
the hot pink shade is still my favourite.

pink lady 2
with circle lenses on, the look still looks natural,
but it has a more dolly look to it.

Senin, 24 Februari 2014

[GTL] Chun Song Yi (Jeon Ji Hyun) from 'You who came from the stars (별에서 온 그대)' make up


HI ALL!
this drama is DA BOMB and everyone is so crazy over this drama right now!
i'm more drawn to chun song yi's (jeon ji hyun/jun ji hyun) make up and products she used to achieve the look in the show.

i created the look without any of the cosmetics that she actually used.
i'm glad to report that her look is very reproducible without breaking your bank account!


the reference photos are taking from screen caps of the drama, courtesy of dramabeans.

DESCONSTRUCTION:

i'm going to do a breakdown of her looks before i get started on the products used..!
this is something new that i haven't done for the previous looks.
i hope this is more useful and helps to explain why i do certain things.

FACE:
- barely there foundation that looks like she has nothing on at all. natural looking face that still has some dark eye circles peeping through.
- semi matte face

EYES:
- natural eyeshadow colours - matte brown/orange shades
- very thin and almost invisible eyeliner that does not alter the shape of her eyes. most probably only lined her waterline and filled in the gaps between the root of her lashes because her upper lashes looks lush, yet the eyeliner is almost invicible.
- natural looking lashes with a slight curl, most likely a lengthening formula

CHEEKS:
 - no obvious signs of blusher

LIPS:
- blue based hot pink lip colour with a slight florescence to it

PRODUCTS USED:


(in chronological order, item used first to item used last)
1. Dr Jart Black Label BB Cream
2. kate designing eyebrow N EX-4
3. Media Cheek Color A OR-1
4. Media Cheek Color A PK-1
5. Maybelline Eye Studio Gel Liner Black
6. Maybelline Lashionista Lengthening Film Mascara
7. Kate Stick Concealer Light Beige
8. Nature Republic By Flower Triple Volume Tint 05 Peony

EYESHADOW:

using the eyebrow palette for both my brows and my eyes.


COLOR MAP:

warning: VERY MESSY MAP!
the white zigzag lines means area of blending.


1. shade eyes with B+C mixed together
2. apply orange blush (or orange eyeshadow if you have it) to outer third of eyes
3. apply a dash of pink to the outer corner of eyes


1. line lower lash line with A
2. apply orange colour onto lower lash line
3. apply pink colour to outer corner only, the area will be slighter larger than that of the orange colour


FINISHED LOOK:


i really like how this look looked on jeon ji hyun, not so much when it's when on my face though. :(
my eyes are just not suitable for such bare looks because my eyelids are too thick to carry off this look.
good for those of you girls who have narrower double eyelids!
this look will suit you perfectly!

and i'm so tempted to buy a neon hot pink lipstick right now.
thank you, kdrama for lighting up that consumer in me.
=_=